Pitzer
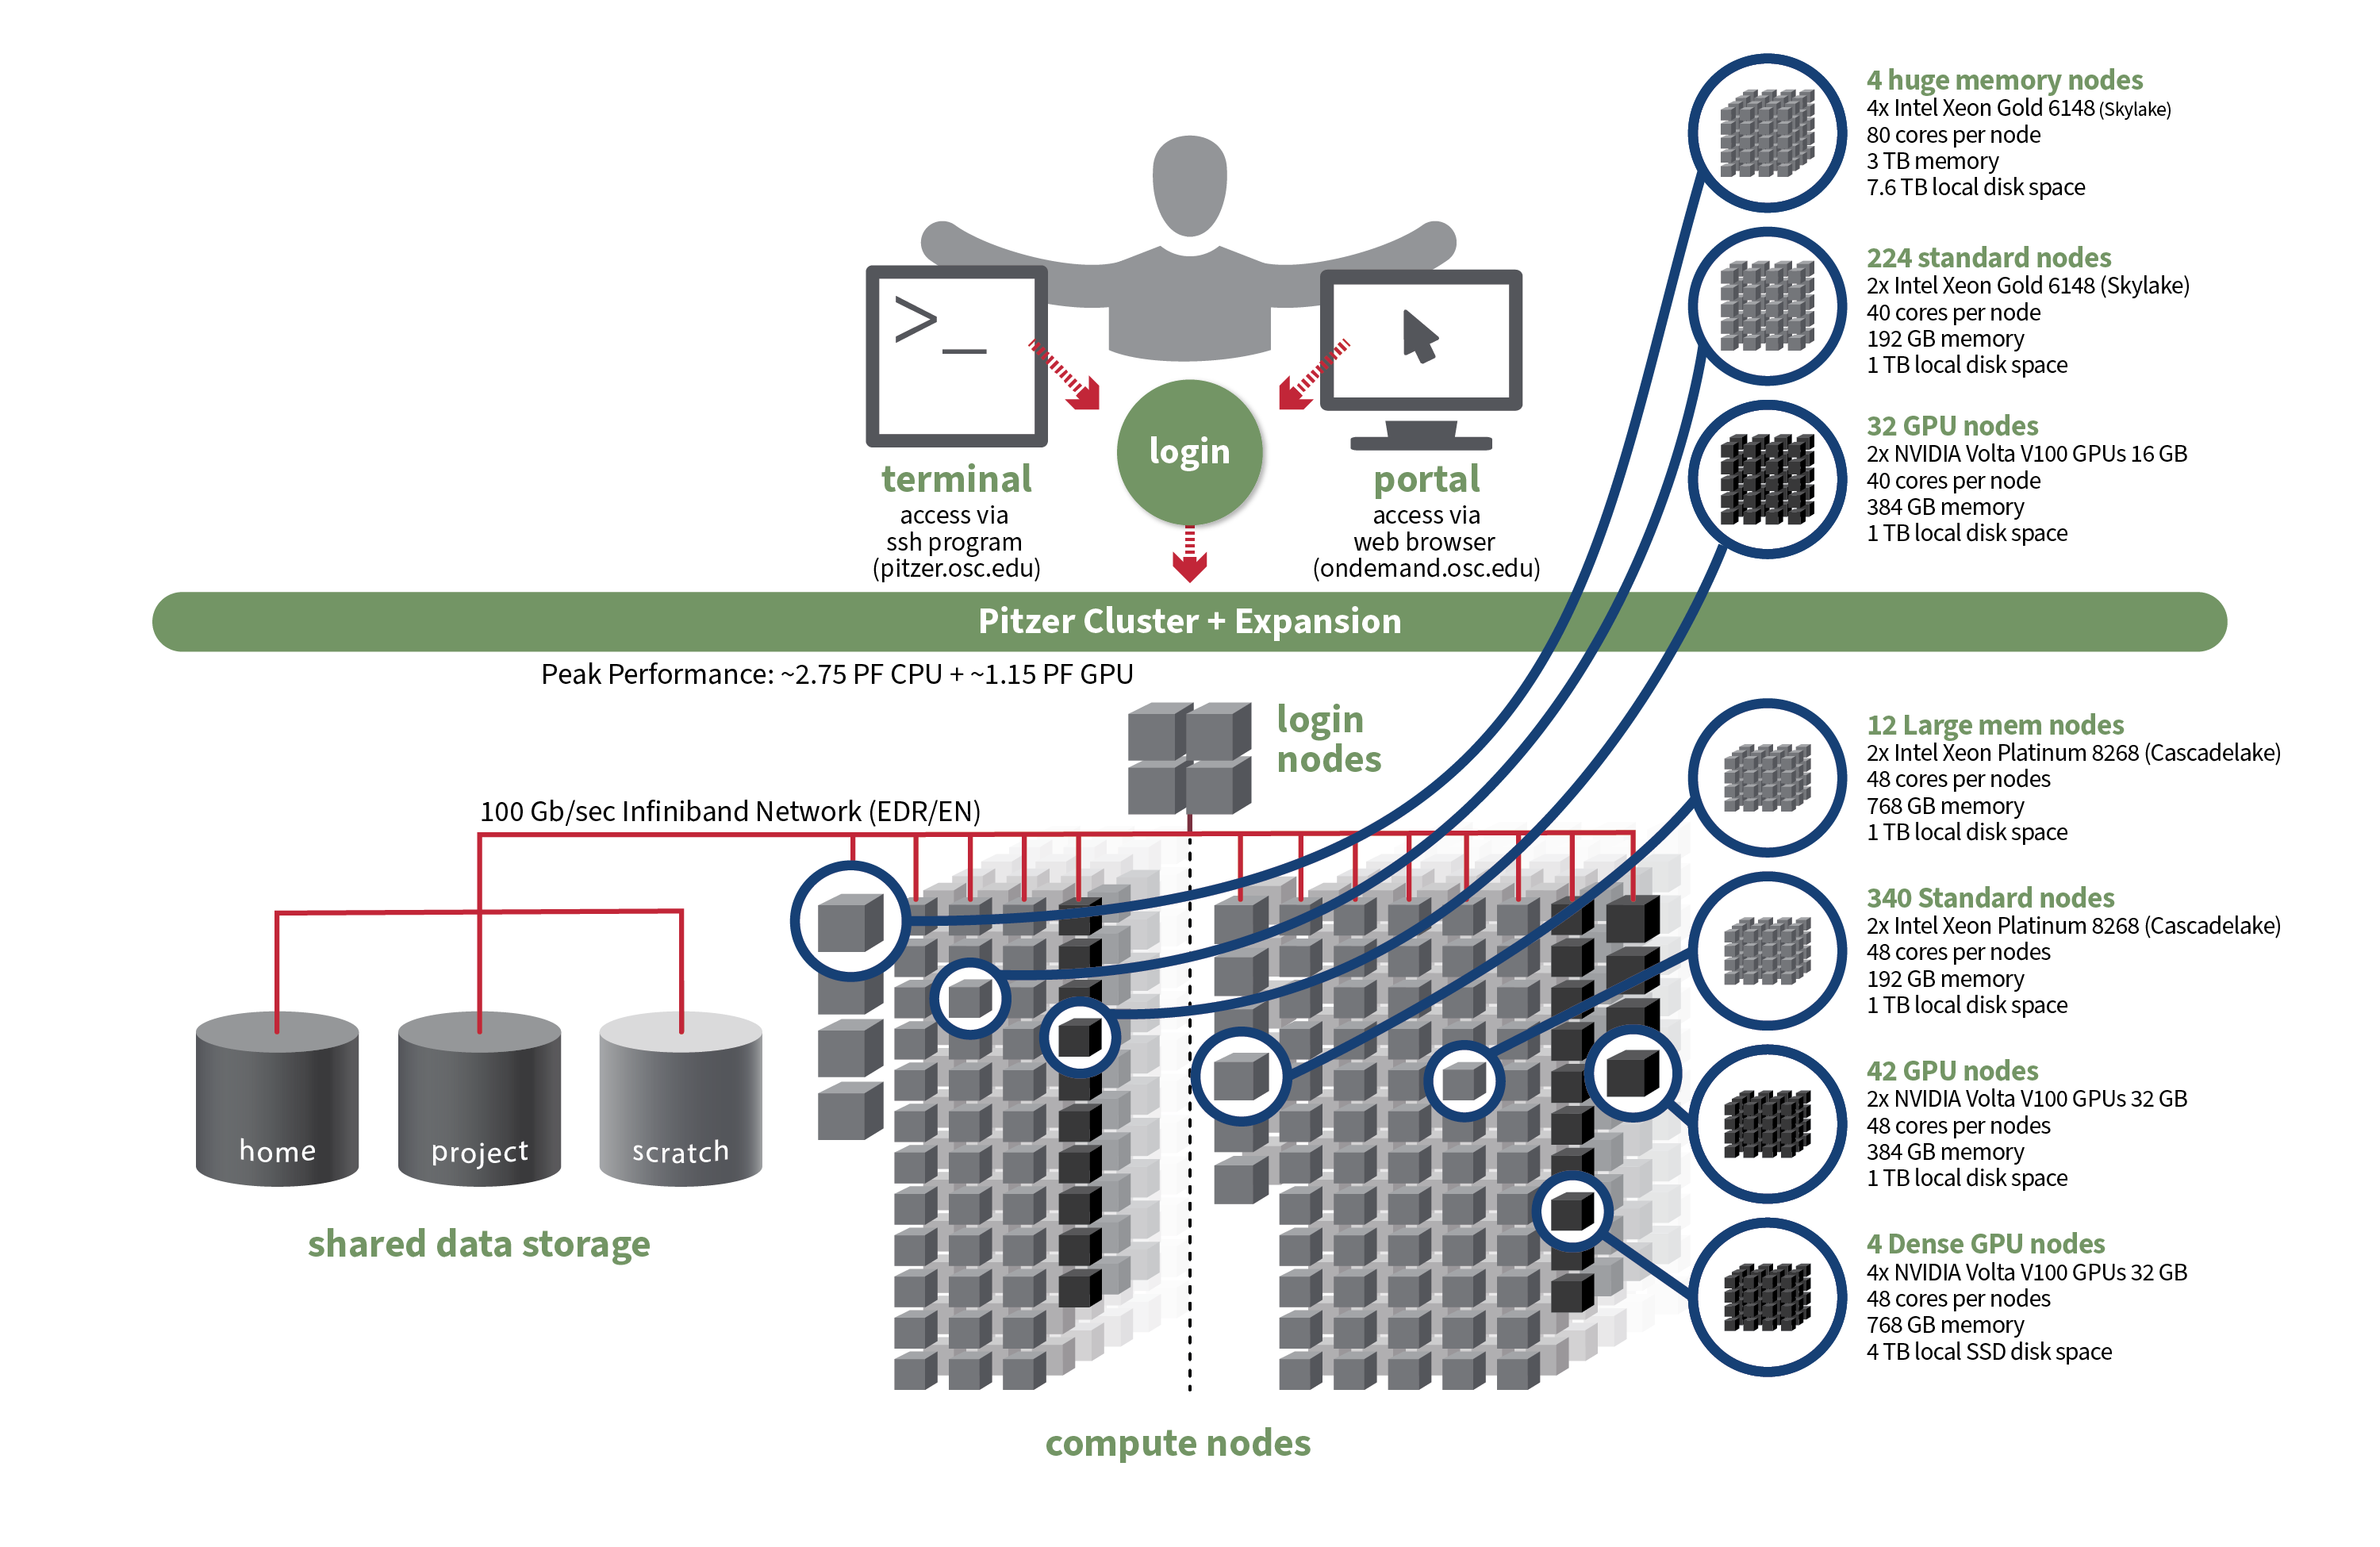
OSC's original Pitzer cluster was installed in late 2018 and is a Dell-built, Intel® Xeon® 'Skylake' processor-based supercomputer with 260 nodes.
In September 2020, OSC installed additional 398 Intel® Xeon® 'Cascade Lake' processor-based nodes as part of a Pitzer Expansion cluster.
Hardware

Detailed system specifications:
| Deployed in 2018 | Deployed in 2020 | Total | |
|---|---|---|---|
| Total Compute Nodes | 260 Dell nodes | 398 Dell nodes | 658 Dell nodes |
| Total CPU Cores | 10,560 total cores | 19,104 total cores | 29,664 total cores |
| Standard Dense Compute Nodes |
224 nodes
|
340 nodes
|
564 nodes |
| Dual GPU Compute Nodes | 32 nodes
|
42 nodes
|
74 dual GPU nodes |
| Quad GPU Compute Nodes | N/A | 4 nodes
|
4 quad GPU nodes |
| Large Memory Compute Nodes | 4 nodes
|
12 nodes
|
16 nodes |
| Interactive Login Nodes |
4 nodes
|
4 nodes | |
| InfiniBand High-Speed Network | Mellanox EDR (100 Gbps) Infiniband networking | Mellanox EDR (100 Gbps) Infiniband networking | |
| Theoretical Peak Performance |
~850 TFLOPS (CPU only) ~450 TFLOPS (GPU only) ~1300 TFLOPS (total) |
~1900 TFLOPS (CPU only) ~700 TFLOPS (GPU only) ~2600 TFLOPS (total) |
~2750 TFLOPS (CPU only) ~1150 TFLOPS (GPU only) ~3900 TFLOPS (total) |
How to Connect
-
SSH Method
To login to Pitzer at OSC, ssh to the following hostname:
pitzer.osc.edu
You can either use an ssh client application or execute ssh on the command line in a terminal window as follows:
ssh <username>@pitzer.osc.edu
You may see a warning message including SSH key fingerprint. Verify that the fingerprint in the message matches one of the SSH key fingerprints listed here, then type yes.
From there, you are connected to the Pitzer login node and have access to the compilers and other software development tools. You can run programs interactively or through batch requests. We use control groups on login nodes to keep the login nodes stable. Please use batch jobs for any compute-intensive or memory-intensive work. See the following sections for details.
-
OnDemand Method
You can also login to Pitzer at OSC with our OnDemand tool. The first step is to log into OnDemand. Then once logged in you can access Pitzer by clicking on "Clusters", and then selecting ">_Pitzer Shell Access".
Instructions on how to connect to OnDemand can be found at the OnDemand documentation page.
File Systems
Pitzer accesses the same OSC mass storage environment as our other clusters. Therefore, users have the same home directory as on the old clusters. Full details of the storage environment are available in our storage environment guide.
Software Environment
The module system on Pitzer is the same as on the Owens and Ruby systems. Use module load <package> to add a software package to your environment. Use module list to see what modules are currently loaded and module avail to see the modules that are available to load. To search for modules that may not be visible due to dependencies or conflicts, use module spider . By default, you will have the batch scheduling software modules, the Intel compiler, and an appropriate version of mvapich2 loaded.
You can keep up to the software packages that have been made available on Pitzer by viewing the Software by System page and selecting the Pitzer system.
Compiling Code to Use Advanced Vector Extensions (AVX2)
The Skylake processors that make Pitzer support the Advanced Vector Extensions (AVX2) instruction set, but you must set the correct compiler flags to take advantage of it. AVX2 has the potential to speed up your code by a factor of 4 or more, depending on the compiler and options you would otherwise use.
In our experience, the Intel and PGI compilers do a much better job than the gnu compilers at optimizing HPC code.
With the Intel compilers, use -xHost and -O2 or higher. With the gnu compilers, use -march=native and -O3 . The PGI compilers by default use the highest available instruction set, so no additional flags are necessary.
This advice assumes that you are building and running your code on Pitzer. The executables will not be portable. Of course, any highly optimized builds, such as those employing the options above, should be thoroughly validated for correctness.
See the Pitzer Programming Environment page for details.
Batch Specifics
Refer to this Slurm migration page to understand how to use Slurm on the Pitzer cluster. Some specifics you will need to know to create well-formed batch scripts:
- OSC enables PBS compatibility layer provided by Slurm such that PBS batch scripts that used to work in the previous Torque/Moab environment mostly still work in Slurm.
- Pitzer is a heterogeneous system with mixed types of CPUs after the expansion as shown in the above table. Please be cautious when requesting resources on Pitzer and check this page for more detailed discussions
- Jobs on Pitzer may request partial nodes.
Using OSC Resources
For more information about how to use OSC resources, please see our guide on batch processing at OSC and Slurm migration. For specific information about modules and file storage, please see the Batch Execution Environment page.
Technical Specifications
- Login Specifications
-
4 Intel Xeon Gold 6148 (Skylake) CPUs
- 40 cores/node and 384 GB of memory/node
Technical specifications for 2018 Pitzer:
- Number of Nodes
-
260 nodes
- Number of CPU Sockets
-
528 (2 sockets/node for standard node)
- Number of CPU Cores
-
10,560 (40 cores/node for standard node)
- Cores Per Node
-
40 cores/node (80 cores/node for Huge Mem Nodes)
- Local Disk Space Per Node
-
1 TB for standard and GPU nodes
- Compute CPU Specifications
-
Intel Xeon Gold 6148 (Skylake) for compute
- 2.4 GHz
- 20 cores per processor
- Computer Server Specifications
-
- 224 Dell PowerEdge C6420
- 32 Dell PowerEdge R740 (for accelerator nodes)
- 4 Dell PowerEdge R940
- Accelerator Specifications
-
NVIDIA V100 "Volta" GPUs 16GB memory
- Number of Accelerator Nodes
-
32 total (2 GPUs per node)
- Total Memory
-
~67 TB
- Memory Per Node
-
- 192 GB for standard nodes
- 384 GB for accelerator nodes
- 3 TB for Huge Mem Nodes
- Memory Per Core
-
- 4.8 GB for standard nodes
- 9.6 GB for accelerator nodes
- 76.8 GB for Huge Mem
- Interconnect
-
Mellanox EDR Infiniband Networking (100Gbps)
-
- Special Nodes
-
4 Huge Memory Nodes
- Dell PowerEdge R940
- 4 Intel Xeon Gold 6148 (Skylake)
- 20 Cores
- 2.4 GHz
- 80 cores (20 cores/CPU)
- 3 TB Memory
- 2x Mirror 1 TB Drive (1 TB usable)
- 7.6 TB SSD disk space
Technical specifications for 2020 Pitzer:
- Number of Nodes
-
398 nodes
- Number of CPU Sockets
-
796 (2 sockets/node for all nodes)
- Number of CPU Cores
-
19,104 (48 cores/node for all nodes)
- Cores Per Node
-
48 cores/node for all nodes
- Local Disk Space Per Node
-
- 1 TB for most nodes
- 4 TB for quad GPU nodes
- Compute CPU Specifications
-
Intel Xeon 8268s Cascade Lakes for most compute
- 2.9 GHz
- 24 cores per processor
- Computer Server Specifications
-
- 352 Dell PowerEdge C6420
- 42 Dell PowerEdge R740 (for dual GPU nodes)
- 4 Dell Poweredge c4140 (for quad GPU nodes)
- Accelerator Specifications
-
- NVIDIA V100 "Volta" GPUs 32GB memory for dual GPU
- NVIDIA V100 "Volta" GPUs 32GB memory and NVLink for quad GPU
- Number of Accelerator Nodes
-
- 42 dual GPU nodes (2 GPUs per node)
- 4 quad GPU nodes (4 GPUs per node)
- Total Memory
-
~95 TB
- Memory Per Node
-
- 192 GB for standard nodes
- 384 GB for dual GPU nodes
- 768 GB for quad and Large Mem Nodes
- Memory Per Core
-
- 4.0 GB for standard nodes
- 8.0 GB for dual GPU nodes
- 16.0 GB for quad and Large Mem Nodes
- Interconnect
-
Mellanox EDR Infiniband Networking (100Gbps)
- Special Nodes
-
4 quad GPU Nodes
- Dual Intel Xeon 8260s Cascade Lakes
- Quad NVIDIA Volta V100s w/32GB GPU memory and NVLink
- 48 cores per node @ 2.4GHz
- 768GB memory
- 4 TB SSD disk space
12 Large Memory Nodes- Dual Intel Xeon 8268 Cascade Lakes
- 48 cores per node @ 2.9GHz
- 768GB memory
- 1 TB HDD disk space
Pitzer Programming Environment
Compilers
The Pitzer cluster (on RHEL 9) supports C, C++, and Fortran programming languages. The available compiler suites include Intel, oneAPI, and GCC. By default, the Intel development toolchain is loaded. The table below lists the compiler commands and recommended options for compiling serial programs. For more details and best practices, please refer to our compilation guide.
The Skylake and Cascade Lake processors that make up Pitzer support the Advanced Vector Extensions (AVX512) instruction set, but you must set the correct compiler flags to take advantage of it. AVX512 has the potential to speed up your code by a factor of 8 or more, depending on the compiler and options you would otherwise use. However, bear in mind that clock speeds decrease as the level of the instruction set increases. So, if your code does not benefit from vectorization it may be beneficial to use a lower instruction set.
In our experience, the Intel compiler usually does the best job of optimizing numerical codes and we recommend that you give it a try if you’ve been using another compiler.
With the Intel or oneAPI compilers, use -xHost and -O2 or higher. With the GNU compilers, use -march=native and -O3.
This advice assumes that you are building and running your code on Pitzer. The executables will not be portable. Of course, any highly optimized builds, such as those employing the options above, should be thoroughly validated for correctness.
| LANGUAGE | INTEL | GNU | ONEAPI |
|---|---|---|---|
| C | icc -O2 -xHost hello.c |
gcc -O3 -march=native hello.c |
icx -O2 -xHost hello.c |
| Fortran | ifort -O2 -xHost hello.F |
gfortran -O3 -march=native hello.F |
ifx -O2 -xHost hello.F |
| C++ | icpc -O2 -xHost hello.cpp |
g++ -O3 -march=native hello.cpp |
icpx -O2 -xHost hello.cpp |
Parallel Programming
MPI
By default, OSC systems use the MVAPICH implementation of the Message Passing Interface (MPI), which is optimized for high-speed InfiniBand interconnects. MPI is a standardized library designed for parallel processing in distributed-memory environments. OSC also supports OpenMPI and Intel MPI. For more information on building MPI applications, please visit the MPI software page.
MPI programs are started with the srun command. For example,
#!/bin/bash
#SBATCH --nodes=2
#SBATCH --ntasks-per-node=8

srun [ options ] mpi_prog
The above job script will allocate 2 CPU nodes with 8 CPU cores each. The srun command will typically spawn one MPI process per task requested in a Slurm batch job. Use the --ntasks-per-node=n option to change that behavior. For example,
#!/bin/bash
#SBATCH --nodes=2
#SBATCH --ntasks-per-node=8

# Run 8 processes per node
srun ./mpi_prog

# Run 4 processes per node
srun --ntasks=8 --ntasks-per-node=4 ./mpi_prog
mpiexec or mpirun is still supported with Intel MPI and OpenMPI, but it may not be fully compatible with our Slurm environment. We recommend using srun in all cases.OpenMP
The Intel, oneAPI and GNU compilers understand the OpenMP set of directives, which support multithreaded programming. For more information on building OpenMP codes on OSC systems, please visit the OpenMP documentation.
An OpenMP program by default will use a number of threads equal to the number of CPUs requested in a Slurm batch job. To use a different number of threads, set the environment variable OMP_NUM_THREADS. For example,
#!/bin/bash
#SBATCH --nodes=1
#SBATCH --ntasks-per-node=8

# Run 8 threads
./omp_prog

# Run 4 threads
export OMP_NUM_THREADS=4
./omp_prog
To run a OpenMP job on an exclusive node:
#!/bin/bash
#SBATCH --nodes=1
#SBATCH --exclusive

./omp_prog
Hybrid (MPI + OpenMP)
An example of running a job for hybrid code:
#!/bin/bash
#SBATCH --nodes=2
#SBATCH --exclusive

# Each Pitzer node is equipped with 40 or 48 CPU cores
# Run 4 MPI processes on each node and 12 OpenMP threads spawned from a MPI process
export OMP_NUM_THREADS=12
srun --ntasks-per-node=4 --cpus-per-task=12 ./hybrid_prog
Tuning Parallel Program Performance: Process/Thread Placement
To get the maximum performance, it is important to make sure that processes/threads are located as close as possible to their data, and as close as possible to each other if they need to work on the same piece of data, with given the arrangement of node, sockets, and cores, with different access to RAM and caches.
While cache and memory contention between threads/processes are an issue, it is best to use scatter distribution for code.
Processes and threads are placed differently depending on the computing resources you requste and the compiler and MPI implementation used to compile your code. For the former, see the above examples to learn how to run a job on exclusive nodes. For the latter, this section summarizes the default behavior and how to modify placement.
OpenMP only
For all three compilers (Intel, GCC and oneAPI), purely threaded codes do not bind to particular CPU cores by default. In other words, it is possible that multiple threads are bound to the same CPU core.
The following table describes how to modify the default placements for pure threaded code:
| DISTRIBUTION | Compact | Scatter/Cyclic |
|---|---|---|
| DESCRIPTION | Place threads as closely as possible on sockets | Distribute threads as evenly as possible across sockets |
| INTEL/ONEAPI | KMP_AFFINITY=compact | KMP_AFFINITY=scatter |
| GNU | OMP_PLACES=sockets[1] | OMP_PROC_BIND=true OMP_PLACES=cores |
- Threads in the same socket might be bound to the same CPU core.
MPI Only
For MPI-only codes, MVAPICH first binds as many processes as possible on one socket, then allocates the remaining processes on the second socket so that consecutive tasks are near each other. Intel MPI and OpenMPI alternately bind processes on socket 1, socket 2, socket 1, socket 2 etc, as cyclic distribution.
For process distribution across nodes, all MPIs first bind as many processes as possible on one node, then allocates the remaining processes on the second node.
The following table describe how to modify the default placements on a single node for MPI-only code with the command srun:
| DISTRIBUTION (single node) |
Compact | Scatter/Cyclic |
|---|---|---|
| DESCRIPTION | Place processs as closely as possible on sockets | Distribute process as evenly as possible across sockets |
| MVAPICH[1] | Default | MVP_CPU_BINDING_POLICY=scatter |
| INTEL MPI | SLURM_DISTRIBUTION=block:block srun -B "2:*:1" ./mpi_prog |
SLURM_DISTRIBUTION=block:cyclic srun -B "2:*:1" ./mpi_prog |
| OPENMPI | SLURM_DISTRIBUTION=block:block srun -B "2:*:1" ./mpi_prog |
SLURM_DISTRIBUTION=block:cyclic srun -B "2:*:1" ./mpi_prog |
MVP_CPU_BINDING_POLICYwill not work ifMVP_ENABLE_AFFINITY=0is set.- To distribute processes evenly across nodes, please set
SLURM_DISTRIBUTION=cyclic.
Hybrid (MPI + OpenMP)
For hybrid codes, each MPI process is allocated a number of cores defined by OMP_NUM_THREADS, and the threads of each process are bound to those cores. All MPI processes, along with the threads bound to them, behave similarly to what was described in the previous sections.
The following table describe how to modify the default placements on a single node for Hybrid code with the command srun:
| DISTRIBUTION (single node) |
Compact | Scatter/Cyclic |
|---|---|---|
| DESCRIPTION | Place processs as closely as possible on sockets | Distribute process as evenly as possible across sockets |
| MVAPICH[1] | Default | MVP_HYBRID_BINDING_POLICY=scatter |
| INTEL MPI[2] | SLURM_DISTRIBUTION=block:block | SLURM_DISTRIBUTION=block:cyclic |
| OPENMPI[2] | SLURM_DISTRIBUTION=block:block | SLURM_DISTRIBUTION=block:cyclic |
Summary
The above tables list the most commonly used settings for process/thread placement. Some compilers and Intel libraries may have additional options for process and thread placement beyond those mentioned on this page. For more information on a specific compiler/library, check the more detailed documentation for that library.
GPU Programming
164 NVIDIA V100 GPUs are available on Pitzer. Please visit our GPU documentation.
Reference
Pitzer Software Environment
The Pitzer RHEL 9 cluster (hereafter referred to as "Pitzer") is now running on Red Hat Enterprise Linux (RHEL) 9, introducing several software-related changes compared to the RHEL 7 environment used on the Pitzer. These updates provide access to modern tools and libraries but may also require adjustments to your workflows. Key software changes and available software are outlined in the following sections.
Updated Compilers and Toolchains
The system GCC (GNU Compiler Collection) is now at version 11. Additionally, newer versions of GCC and other compiler suites, including the Intel Compiler Classic and Intel oneAPI, are available and can be accessed through the modules system. These new compiler versions may impact code compilation, optimization, and performance. We encourage users to test and validate their applications in this new environment to ensure compatibility and performance.
Python Upgrades
The system Python has been upgraded to version 3.9, and the system Python 2 is no longer available on Pitzer. Additionaly, newer versions of Python 3 are available through the modules system. This change may impact scripts and packages that rely on older versions of Python. We recommend users review and update their code to ensure compatibility or create custom environments as needed.
Available Software
Selected software packages have been installed on Pitzer . You can use module spider to view the available packages after logging into Pitzer. Additionally, check this page to see the available packages. Please note that the package list on the webpage is not yet complete.
After the Pitzer cluster goes into full production (tentatively on March 31), you can view the installed software by visiting Browse Software and select "Pitzer" under the "System".
If the software required for your research is not available, please contact OSC Help to reqeust the software.
Key change
A key change is that you are now required to specify the module version when loading any modules. For example, instead of using module load intel, you must use module load intel/2021.10.0. Failure to specify the version will result in an error message.
Below is an example message when loading gcc without specifying the version:
$ module load gcc
Lmod has detected the following error:  These module(s) or extension(s) exist but cannot be loaded as requested: "gcc".

You encountered this error for one of the following reasons:
1. Missing version specification: On Pitzer, you must specify an available version.
2. Missing required modules: Ensure you have loaded the appropriate compiler and MPI modules.

Try: "module spider gcc" to view available versions or required modules.

If you need further assistance, please contact oschelp@osc.edu with the subject line "lmod error: gcc"
Revised Software Modules
Some modules have been updated, renamed, or removed to align with the standards of the package managent system. For more details, please refer to the software page of the specific software you are interested in. Notable changes include:
| Package | Pitzer (RHEL 7) | Pitzer |
|---|---|---|
| Default MPI | mvapich2/2.3.3 | mvapich/3.0 |
| GCC | gnu | gcc |
| Intel MKL | intel, mkl | intel-oneapi-mkl |
| Intel VTune | intel | intel-oneapi-vtune |
| Intel TBB | intel | intel-oneapi-tbb |
| Intel MPI | intelmpi | intel-oneapi-mpi |
| NetCDF | netcdf | netcdf-c, netcdf-cxx4, netcdf-fortran |
| BLAST+ | blast | blast-plus |
| Java | java | openjdk |
| Quantum Espresso | espresso | quantum-espresso |
Licensed Software
All licensed software has been moved to Cardinal. No licensed software is available on Pitzer.
Known Issues
We are actively identifying and addressing issues in the new environment. Please report any problems to the support team by contacting OSC Help to ensure a smooth transition. Notable issues include:
| Software | Versions | Issues |
|---|---|---|
Additional known issues can be found on our Known Issues page. To view issues related to the Pitzer cluster, select "Pitzer" under the "Category".
Using Software on Pitzer RHEL 7
While OSC has upgraded the Pitzer cluster to RHEL 9, you may encounter challenges when migrating jobs from RHEL 7 to the new system. To support your ongoing research, please refer to the guide Using Software on Pitzer RHEL 7 for instructions on how to continue running your workflows in the RHEL 7 environment.
Batch Limit Rules
Memory limit
A small portion of the total physical memory on each node is reserved for distributed processes. The actual physical memory available to user jobs is tabulated below.
Summary
| Node type | default and max memory per core | max memory per node |
|---|---|---|
| Skylake 40 core - regular compute | 4.449 GB | 177.96 GB |
| Cascade Lake 48 core - regular compute | 3.708 GB | 177.98 GB |
| large memory | 15.5 GB | 744 GB |
| huge memory | 37.362 GB | 2988.98 GB |
| Skylake 40 core dual gpu | 9.074 GB | 363 GB |
| Cascade 48 core dual gpu | 7.562 GB | 363 GB |
| quad gpu (48 core) | 15.5 GB |
744 GB |
A job may request more than the max memory per core, but the job will be allocated more cores to satisfy the memory request instead of just more memory.
e.g. The following slurm directives will actually grant this job 3 cores, with 10 GB of memory
(since 2 cores * 4.5 GB = 9 GB doesn't satisfy the memory request).
#SBATCH --ntasks-per-node=2

 #SBATCH --mem=10g
It is recommended to let the default memory apply unless more control over memory is needed.
Note that if an entire node is requested, then the job is automatically granted the entire node's main memory. On the other hand, if a partial node is requested, then memory is granted based on the default memory per core.
See a more detailed explanation below.
Regular Compute Node
- For the regular 'Skylake' processor-based node, it has 40 cores/node. The physical memory equates to 4.8 GB/core or 192 GB/node; while the usable memory equates to 4,556 MB/core or 182,240 MB/node (177.96 GB/node).
- For the regular 'Cascade Lake' processor-based node, it has 48 cores/node. The physical memory equates to 4.0 GB/core or 192 GB/node; while the usable memory equates to 3,797 MB/core or 182,256 MB/node (177.98 GB/node).
Jobs requesting no more than 1 node
If your job requests less than a full node, it may be scheduled on a node with other running jobs. In this case, your job is entitled to a memory allocation proportional to the number of cores requested (4,556 MB/core or 3,797 MB/core depending on which type of node your job lands on). For example, without any memory request ( --mem=XX ):
- A job that requests
--ntasks-per-node=1and lands on a 'Skylake' node will be assigned one core and should use no more than 4556 MB of RAM; a job that requests--ntasks-per-node=1and lands on a 'Cascade Lake' node will be assigned one core and should use no more than 3797 MB of RAM - A job that requests
--ntasks-per-node=3and lands on a 'Skylake' node will be assigned 3 cores and should use no more than 3*4556 MB of RAM; a job that requests--ntasks-per-node=3and lands on a 'Cascade Lake' node will be assigned 3 cores and should use no more than 3*3797 MB of RAM - A job that requests
--ntasks-per-node=40and lands on a 'Skylake' node will be assigned the whole node (40 cores) with 178 GB of RAM; a job that requests--ntasks-per-node=40and lands on a 'Cascade Lake' node will be assigned 40 cores (partial node) and should use no more than 40* 3797 MB of RAM - A job that requests
--exclusiveand lands on a 'Skylake' node will be assigned the whole node (40 cores) with 178 GB of RAM; a job that requests--exclusiveand lands on a 'Cascade Lake' node will be assigned the whole node (48 cores) with 178 GB of RAM - A job that requests
--exclusive --constraint=40corewill land on a 'Skylake' node and will be assigned the whole node (40 cores) with 178 GB of RAM.
For example, with a memory request: - A job that requests
--ntasks-per-node=1 --mem=16000MBand lands on 'Skylake' node will be assigned 4 cores and have access to 16000 MB of RAM, and charged for 4 cores worth of usage; a job that requests--ntasks-per-node=1 --mem=16000MBand lands on 'Cascade Lake' node will be assigned 5 cores and have access to 16000 MB of RAM, and charged for 5 cores worth of usage - A job that requests
--ntasks-per-node=8 --mem=16000MBand lands on 'Skylake' node will be assigned 8 cores but have access to only 16000 MB of RAM , and charged for 8 cores worth of usage; a job that requests--ntasks-per-node=8 --mem=16000MBand lands on 'Cascade Lake' node will be assigned 8 cores but have access to only 16000 MB of RAM , and charged for 8 cores worth of usage
Jobs requesting more than 1 node
A multi-node job ( --nodes > 1 ) will be assigned the entire nodes and charged for the entire nodes regardless of --ntasks-per-node request. For example, a job that requests --nodes=10 --ntasks-per-node=1 and lands on 'Skylake' node will be charged for 10 whole nodes (40 cores/node*10 nodes, which is 400 cores worth of usage); a job that requests --nodes=10 --ntasks-per-node=1 and lands on 'Cascade Lake' node will be charged for 10 whole nodes (48 cores/node*10 nodes, which is 480 cores worth of usage).
Large Memory Node
On Pitzer, it has 48 cores per node. The physical memory equates to 16.0 GB/core or 768 GB/node; while the usable memory equates to 15,872 MB/core or 761,856 MB/node (744 GB/node).
For any job that requests no less than 363 GB/node but less than 744 GB/node, the job will be scheduled on the large memory node.To request no more than a full large memory node, you need to specify the memory request between 363 GB and 744 GB, i.e., 363GB <= mem <744GB. --mem is the total memory per node allocated to the job. You can request a partial large memory node, so consider your request more carefully when you plan to use a large memory node, and specify the memory based on what you will use.
Huge Memory Node
On Pitzer, it has 80 cores per node. The physical memory equates to 37.5 GB/core or 3 TB/node; while the usable memory equates to 38,259 MB/core or 3,060,720 MB/node (2988.98 GB/node).
To request no more than a full huge memory node, you have two options:
- The first is to specify the memory request between 744 GB and 2988 GB, i.e.,
744GB <= mem <=2988GB). - The other option is to use the combination of
--ntasks-per-nodeand--partition, like--ntasks-per-node=4 --partition=hugemem. When no memory is specified for the huge memory node, your job is entitled to a memory allocation proportional to the number of cores requested (38,259 MB/core). Note,--ntasks-per-nodeshould be no less than 20 and no more than 80
Debug
On Pitzer, the debug queue has available the 40 core and 48 core nodes, both with and without GPUs. These should be used for short jobs (less than an hour) in order to test code. If you submit a job request via "sinteractive" that is able to scheduled to the debug queue, it will automatically be routed there.
Debug can also be manually requested with the respective partition flag indicated below. There is currently no way to request a debug partition through an OnDemand job.
Summary
In summary, for serial jobs, we will allocate the resources considering both the # of cores and the memory request. For parallel jobs (nodes>1), we will allocate the entire nodes with the whole memory regardless of other requests. Check requesting resources on pitzer for information about the usable memory of different types of nodes on Pitzer. To manage and monitor your memory usage, please refer to Out-of-Memory (OOM) or Excessive Memory Usage.
GPU Jobs
Dual GPU Node
- For the dual GPU node with 'Skylake' processor, it has 40 cores/node. The physical memory equates to 9.6 GB/core or 384 GB/node; while the usable memory equates to 9292 MB/core or 363 GB/node. Each node has 2 NVIDIA Volta V100 w/ 16 GB GPU memory.
- For the dual GPU node with 'Cascade Lake' processor, it has 48 cores/node. The physical memory equates to 8.0 GB/core or 384 GB/node; while the usable memory equates to 7744 MB/core or 363 GB/node. Each node has 2 NVIDIA Volta V100 w/32GB GPU memory.
For serial jobs, we will allow node sharing on GPU nodes so a job may request either 1 or 2 GPUs (--ntasks-per-node=XX --gpus-per-node=1 or --ntasks-per-node=XX --gpus-per-node=2)
For parallel jobs (nodes>1), we will not allow node sharing. A job may request 1 or 2 GPUs ( gpus-per-node=1 or gpus-per-node=2 ) but both GPUs will be allocated to the job.
Quad GPU Node
For quad GPU node, it has 48 cores/node. The physical memory equates to 16.0 GB/core or 768 GB/node; while the usable memory equates to 15,872 MB/core or 744 GB/node.. Each node has 4 NVIDIA Volta V100s w/32 GB GPU memory and NVLink.
For serial jobs, we will allow node sharing on GPU nodes, so a job can land on a quad GPU node if it requests 3-4 GPUs per node (--ntasks-per-node=XX --gpus-per-node=3 or --ntasks-per-node=XX --gpus-per-node=4), or requests quad GPU node explicitly with using --gpus-per-node=v100-quad:4, or gets backfilled with requesting 1-2 GPUs per node with less than 4 hours long.
For parallel jobs (nodes>1), only up to 2 quad GPU nodes can be requested in a single job. We will not allow node sharing and all GPUs will be allocated to the job.
Partition time and job size limits
Here is the walltime and node limits per job for different queues/partitions available on Pitzer:
| Partition | Max walltime limit | Min job size | Max job size | Note |
|---|---|---|---|---|
| cpu | 7-00:00:00 (168 hours) | 1 core | 20 nodes |
Standard nodes: 40 cores per node without GPU |
| cpu-exp | 7-00:00:00 (168 hours) | 1 core | 36 nodes | Standard nodes: 48 cores per node without GPU |
| longcpu | 14-00:00:00 | 1 core | 1 node |
|
| gpu | 7-00:00:00 (168 hours) | 1 core | 4 nodes | Dual GPU nodes: 40 cores per node, 16GB V100s |
| gpu-exp | 7-00:00:00 (168 hours) | 1 core | 6 nodes | Dual GPU nodes: 48 cores per node, 32GB V100s |
| gpu-quad | 7-00:00:00 (168 hours) | 1 core | 1 node | Quad GPU nodes, 32GB V100s |
| debug-cpu | 1:00:00 (1 hour) | 1 core | 2 nodes |
Standard nodes: 40 cores per node without GPU
|
| debug-exp | 1:00:00 (1 hour) | 1 core | 2 nodes |
Standard nodes: 48 cores per node without GPU
|
| gpudebug | 1:00:00 (1 hour) | 1 core | 2 nodes |
Dual GPU nodes: 40 cores per node, 16GB V100s |
| gpudebug-exp | 1:00:00 (1 hour) | 1 core | 2 nodes |
Dual GPU nodes: 48 cores per node, 32GB V100s
|
| hugemem | 1-00:00:00 (24 hours) | 1 core | 1 node | There are only 4 huge memory nodes |
| largemem | 1-00:00:00 (24 hours) | 1 core | 1 node | There are 12 large memory nodes |
To specify a partition for a job, either add the flag --partition=<partition-name> to the sbatch command at submission time or add this line to the job script:
#SBATCH --partition=<partition-name>
To access one of the restricted queues, please contact OSC Help. Generally, access will only be granted to these queues if the performance of the job cannot be improved, and job size cannot be reduced by splitting or checkpointing the job.
Job/Core Limits
| Max Running Job Limit | Max Core/Processor Limit | Max node Limit | |||||
|---|---|---|---|---|---|---|---|
| For all types | GPU jobs | Regular debug jobs | GPU debug jobs | For all types | largemem | hugemem | |
| Individual User | 576 | 140 | 4 | 4 | 6480 | 12 | 3 |
| Project/Group | 576 | 140 | n/a | n/a | 6480 | 12 | 3 |
An individual user can have up to the max concurrently running jobs and/or up to the max processors/cores in use. However, among all the users in a particular group/project, they can have up to the max concurrently running jobs and/or up to the max processors/cores in use.
Citation
For more information about citations of OSC, visit https://www.osc.edu/citation.
To cite Pitzer, please use the following information:
Ohio Supercomputer Center. (2018). Pitzer Cluster. Ohio Supercomputer Center. https://doi.org/10.82404/GYT1-JH87
BibTeX:
@MISC{Ohio_Supercomputer_Center2018-dl,
  title     = "Pitzer Cluster",
  author    = "{Ohio Supercomputer Center}",
  publisher = "Ohio Supercomputer Center",
  year      =  "2018",
  doi       = "10.82404/gyt1-jh87"
}
ris:
TY  - MISC
AU  - Ohio Supercomputer Center
TI  - Pitzer Cluster
PY  - 2018
DA  - 2018
PB  - Ohio Supercomputer Center
DO  - 10.82404/GYT1-JH87
UR  - http://dx.doi.org/10.82404/GYT1-JH87
Pitzer SSH key fingerprints
These are the public key fingerprints for Pitzer:
pitzer: ssh_host_rsa_key.pub = 8c:8a:1f:67:a0:e8:77:d5:4e:3b:79:5e:e8:43:49:0e
pitzer: ssh_host_ed25519_key.pub = 6d:19:73:8e:b4:61:09:a9:e6:0f:e5:0d:e5:cb:59:0b
pitzer: ssh_host_ecdsa_key.pub = 6f:c7:d0:f9:08:78:97:b8:23:2e:0d:e2:63:e7:ac:93
These are the SHA256 hashes:
pitzer: ssh_host_rsa_key.pub = SHA256:oWBf+YmIzwIp+DsyuvB4loGrpi2ecow9fnZKNZgEVHc
pitzer: ssh_host_ed25519_key.pub = SHA256:zUgn1K3+FK+25JtG6oFI9hVZjVxty1xEqw/K7DEwZdc
pitzer: ssh_host_ecdsa_key.pub = SHA256:8XAn/GbQ0nbGONUmlNQJenMuY5r3x7ynjnzLt+k+W1M
Guidance After Pitzer Upgrade to RHEL9
We upgraded the operating system on the Pitzer cluster from RHEL7 to RHEL9 on July 28 2025. This upgrade introduces several software-related changes compared to the RHEL7 environment used on the Pitzer and provides access to modern tools and libraries but may also require adjustments to your workflows. Please refer to
- Pitzer Software Environment on RHEL 9 for key software changes and available software
- Pitzer Programming Environment on RHEL 9 for details on compiler commands, parallel and GPU computing
Key changes
- PBS compatibility layer provided by Slurm is disabled so you need to convert your PBS batch scripts to Slurm scripts. See this Slurm migration page for more guidance.
- You are now required to specify the module version when loading any modules. For example, instead of using
module load intel, you must usemodule load intel/2021.10.0. Failure to specify the version will result in an error message. Below is an example message when loading gcc without specifying the version:$ module load gcc Lmod has detected the following error: These module(s) or extension(s) exist but cannot be loaded as requested: "gcc". You encountered this error for one of the following reasons: 1. Missing version specification: On Ascend, you must specify an available version. 2. Missing required modules: Ensure you have loaded the appropriate compiler and MPI modules. Try: "module spider gcc" to view available versions or required modules. If you need further assistance, please contact oschelp@osc.edu with the subject line "lmod error: gcc"
Guidance on Requesting Resources on Pitzer
In late 2018, OSC installed 260 Intel® Xeon® 'Skylake' processor-based nodes as the original Pitzer cluster. In September 2020, OSC installed additional 398 Intel® Xeon® 'Cascade Lake' processor-based nodes as part of a Pitzer Expansion cluster. This expansion makes Pitzer a heterogeneous cluster, which means that the jobs may land on different types of CPU and behaves differently if the user submits the same job script repeatedly to Pitzer but does not request the resources properly. This document provides you some general guidance on how to request resources on Pitzer due to this heterogeneous nature.
Step 1: Identify your job type
| Nodes the job may be allocated on | # of cores per node | Usable Memory | GPU | |
|---|---|---|---|---|
| Jobs requesting standard compute node(s) | Dual Intel Xeon 6148s Skylake @2.4GHz | 40 |
178 GB memory/node 4556 MB memory/core |
N/A |
| Dual Intel Xeon 8268s Cascade Lakes @2.9GHz | 48 |
178 GB memory/node 3797 MB memory/core |
N/A | |
| Jobs requesting dual GPU node(s) |
Dual Intel Xeon 6148s Skylake @2.4GHz |
40 |
363 GB memory/node 9292 MB memory/core |
2 NVIDIA Volta V100 w/ 16GB GPU memory |
| Dual Intel Xeon 8268s Cascade Lakes @2.9GHz | 48 |
363 GB memory/node 7744 MB memory/core |
2 NVIDIA Volta V100 w/32GB GPU memory | |
| Jobs requesting quad GPU node(s) | Dual Intel Xeon 8260s Cascade Lakes @2.4GHz | 48 |
744 GB memory/node 15872 MB memory/core |
4 NVIDIA Volta V100s w/32GB GPU memory and NVLink |
| Jobs requesting large memory node(s) | Dual Intel Xeon 8268s Cascade Lakes @2.9GHz | 48 |
744 GB memory/node 15872 MB memory/core |
N/A |
| Jobs requesting huge memory node(s) | Quad Processor Intel Xeon 6148 Skylakes @2.4GHz | 80 |
2989 GB memory/node 38259 MB memory/core |
N/A |
According to this table,
- If your job requests standard compute node(s) or dual GPU node(s), it can potentially land on different types of nodes and may result in different job performance. Please follow the steps below to determine whether you would like to restrain your job to a certain type of node(s).
- If your job requests quad GPU node(s), large memory node(s), or huge memory node(s), please check pitzer batch limit rules on how to request these special types of resources properly.
Step 2: Perform test
This step is to submit your jobs requesting the same resources to different types of nodes on Pitzer. For your job script is prepared with either PBS syntax or Slurm syntax:
Request 40 or 48 core nodes
#SBATCH --constraint=40core
#SBATCH --constraint=48core
Request 16gb, 32gb gpu
#SBATCH --constraint=v100
#SBATCH --constraint=v100-32g --partition=gpuserial-48core
Once the script is ready, submit your jobs to Pitzer and wait till the jobs are completed.
Step 3: Compare the results
Once the jobs are completed, you can compare the job performances in terms of core-hours, gpu-hours, walltime, etc. to determine how your job is sensitive to the type of the nodes. If you would like to restrain your job to land on a certain type of nodes based on the testing, you can add #SBATCH --constraint=. The disadvantage of this is that you may have a longer queue wait time on the system. If you would like to have your jobs scheduled as fast as possible and do not care which type of nodes your job will land on, do not include the constraint in the job request.