Technical Support
OSC Help consists of technical support and consulting services for OSC's high performance computing resources. Members of OSC's HPC Client Services group comprise OSC Help.
Before contacting OSC Help, please check to see if your question is answered in either the FAQ or the Knowledge Base. Many of the questions asked by both new and experienced OSC users are answered in these web pages.
If you still cannot solve your problem, please do not hesitate to contact OSC Help:
Phone: (614) 292-1800
Email: oschelp@osc.edu
Submit your issue online
OSC Help hours of operation:
Basic and advanced support are available Monday through Friday, 9 a.m.–5 p.m. (Eastern time zone), except for these holiday dates.
HPC Changelog
Changes to HPC systems are listed below, optionally filtered by system.
MVAPICH2 version 2.3 modules modified on Owens
Replace MV2_ENABLE_AFFINITY=0 with MV2_CPU_BINDING_POLICY=hybrid.
Known issues
Unresolved known issues
Known issue with an Unresolved Resolution state is an active problem under investigation; a temporary workaround may be available.
Resolved known issues
A known issue with a Resolved (workaround) Resolution state is an ongoing problem; a permanent workaround is available which may include using different software or hardware.
A known issue with Resolved Resolution state has been corrected.
Search Documentation
Search our client documentation below, optionally filtered by one or more systems.
Supercomputers
We currently operate three major systems:
- Owens Cluster, a 23,000+ core Dell Intel Xeon machine
- Ruby Cluster, an 4800 core HP Intel Xeon machine
- 20 nodes have Nvidia Tesla K40 GPUs
- One node has 1 TB of RAM and 32 cores, for large SMP style jobs.
- Pitzer Cluster, an 10,500+ core Dell Intel Xeon machine
Our clusters share a common environment, and we have several guides available.
- An introduction to the basic login environment.
- A detailed guide to our batch environment, explaining how to submit jobs to the scheduler and request the required resources for your computations.
OSC also provides more than 5 PB of storage, and another 5.5 PB of tape backup.
- Learn how that space is made available to users, and how to best utilize the resources, in our storage environment guide.
Finally, you can keep up to date with any known issues on our systems (and the available workarounds). An archive of resolved issues can be found here.
Ascend
OSC's original Ascend cluster was installed in fall 2022 and is a Dell-built, AMD EPYC™ CPUs with NVIDIA A100 80GB GPUs cluster. In 2025, OSC expanded HPC resources on its Ascend cluster, which features additional 298 Dell R7525 server nodes with AMD EPYC 7H12 CPUs and NVIDIA A100 40GB GPUs.
Hardware
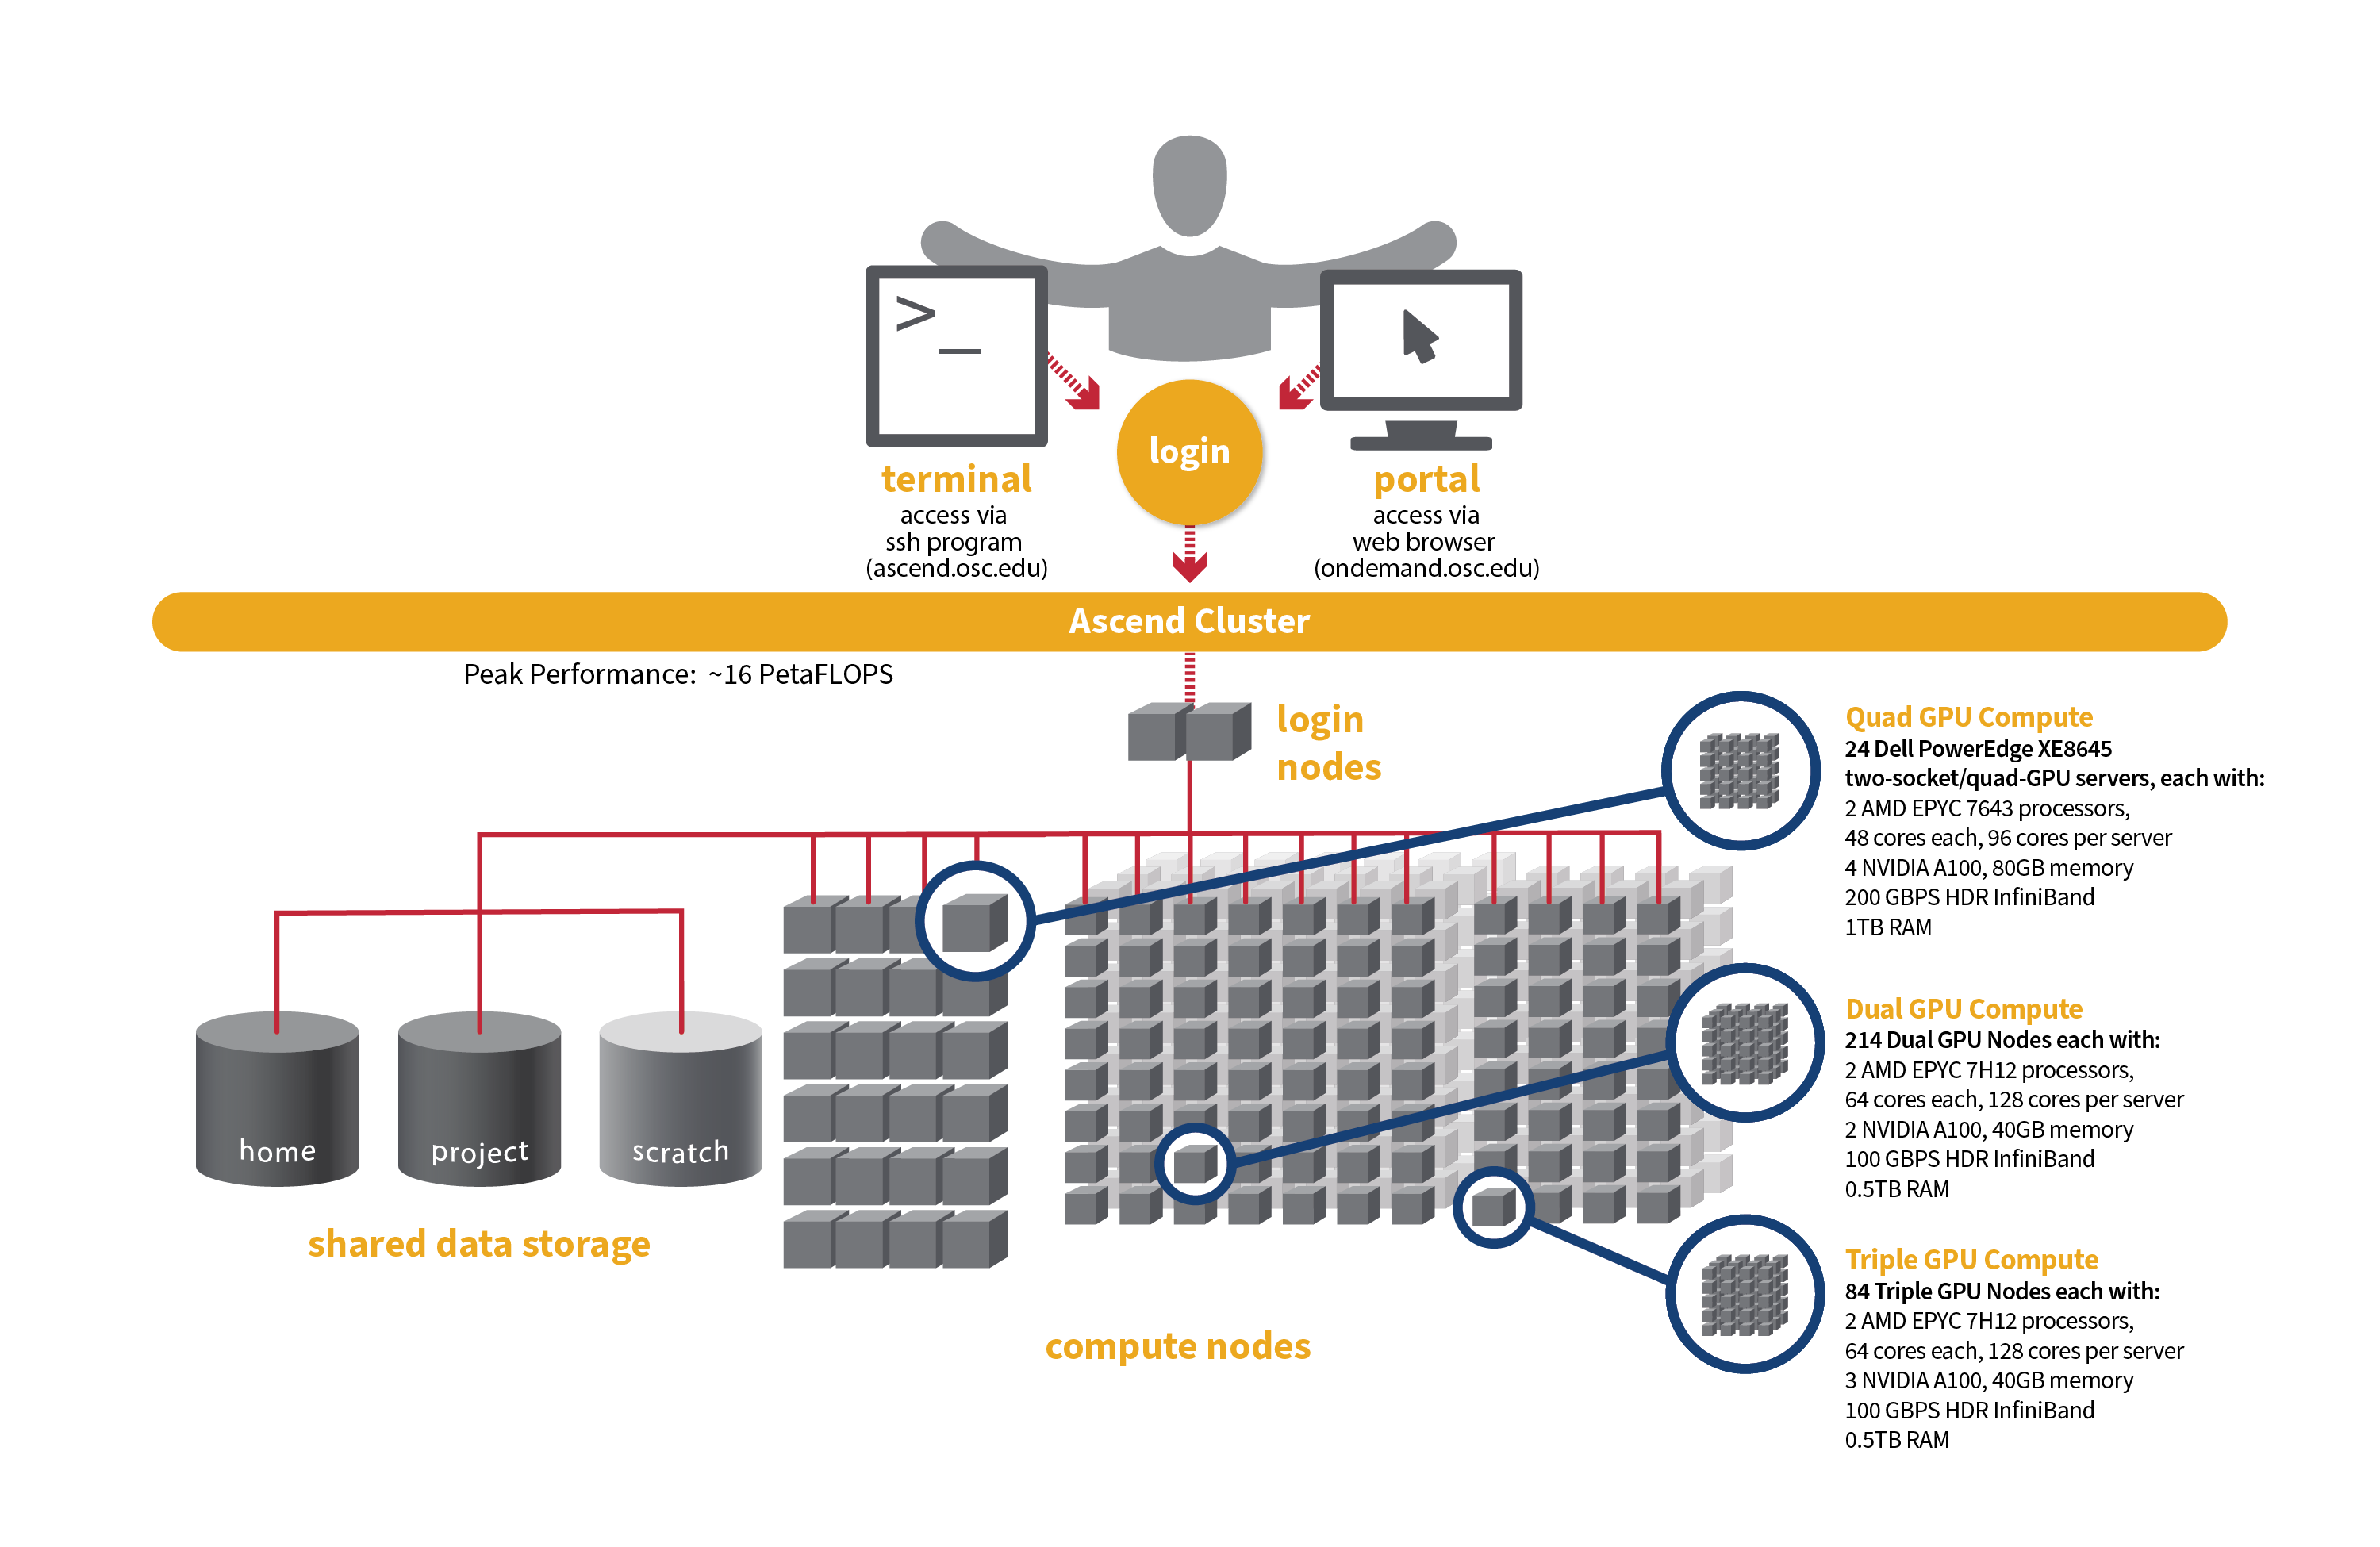
- Quad GPU Compute: 24 Dell PowerEdge XE8645 two-socket/quad-GPU servers, each with:
- 2 AMD EPYC 7643 (Milan) processors (2.3 GHz, each with 44 usable cores)
- 4 NVIDIA A100 GPUs with 80GB memory each, connected by NVIDIA NVLink
- 921GB usable memory
- 12.8TB NVMe internal storage
- HDR200 Infiniband (200 Gbps)
- Dual GPU Compute: 214 Dell PowerEdge R7545 two-socket/dual GPU servers (190 available to Slurm and 24 reserved for Kubernetes), each with:
- 2 AMD EPYC 7H12 processors (2.60 GHz, each with 60 usable cores)
- 2 NVIDIA A100 GPUs with 40GB memory each, PCIe, 250W
- 472GB usable Memory
- 1.92TB NVMe internal storage
- HDR100 Infiniband (100 Gbps)
- Triple GPU Compute: 84 Dell PowerEdge R7545 two-socket/dual GPU servers, each with:
- 2 AMD EPYC 7H12 processors (2.60 GHz, each with 60 usable cores)
- 3 NVIDIA A100 GPUs with 40GB memory each, PCIe, 250W (24 nodes with three GPUs are currently available. The remaining 60 nodes are still undergoing testing on their third GPU, so that GPU is not yet available for user jobs).
- 472GB usable Memory
- 1.92TB NVMe internal storage
- HDR100 Infiniband (100 Gbps)
- Theoretical system peak performance
- ~16 PetaFLOPS
- 40,448 total cores and 776 GPUs (some cores and GPUs are reserved for Kubernetes)
- 2 login nodes
- IP address: 192.148.247.[180-181]
How to Connect
-
SSH Method
To login to Ascend at OSC, ssh to the following hostname:
ascend.osc.edu
You can either use an ssh client application or execute ssh on the command line in a terminal window as follows:
ssh <username>@ascend.osc.edu
You may see a warning message including SSH key fingerprint. Verify that the fingerprint in the message matches one of the SSH key fingerprints listed here, then type yes.
From there, you are connected to the Ascend login node and have access to the compilers and other software development tools. You can run programs interactively or through batch requests. We use control groups on login nodes to keep the login nodes stable. Please use batch jobs for any compute-intensive or memory-intensive work. See the following sections for details.
-
OnDemand Method
You can also login to Ascend at OSC with our OnDemand tool. The first step is to log into OnDemand. Then once logged in you can access Ascend by clicking on "Clusters", and then selecting ">_Ascend Shell Access".
Instructions on how to connect to OnDemand can be found at the OnDemand documentation page.
File Systems
Ascend accesses the same OSC mass storage environment as our other clusters. Therefore, users have the same home directory as on the old clusters. Full details of the storage environment are available in our storage environment guide.
Software Environment
The Ascend cluster is now running on Red Hat Enterprise Linux (RHEL) 9, introducing several software-related changes compared to the RHEL 7/8 environment. These updates provide access to modern tools and libraries but may also require adjustments to your workflows. You can stay updated on the software packages available on Ascend by viewing Available software list on Next Gen Ascend.
Key change
A key change is that you are now required to specify the module version when loading any modules. For example, instead of using module load intel, you must use module load intel/2021.10.0. Failure to specify the version will result in an error message.
Below is an example message when loading gcc without specifying the version:
$ module load gcc
Lmod has detected the following error:  These module(s) or extension(s) exist but cannot be loaded as requested: "gcc".

You encountered this error for one of the following reasons:
1. Missing version specification: On Ascend, you must specify an available version.
2. Missing required modules: Ensure you have loaded the appropriate compiler and MPI modules.

Try: "module spider gcc" to view available versions or required modules.

If you need further assistance, please contact oschelp@osc.edu with the subject line "lmod error: gcc"
Batch Specifics
Refer to this Slurm migration page to understand how to use Slurm on the Ascend cluster.
Using OSC Resources
For more information about how to use OSC resources, please see our guide on batch processing at OSC. For specific information about modules and file storage, please see the Batch Execution Environment page.
Ascend Programming Environment
Compilers
C, C++ and Fortran are supported on the Ascend cluster. Intel, oneAPI, GNU Compiler Collectio (GCC) and AOCC are available. The Intel development tool chain is loaded by default. Compiler commands and recommended options for serial programs are listed in the table below. See also our compilation guide.
The Rome/Milan processors from AMD that make up Ascend support the Advanced Vector Extensions (AVX2) instruction set, but you must set the correct compiler flags to take advantage of it. AVX2 has the potential to speed up your code by a factor of 4 or more, depending on the compiler and options you would otherwise use. However, bear in mind that clock speeds decrease as the level of the instruction set increases. So, if your code does not benefit from vectorization it may be beneficial to use a lower instruction set.
In our experience, the Intel compiler usually does the best job of optimizing numerical codes and we recommend that you give it a try if you’ve been using another compiler.
With the Intel/oneAPI compilers, use -xHost and -O2 or higher. With GCC, use -march=native and -O3.
This advice assumes that you are building and running your code on Ascend. The executables will not be portable. Of course, any highly optimized builds, such as those employing the options above, should be thoroughly validated for correctness.
| LANGUAGE | INTEL | GCC | ONEAPI |
|---|---|---|---|
| C | icc -O2 -xHost hello.c | gcc -O3 -march=native hello.c | icx -O2 -xHost hello.c |
| Fortran | ifort -O2 -xHost hello.F | gfortran -O3 -march=native hello.F | ifx -O2 -xHost hello.F |
| C++ | icpc -O2 -xHost hello.cpp | g++ -O3 -march=native hello.cpp | icpx -O2 -xHost hello.cpp |
Parallel Programming
MPI
OSC systems use the MVAPICH implementation of the Message Passing Interface (MPI), optimized for the high-speed Infiniband interconnect. MPI is a standard library for performing parallel processing using a distributed-memory model. For more information on building your MPI codes, please visit the MPI Library documentation.
MPI programs are started with the srun command. For example,
#!/bin/bash
#SBATCH --nodes=2
#SBATCH --ntasks-per-node=48

srun [ options ] mpi_prog
The srun command will normally spawn one MPI process per task requested in a Slurm batch job. Use the --ntasks-per-node=n option to change that behavior. For example,
#!/bin/bash
#SBATCH --nodes=2
#SBATCh --exclusive

# Use the maximum number of CPUs of two nodes
srun ./mpi_prog

# Run 8 processes per node
srun -n 16 --ntasks-per-node=8  ./mpi_prog
The table below shows some commonly used options. Use srun -help for more information.
| OPTION | COMMENT |
|---|---|
--ntasks-per-node=n |
number of tasks to invoke on each node |
-help |
Get a list of available options |
srun in any circumstances.OpenMP
The Intel, and GNU compilers understand the OpenMP set of directives, which support multithreaded programming. For more information on building OpenMP codes on OSC systems, please visit the OpenMP documentation.
An OpenMP program by default will use a number of threads equal to the number of CPUs requested in a Slurm batch job. To use a different number of threads, set the environment variable OMP_NUM_THREADS. For example,
#!/bin/bash
#SBATCH --ntasks-per-node=8

# Run 8 threads
./omp_prog

# Run 4 threads
export OMP_NUM_THREADS=4
./omp_prog
Interactive job only
Please use -c, --cpus-per-task=X to request an interactive job. Both result in an interactive job with X CPUs available but only the former option automatically assigns the correct number of threads to the OpenMP program.
Hybrid (MPI + OpenMP)
An example of running a job for hybrid code:
#!/bin/bash
#SBATCH --nodes=2
#SBATCH --ntasks-per-node=80

# Run 4 MPI processes on each node and 40 OpenMP threads spawned from a MPI process
export OMP_NUM_THREADS=40
srun -n 8 -c 40 --ntasks-per-node=4 ./hybrid_prog
Tuning Parallel Program Performance: Process/Thread Placement
To get the maximum performance, it is important to make sure that processes/threads are located as close as possible to their data, and as close as possible to each other if they need to work on the same piece of data, with given the arrangement of node, sockets, and cores, with different access to RAM and caches.
While cache and memory contention between threads/processes are an issue, it is best to use scatter distribution for code.
Processes and threads are placed differently depending on the computing resources you requste and the compiler and MPI implementation used to compile your code. For the former, see the above examples to learn how to run a job on exclusive nodes. For the latter, this section summarizes the default behavior and how to modify placement.
OpenMP only
For all three compilers (Intel, GCC and oneAPI), purely threaded codes do not bind to particular CPU cores by default. In other words, it is possible that multiple threads are bound to the same CPU core.
The following table describes how to modify the default placements for pure threaded code:
| DISTRIBUTION | Compact | Scatter/Cyclic |
|---|---|---|
| DESCRIPTION | Place threads close to each other as possible in successive order | Distribute threads as evenly as possible across sockets |
| INTEL/ONEAPI | KMP_AFFINITY=compact | KMP_AFFINITY=scatter |
| GCC | OMP_PLACES=sockets[1] | OMP_PROC_BIND=true OMP_PLACES=cores |
- Threads in the same socket might be bound to the same CPU core.
MPI Only
For MPI-only codes, MVAPICH first binds as many processes as possible on one socket, then allocates the remaining processes on the second socket so that consecutive tasks are near each other. Intel MPI and OpenMPI alternately bind processes on socket 1, socket 2, socket 1, socket 2 etc, as cyclic distribution.
For process distribution across nodes, all MPIs first bind as many processes as possible on one node, then allocates the remaining processes on the second node.
The following table describe how to modify the default placements on single node for MPI-only code with the command srun:
| DISTRIBUTION (single node) |
Compact | Scatter/Cyclic |
|---|---|---|
| DESCRIPTION | Place processs close to each other as possible in successive order | Distribute process as evenly as possible across sockets |
| MVAPICH[1] | Default | MVP_CPU_BINDING_POLICY=scatter |
| INTEL MPI | SLURM_DISTRIBUTION=block:block srun -B "2:*:1" ./mpi_prog |
SLURM_DISTRIBUTION=block:cyclic srun -B "2:*:1" ./mpi_prog |
| OPENMPI | SLURM_DISTRIBUTION=block:block srun -B "2:*:1" ./mpi_prog |
SLURM_DISTRIBUTION=block:cyclic srun -B "2:*:1" ./mpi_prog |
MVP_CPU_BINDING_POLICYwill not work ifMVP_ENABLE_AFFINITY=0is set.
To distribute processes evenly across nodes, please set SLURM_DISTRIBUTION=cyclic.
Hybrid (MPI + OpenMP)
For hybrid codes, each MPI process is allocated a number of cores defined by OMP_NUM_THREADS, and the threads of each process are bound to those cores. All MPI processes, along with the threads bound to them, behave similarly to what was described in the previous sections.
The following table describe how to modify the default placements on a single node for Hybrid code with the command srun:
| DISTRIBUTION (single node) |
Compact | Scatter/Cyclic |
|---|---|---|
| DESCRIPTION | Place processs as closely as possible on sockets | Distribute process as evenly as possible across sockets |
| MVAPICH[1] | Default | MVP_HYBRID_BINDING_POLICY=scatter |
| INTEL MPI[2] | SLURM_DISTRIBUTION=block:block | SLURM_DISTRIBUTION=block:cyclic |
| OPENMPI[2] | SLURM_DISTRIBUTION=block:block | SLURM_DISTRIBUTION=block:cyclic |
Summary
The above tables list the most commonly used settings for process/thread placement. Some compilers and Intel libraries may have additional options for process and thread placement beyond those mentioned on this page. For more information on a specific compiler/library, check the more detailed documentation for that library.
GPU Programming
244 NVIDIA A100 GPUs are available on Ascend. Please visit our GPU documentation.
Reference
Ascend Software Environment
The Next Gen Ascend (hereafter referred to as “Ascend”) cluster is now running on Red Hat Enterprise Linux (RHEL) 9, introducing several software-related changes compared to the RHEL 7/8 environment used on the Pitzer and original Ascend cluster. These updates provide access to modern tools and libraries but may also require adjustments to your workflows. Key software changes and available software are outlined in the following sections.
Updated Compilers and Toolchains
The system GCC (GNU Compiler Collection) is now at version 11. Additionally, newer versions of GCC and other compiler suites, including the Intel Compiler Classic and Intel oneAPI, are available and can be accessed through the modules system. These new compiler versions may impact code compilation, optimization, and performance. We encourage users to test and validate their applications in this new environment to ensure compatibility and performance.
Python Upgrades
The system Python has been upgraded to version 3.9, and the system Python 2 is no longer available on Ascend. Additionaly, newer versions of Python 3 are available through the modules system. This change may impact scripts and packages that rely on older versions of Python. We recommend users review and update their code to ensure compatibility or create custom environments as needed.
Available Software
Selected software packages have been installed on Ascend. You can use module spider to view the available packages after logging into Ascend. Additionally, check this page to see the available packages. Please note that the package list on the webpage is not yet complete.
After the Ascend cluster goes into full production (tentatively on March 31), you can view the installed software by visiting Browse Software and select "Ascend" under the "System".
If the software required for your research is not available, please contact OSC Help to reqeust the software.
Key change
A key change is that you are now required to specify the module version when loading any modules. For example, instead of using module load intel, you must use module load intel/2021.10.0. Failure to specify the version will result in an error message.
Below is an example message when loading gcc without specifying the version:
$ module load gcc
Lmod has detected the following error:  These module(s) or extension(s) exist but cannot be loaded as requested: "gcc".

You encountered this error for one of the following reasons:
1. Missing version specification: On Ascend, you must specify an available version.
2. Missing required modules: Ensure you have loaded the appropriate compiler and MPI modules.

Try: "module spider gcc" to view available versions or required modules.

If you need further assistance, please contact oschelp@osc.edu with the subject line "lmod error: gcc"
Revised Software Modules
Some modules have been updated, renamed, or removed to align with the standards of the package managent system. For more details, please refer to the software page of the specific software you are interested in. Notable changes include:
| Package | Pitzer | Original Ascend | Ascend |
|---|---|---|---|
| Default MPI | mvapich2/2.3.3 | mvapich/2.3.7 | mvapich/3.0 |
| GCC | gnu | gnu | gcc |
| Intel MKL | intel, mkl | intel, mkl | intel-oneapi-mkl |
| Intel VTune | intel | intel | intel-oneapi-vtune |
| Intel TBB | intel | intel | intel-oneapi-tbb |
| Intel MPI | intelmpi | intelmpi | intel-oneapi-mpi |
| NetCDF | netcdf | netcdf-c, netcdf-cxx4, netcdf-fortran | |
| BLAST+ | blast | blast-plus | |
| Java | java | openjdk | |
| Quantum Espresso | espresso | quantum-espresso |
Licensed Software
No licensed software packages are available on Ascend.
Known Issues
We are actively identifying and addressing issues in the new environment. Please report any problems to the support team by contacting OSC Help to ensure a smooth transition. Notable issues include:
| Software | Versions | Issues |
|---|---|---|
Additional known issues can be found on our Known Issues page. To view issues related to the Ascend cluster, select "Ascend" under the "Category".
Batch Limit Rules
Memory limit
It is strongly suggested to consider the memory use to the available per-core memory when users request OSC resources for their jobs.
Summary
| Partition | # of gpus per node | Usable cores per node | default memory per core | max usable memory per node |
|---|---|---|---|---|
| nextgen | 2,3 | 120 | 4,027 MB | 471.91 GB |
| quad | 4 | 88 | 10,724 MB | 921.59 GB |
| batch | 4 | 88 | 10,724 MB | 921.59 GB |
It is recommended to let the default memory apply unless more control over memory is needed.
Note that if an entire node is requested, then the job is automatically granted the entire node's main memory. On the other hand, if a partial node is requested, then memory is granted based on the default memory per core.
See a more detailed explanation below.
Default memory limits
A job can request resources and allow the default memory to apply. If a job requires 300 GB for example:
#SBATCH --ntasks-per-node=1
#SBATCH --cpus-per-task=30
This requests 30 cores, and each core will automatically be allocated 10.4 GB of memory for a quad GPU node (30 core * 10 GB memory = 300 GB memory).
Explicit memory requests
If needed, an explicit memory request can be added:
#SBATCH --ntasks-per-node=1
#SBATCH --cpus-per-task=4
#SBATCH --mem=300G
See Job and storage charging for details.
CPU only jobs
We reserve 1 core per 1 GPU. The CPU-only job can be scheduled but can only request up to 118 cores per dual GPU node and up to 84 cores per quad GPU node. You can also request multiple nodes for one CPU-only job.
GPU Jobs
Jobs may request only parts of GPU node. These jobs may request up to the total cores on the node (88 cores) for quad GPU nodes.
Requests two gpus for one task:
#SBATCH --time=5:00:00
#SBATCH --nodes=1
#SBATCH --ntasks-per-node=1
#SBATCH --cpus-per-task=20
#SBATCH --gpus-per-task=2
Requests two GPUs, one for each task:
#SBATCH --time=5:00:00
#SBATCH --nodes=1
#SBATCH --ntasks-per-node=2
#SBATCH --cpus-per-task=10
#SBATCH --gpus-per-task=1
Of course, jobs can request all the GPUs of a dense GPU node as well. These jobs have access to all cores as well.
Request an entire dense GPU node:
#SBATCH --nodes=1
#SBATCH --ntasks-per-node=1
#SBATCH --cpus-per-task=88
#SBATCH --gpus-per-node=4
Debug
On Ascend, the debug queue has all 3 node types available, providing access to 2, 3, and 4 GPU nodes and 88 or 120 cores. These should be used for short jobs (less than an hour) in order to test code. If you submit a job request via "sinteractive" that is able to scheduled to the debug queue, it will automatically be routed there.
Debug can also be manually requested with the respective flag indicated below. There is currently no way to request a debug partition through an OnDemand job.
Partition time and job size limits
Here is the walltime and node limits per job for different queues/partitions available on Ascend:
| Partition | Max walltime limit | Min job size | Max job size | Note |
|---|---|---|---|---|
| nextgen | 7-00:00:00 (168 hours) | 1 core | 16 nodes |
Can request multiple partial nodes For jobs requesting gpu=1, 2, or 3 per node |
| quad | 7-00:00:00 (168 hours) | 1 core | 4 nodes |
Can request multiple partial nodes For jobs requesting gpu=3 or 4 per node |
| debug-nextgen | 1:00:00 (1 hour) | 1 core | 2 nodes | --partition=debug-nextgen |
| debug-quad | 1:00:00 (1 hour) | 1 core | 2 nodes |
|
If you request -gpus-per-node=1 or -gpus-per-node=2 but need 80GB GPU memory node, please add --partition=quad
Usually, you do not need to specify the partition for a job and the scheduler will assign the right partition based on the requested resources. To specify a partition for a job, either add the flag --partition=<partition-name> to the sbatch command at submission time or add this line to the job script:
#SBATCH --paritition=<partition-name>
Job/Core Limits
| Max # of cores in use | Max # of GPUs in use | Max # of running jobs | Max # of jobs to submit | |
|---|---|---|---|---|
| Per user | 5,632 | 96 | 256 | 1000 |
| Per project | 5,632 | 96 | 512 | n/a |
An individual user can have up to the max concurrently running jobs and/or up to the max processors/cores in use. However, among all the users in a particular group/project, they can have up to the max concurrently running jobs and/or up to the max processors/cores in use.
Citation
For more information about citations of OSC, visit https://www.osc.edu/citation.
To cite Ascend, please use the following information:
Ohio Supercomputer Center. (2022). Ascend Cluster. Ohio Supercomputer Center. https://doi.org/10.82404/6JBT-FA57
BibTeX:
@MISC{Ohio_Supercomputer_Center2022-dl,
  title     = "Ascend Cluster",
  author    = "{Ohio Supercomputer Center}",
  publisher = "Ohio Supercomputer Center",
  year   =  "2022",
  doi       = "10.82404/6JBT-FA57"
}
ris:
TY  - MISC
AU  - Ohio Supercomputer Center
TI  - Ascend Cluster
PY  - 2022
DA  - 2022
PB  - Ohio Supercomputer Center
DO  - 10.82404/6JBT-FA57
UR  - http://dx.doi.org/10.82404/6JBT-FA57
Available software list on Next Gen Ascend
Available Software
- R: R/4.4.0
- afni: afni/2024.10.14
- alphafold: alphafold/2.3.2
- alphafold3: alphafold3/3.0.1
- amber: amber/24
- amd-hpc-benchmarks: amd-hpc-benchmarks/2024-10
- aocc: aocc/4.2.0, aocc/5.0.0
- app_code_server: app_code_server/4.8.3
- app_jupyter: app_jupyter/4.1.5
- bcftools: bcftools/1.17, bcftools/1.21
- bedtools2: bedtools2/2.31.0
- blast-database: blast-database/2024-07
- blast-plus: blast-plus/2.16.0
- blender: blender/4.2
- boost: boost/1.83.0
- bowtie: bowtie/1.3.1
- bowtie2: bowtie2/2.5.1
- bwa: bwa/0.7.17
- cmake: cmake/3.25.2
- connectome-workbench: connectome-workbench/1.3.2, connectome-workbench/2.0.0
- cp2k: cp2k/2023.2
- cuda: cuda/11.8.0, cuda/12.4.1, cuda/12.6.2
- cuda-samples: cuda-samples/11.8, cuda-samples/12.4.1, cuda-samples/12.6
- cudnn: cudnn/8.9.7.29-12
- cufflinks: cufflinks/2.2.1
- curl: curl/8.4.0
- darshan-runtime: darshan-runtime/3.4.6
- darshan-util: darshan-util/3.4.6
- dcm2nii: dcm2nii/11_12_2024
- desmond: desmond/2023.4
- dsi-studio: dsi-studio/2025.Jan
- fastqc: fastqc/0.12.1
- ffmpeg: ffmpeg/4.3.2, ffmpeg/6.1.1
- fftw: fftw/3.3.10
- fmriprep: fmriprep/20.2.0, fmriprep/24.1.1
- freesurfer: freesurfer/6.0.0, freesurfer/7.2.0, freesurfer/7.3.2, freesurfer/7.4.1
- fsl: fsl/6.0.7.13
- gatk: gatk/4.6.0.0
- gaussian: gaussian/g16c02
- gcc: gcc/12.3.0, gcc/13.2.0
- gdal: gdal/3.7.3
- geos: geos/3.12.0
- gromacs: gromacs/2024.4
- gsl: gsl/2.7.1
- gurobi: gurobi/12.0.0
- hdf5: hdf5/1.14.3
- hpctoolkit: hpctoolkit/2023.08.1
- hpcx: hpcx/2.17.1
- htslib: htslib/1.20
- intel: intel/2021.10.0
- intel-oneapi-mkl: intel-oneapi-mkl/2023.2.0, intel-oneapi-mkl/2024.1.0
- intel-oneapi-mpi: intel-oneapi-mpi/2021.10.0, intel-oneapi-mpi/2021.12.1
- intel-oneapi-tbb: intel-oneapi-tbb/2021.10.0
- intel-oneapi-vtune: intel-oneapi-vtune/2024.2.1
- julia: julia/1.10.4
- lammps: lammps/20230802.3
- libjpeg-turbo: libjpeg-turbo/3.0.2
- lightdesktop_base: lightdesktop_base/rhel9
- matlab: matlab/r2024a
- miniconda3: miniconda3/24.1.2-py310
- modules: modules/sp2025
- mricrogl: mricrogl/1.2.20220720
- mriqc: mriqc/0.16.1, mriqc/23.1.0rc0, mriqc/24.1.0
- mvapich: mvapich/3.0
- mvapich-plus: mvapich-plus/4.0
- mvapich2: mvapich2/2.3.7-1
- namd: namd/3.0
- nccl: nccl/2.19.3-1
- ncview: ncview/2.1.10
- netcdf-c: netcdf-c/4.8.1
- netcdf-cxx4: netcdf-cxx4/4.3.1
- netcdf-fortran: netcdf-fortran/4.6.1
- neuropointillist: neuropointillist/0.0.0.9000
- nextflow: nextflow/24.10.4
- node-js: node-js/20.12.0, node-js/22.12.0
- novnc: novnc/1.4.0
- nvhpc: nvhpc/24.11, nvhpc/25.1
- oneapi: oneapi/2023.2.3, oneapi/2024.1.0
- openfoam: openfoam/2312
- openjdk: openjdk/17.0.8.1_1
- openmpi: openmpi/5.0.2
- openmpi-cuda: openmpi-cuda/5.0.2
- orca: orca/5.0.4
- osu-micro-benchmarks: osu-micro-benchmarks/7.3
- parallel-netcdf: parallel-netcdf/1.12.3
- picard: picard/3.0.0
- proj: proj/9.2.1
- project: project/flowbelow, project/ondemand, project/pas1531
- python: python/3.12
- pytorch: pytorch/2.5.0
- qchem: qchem/6.2.1, qchem/6.2.2
- quantum-espresso: quantum-espresso/7.3.1
- reframe: reframe/3.11.2
- relion: relion/5.0.0
- rosetta: rosetta/3.12
- ruby: ruby/3.3.6
- samtools: samtools/1.17, samtools/1.21
- scipion: scipion/3.7.1
- snpeff: snpeff/5.2c
- spack: spack/0.21.1
- spark: spark/3.5.1
- spm: spm/8, spm/12.7771
- sratoolkit: sratoolkit/3.0.2
- star: star/2.7.10b
- texlive: texlive/2024
- topaz: topaz/anacondaApril25
- turbovnc: turbovnc/3.1.1
- vcftools: vcftools/0.1.16
- virtualgl: virtualgl/3.1.1
- visit: visit/3.3.3, visit/3.4.2
- xalt: xalt/latest
OSU College of Medicine Compute Service
Key information:
- To verify whether your project falls under CoM and can run jobs on Ascend only, run the following command from your terminal (on Cardinal or Ascend; On Pitzer, you’ll need to load Python first:
module load python/3.9-2022.05), replacing project_code with your actual project account:python /users/PZS0645/support/bin/parentCharge.py project_code - When using CoM project, please add
--partition=nextgenin your job scripts or specify ‘nextgen’ as the partition name with OnDemand apps. Failure to do so will result in your job being rejected. - A list of software available on Ascend can be found here: https://www.osc.edu/content/available_software_list_on_next_gen_ascend
- Always specify the module version when loading software. For example, instead of using module load intel, you must use
module load intel/2021.10.0. Failure to specify the version will result in an error message.
Hardware information:
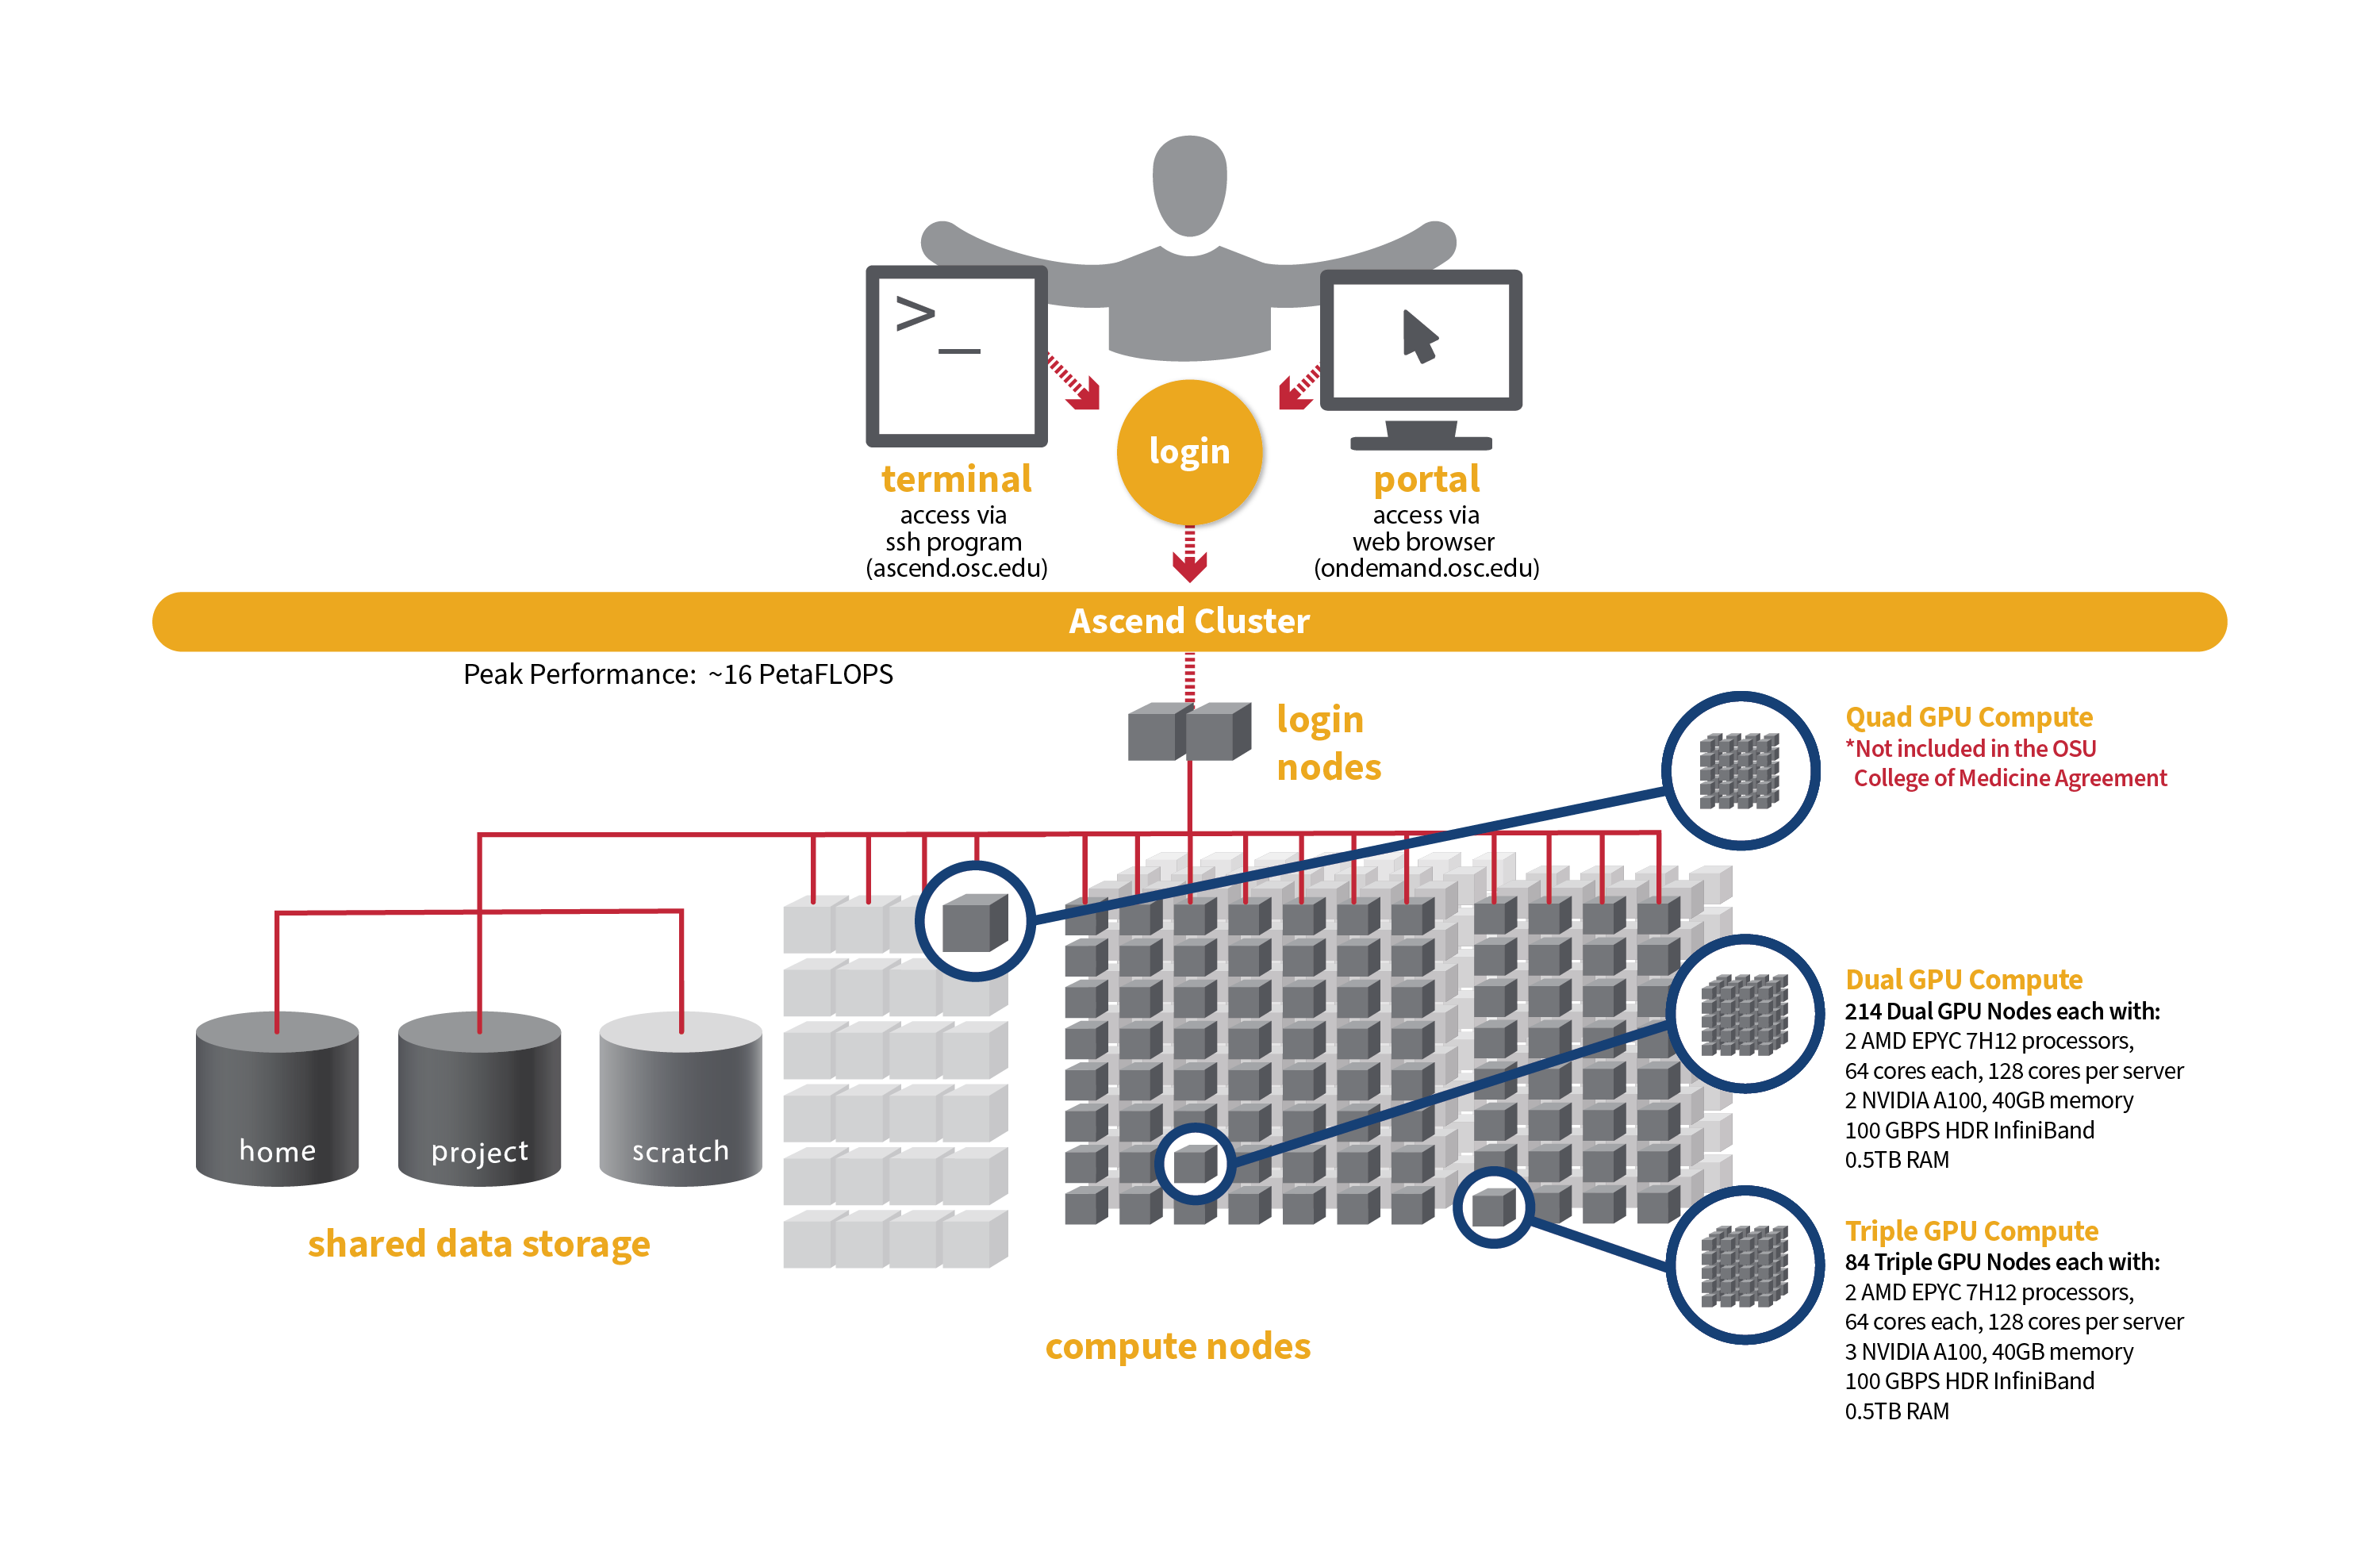
Detailed system specifications for Slurm workload:
- Dual GPU Compute: 190 Dell PowerEdge R7545 two-socket/dual GPU servers, each with:
- 2 AMD EPYC 7H12 processors (2.60 GHz, each with 60 usable cores)
- 2 NVIDIA A100 GPUs with 40GB memory each, PCIe, 250W
- 472GB usable Memory
- 1.92TB NVMe internal storage
- HDR100 Infiniband (100 Gbps)
- Triple GPU Compute: 84 Dell PowerEdge R7545 two-socket/dual GPU servers, each with:
- 2 AMD EPYC 7H12 processors (2.60 GHz, each with 60 usable cores)
- 3 NVIDIA A100 GPUs with 40GB memory each, PCIe, 250W (3rd GPU on each node is under testing and not available for user jobs)
- 472GB usable Memory
- 1.92TB NVMe internal storage
- HDR100 Infiniband (100 Gbps)
Please check this Ascend page for more information on its hardware, programming and software environment, etc.
Governance
The CoM compute service is available to approved CoM users. A regular billing summary for all CoM PIs will be submitted to the OSU CoM Research Computing and Infrastructure Subcommittee (RISST) for review. PIs who are not eligible may be transitioned to a different agreement with OSC.
The committee will also review and consider requests for new project approvals or increases in storage quotas for existing projects.
Storage for CoM projects is billed to CoM at $3.20 per TB/month, with CoM covering up to 10TB. Any additional storage costs may be passed on to the PI.
Set up FY27 budgets
FY27 is the period of July 1, 2026 through June 30, 2027. As a reminder, the project budgets can only be managed by the project PI or a project administrator designated by the PI.
Do the following to create your budget for each project you want to use in FY27:
- Log into MyOSC
- Open the project details
- Select "Create a new budget"
- Select "Add or replace the FUTURE budget" to set the FY27 budget. Use 'unlimited' as the Budget type by choosing 'No' to the question: Do you want to set a dollar budget?
- Confirm your budget dates on the budget review page before submitting
- You will receive an email that your application has been submitted
It may be helpful to review a video explaining how to create and manage budgets.
Creating a new CoM project
Any user with the Primary Investigator (PI) role can request a new project in the client portal. Using the navigation bar, select Project, Create a new project. Fill in the required information.
If you are creating a new academic project
Choose ‘academic’ type as project type. Choose an existing charge account of yours in the College of Medicine, or if you do not have one, create a new charge account and select the department the work will be under. If you cannot find your department, please reach out to us for assistance. Use 'unlimited' as the Budget type by choosing 'No' to the question: Do you want to set a dollar budget?
For more instructions. see Video Tutorial and Projects, budgets and charge accounts page.
If you are creating a new classroom project
Choose ‘classroom’ type as project type. Under the top charge account of CoM: 34754, choose an existing charge account of yours, or if you do not have one, create a new charge account. You will request a $500 budget.
For more instructions. see Video Tutorial and Classroom Project Resource Guide.
Connecting
To access compute resources, you need to log in to Ascend at OSC by connecting to the following hostname:
ascend.osc.edu
You can either use an ssh client application or execute ssh on the command line in a terminal window as follows:
ssh <username>@ascend.osc.edu
From there, you can run programs interactively (only for small and test jobs) or through batch requests.
Running Jobs
OSC clusters are utilizing Slurm for job scheduling and resource management. Slurm , which stands for Simple Linux Utility for Resource Management, is a widely used open-source HPC resource management and scheduling system that originated at Lawrence Livermore National Laboratory. Please refer to this page for instructions on how to prepare and submit Slurm job scripts.
Remember to specify your project codes in the Slurm batch jobs, such that:
#SBATCH --account=PCON0000
where PCON0000 specifies your individual project code.
File Systems
CoM dedicated compute uses the same OSC mass storage environment as our other clusters. Large amounts of project storage is available on our Project storage service. Full details of the storage environment are available in our storage environment guide.
Training and Education Resources
The following are resource guides and select training materials available to OSC users:
- Users new to OSC are encouraged to refer to our New User Resource Guide page and an Introduction to OSC training video.
- A guide to the OSC Client Portal: MyOSC. MySC portal is primarily used for managing users on a project code, such as adding and/or removing users.
- Documentation on using OnDemand web portal can be found here.
- Training materials and tutorial on Unix Basics are here.
- Documentation on the use of the XDMoD tool for viewing job performance can be found here.
- The HOWTO pages, highlighting common activities users perform on our systems, are here.
- A guide on batch processing at OSC is here.
- For specific information about modules and file storage, please see the Batch Execution Environment page.
- Information on Pitzer programming environment can be found here.
Getting Support
Contact OSC Help if you have any other questions, or need other assistance.
SSH key fingerprints
- These are the public key fingerprints for Ascend:
ascend: ssh_host_rsa_key.pub = 2f:ad:ee:99:5a:f4:7f:0d:58:8f:d1:70:9d:e4:f4:16
ascend: ssh_host_ed25519_key.pub = 6b:0e:f1:fb:10:da:8c:0b:36:12:04:57:2b:2c:2b:4d
ascend: ssh_host_ecdsa_key.pub = f4:6f:b5:d2:fa:96:02:73:9a:40:5e:cf:ad:6d:19:e5
These are the SHA256 hashes:
ascend: ssh_host_rsa_key.pub = SHA256:4l25PJOI9sDUaz9NjUJ9z/GIiw0QV/h86DOoudzk4oQ
ascend: ssh_host_ed25519_key.pub = SHA256:pvz/XrtS+PPv4nsn6G10Nfc7yM7CtWoTnkgQwz+WmNY
ascend: ssh_host_ecdsa_key.pub = SHA256:giMUelxDSD8BTWwyECO10SCohi3ahLPBtkL2qJ3l080
Technical Specifications
The following are technical specifications for Quad GPU nodes.
- Number of Nodes
-
24 nodes
- Number of CPU Sockets
-
48 (2 sockets/node)
- Number of CPU Cores
-
2,304 (96 cores/node)
- Cores Per Node
-
96 cores/node (88 usable cores/node)
- Internal Storage
-
12.8 TB NVMe internal storage
- Compute CPU Specifications
-
AMD EPYC 7643 (Milan) processors for compute
- 2.3 GHz
- 48 cores per processor
- Computer Server Specifications
-
24 Dell XE8545 servers
- Accelerator Specifications
-
4 NVIDIA A100 GPUs with 80GB memory each, supercharged by NVIDIA NVLink
- Number of Accelerator Nodes
-
24 total
- Total Memory
- ~ 24 TB
- Physical Memory Per Node
-
1 TB
- Physical Memory Per Core
-
10.6 GB
- Interconnect
-
Mellanox/NVIDA 200 Gbps HDR InfiniBand
-
The following are technical specifications for Triple GPU nodes.
- Number of Nodes
-
84 nodes
- Number of CPU Sockets
-
168 (2 sockets/node)
- Number of CPU Cores
-
10,752 (128 cores/node)
- Cores Per Node
-
128 cores/node (120 usable cores/node)
- Internal Storage
-
1.92 TB NVMe internal storage
- Compute CPU Specifications
-
2 AMD EPYC 7H12 processors for compute
- 2.60 GHz
- 64 cores per processor
- Computer Server Specifications
-
84 Dell R7525 servers
- Accelerator Specifications
- 3 NVIDIA A100 GPUs with 40GB memory each, PCIe, 250W
- Number of Accelerator Nodes
-
168 total
- Total Memory
- ~ 42 TB
- Physical Memory Per Node
-
0.5 TB
- Physical Memory Per Core
-
4 GB
- Interconnect
-
HDR100 Infiniband (100 Gbps)
-
The following are technical specifications for Dual GPU nodes.
- Number of Nodes
-
214 nodes ( 190 nodes available to Slurm and 24 reserved for Kubernetes)
- Number of CPU Sockets
-
380 (2 sockets/node)
- Number of CPU Cores
-
24,320 (128 cores/node)
- Cores Per Node
-
128 cores/node (120 usable cores/node)
- Internal Storage
-
1.92 TB NVMe internal storage
- Compute CPU Specifications
-
2 AMD EPYC 7H12 processors for compute
- 2.60 GHz
- 64 cores per processor
- Computer Server Specifications
-
190 Dell R7525 servers
- Accelerator Specifications
- 2 NVIDIA A100 GPUs with 40GB memory each, PCIe, 250W
- Number of Accelerator Nodes
-
380 total
- Total Memory
- ~ 95 TB
- Physical Memory Per Node
-
0.5 TB
- Physical Memory Per Core
-
4 GB
- Interconnect
-
HDR100 Infiniband (100 Gbps)
Cardinal
Detailed system specifications:
-
378 Dell Nodes, 39,312 total cores, 128 GPUs
-
Dense Compute: 326 Dell PowerEdge C6620 two-socket servers, each with:
-
2 Intel Xeon CPU Max 9470 (Sapphire Rapids, 52 cores [48 usable], 2.0 GHz) processors
-
128 GB HBM2e and 512 GB DDR5 memory
-
1.6 TB NVMe local storage
-
NDR200 Infiniband
-
-
GPU Compute: 32 Dell PowerEdge XE9640 two-socket servers, each with:
-
2 Intel Xeon Platinum 8470 (Sapphire Rapids, 52 cores [48 usable], 2.0 GHz) processors
-
1 TB DDR5 memory
-
4 NVIDIA H100 (Hopper) GPUs each with 94 GB HBM2e memory and NVIDIA NVLink
-
12.8 TB NVMe local storage
-
Four NDR400 Infiniband HCAs supporting GPUDirect
-
-
Analytics: 16 Dell PowerEdge R660 two-socket servers, each with:
-
2 Intel Xeon CPU Max 9470 (Sapphire Rapids, 52 cores [48 usable], 2.0 GHz) processors
-
128 GB HBM2e and 2 TB DDR5 memory
-
12.8 TB NVMe local storage
-
NDR200 Infiniband
-
-
Login nodes: 4 Dell PowerEdge R660 two-socket servers, each with:
-
2 Intel Xeon CPU Max 9470 (Sapphire Rapids, 52 cores [48 usable], 2.0 GHz) processors
-
128 GB HBM and 1 TB DDR5 memory
-
3.2 TB NVMe local storage
-
NDR200 Infiniband
-
IP address: 192.148.247.[182-185]
-
-
~10.5 PF Theoretical system peak performance
-
~8 PetaFLOPs (GPU)
-
~2.5 PetaFLOPS (CPU)
-
-
9 Physical racks, plus Two Coolant Distribution Units (CDUs) providing direct-to-the-chip liquid cooling for all nodes
How to Connect
-
SSH Method
To login to Cardinal cluster at OSC, ssh to the following hostname:
cardinal.osc.edu
You can either use an ssh client application or execute ssh on the command line in a terminal window as follows:
ssh <username>@cardinal.osc.edu
You may see a warning message including SSH key fingerprint. Verify that the fingerprint in the message matches one of the SSH key fingerprints listed here, then type yes.
From there, you are connected to the Cardinal login node and have access to the compilers and other software development tools. You can run programs interactively or through batch requests. We use control groups on login nodes to keep the login nodes stable. Please use batch jobs for any compute-intensive or memory-intensive work. See the following sections for details.
-
OnDemand Method
You can also login to Cardinal with our OnDemand tool. The first step is to log into ondemand.osc.edu. Once logged in you can access Cardinal by clicking on "Clusters", and then selecting ">_Cardinal Shell Access".
Instructions on how to use OnDemand can be found at the OnDemand documentation page.
File Systems
Cardinal accesses the same OSC mass storage environment as our other clusters. Therefore, users have the same home directory as on the old clusters. Full details of the storage environment are available in our storage environment guide.
Software Environment
The Cardinal cluster runs on Red Hat Enterprise Linux (RHEL) 9, which provides access to modern tools and libraries but may also require adjustments to your workflows. Please refer to the Cardinal Software Environment page for key software changes and available software.
Cardinal uses the same module system as the other clusters. You can keep up to on the software packages that have been made available on Cardinal by viewing the Software by System page and selecting the Cardinal system.
Programming Environment
The Cardinal cluster supports programming in C, C++, and Fortran. The available compiler suites include Intel, oneAPI, and GCC. Additionally, users have access to high-bandwidth memory (HBM), which is expected to enhance the performance of memory-bound applications. Please refer to the Cardinal Programming Environment page for details on compiler commands, parallel and GPU computing, and instructions on how to effectively utilize HBM.
Batch Specifics
The Cardinal cluster supports Slurm with the PBS compatibility layer being disabled. Refer to the documentation for our batch environment to understand how to use the batch system on OSC hardware. Refer to the Slurm migration page to understand how to use Slurm and the batch limit page about scheduling policy during the Program.
Technical Specifications
The following are technical specifications for Cardinal.
- Number of Nodes
-
378 nodes
- Number of CPU Sockets
-
756 (2 sockets/node for all nodes)
- Number of CPU Cores
-
39,312
- Cores Per Node
-
104 cores/node for all nodes (96 usable)
- Local Disk Space Per Node
-
- 1.6 TB for compute nodes
- 12.8 TB for GPU and Large mem nodes
- 3.2 TB for login nodes
- Compute, Large Mem & Login Node CPU Specifications
- Intel Xeon CPU Max 9470 HBM2e (Sapphire Rapids)
- 2.0 GHz
- 52 cores per processor (48 usable)
- GPU Node CPU Specifications
- Intel Xeon Platinum 8470 (Sapphire Rapids)
- 2.0 GHz
- 52 cores per processor
- Server Specifications
-
- 326 Dell PowerEdge C6620
- 32 Dell PowerEdge XE9640 (GPU nodes)
- 20 Dell PowerEdge R660 (largemem & login nodes)
- Accelerator Specifications
-
NVIDIA H100 (Hopper) GPUs each with 96 GB HBM2e memory and NVIDIA NVLINK
- Number of Accelerator Nodes
-
32 quad GPU nodes (4 GPUs per node)
- Total Memory
-
~281 TB (44 TB HBM, 237 TB DDR5)
- Memory Per Node
-
- 128 GB HBM / 512 GB DDR5 (compute nodes)
- 1 TB (GPU nodes)
- 128 GB HBM / 2 TB DDR5 (large mem nodes)
- 128 GB HBM / 1 TB DDR5 (login nodes)
- Memory Per Core
-
- 1.2 GB HBM / 4.9 GB DDR5 (compute nodes)
- 9.8 GB (GPU nodes)
- 1.2 GB HBM / 19.7 GB DDR5 (large mem nodes)
- 1.2 GB HBM / 9.8 GB DDR5 (login nodes)
- Interconnect
-
- NDR200 Infiniband (200 Gbps) (compute, large mem, login nodes)
- 4x NDR400 Infiniband (400 Gbps x 4) with GPUDirect, allowing non-blocking communication between up to 10 nodes (GPU nodes)
Cardinal Programming Environment
Compilers
The Cardinal cluster supports C, C++, and Fortran programming languages. The available compiler suites include Intel, oneAPI, and GCC. By default, the Intel development toolchain is loaded. The table below lists the compiler commands and recommended options for compiling serial programs. For more details and best practices, please refer to our compilation guide.
The Sapphire Rapids processors that make up Cardinal support the Advanced Vector Extensions (AVX512) instruction set, but you must set the correct compiler flags to take advantage of it. AVX512 has the potential to speed up your code by a factor of 8 or more, depending on the compiler and options you would otherwise use. However, bear in mind that clock speeds decrease as the level of the instruction set increases. So, if your code does not benefit from vectorization it may be beneficial to use a lower instruction set.
In our experience, the Intel compiler usually does the best job of optimizing numerical codes and we recommend that you give it a try if you’ve been using another compiler.
With the Intel or oneAPI compilers, use -xHost and -O2 or higher. With the GNU compilers, use -march=native and -O3.
This advice assumes that you are building and running your code on Cardinal. The executables will not be portable. Of course, any highly optimized builds, such as those employing the options above, should be thoroughly validated for correctness.
| LANGUAGE | INTEL | GNU | ONEAPI |
|---|---|---|---|
| C | icc -O2 -xHost hello.c |
gcc -O3 -march=native hello.c |
icx -O2 -xHost hello.c |
| Fortran | ifort -O2 -xHost hello.F |
gfortran -O3 -march=native hello.F |
ifx -O2 -xHost hello.F |
| C++ | icpc -O2 -xHost hello.cpp |
g++ -O3 -march=native hello.cpp |
icpx -O2 -xHost hello.cpp |
Parallel Programming
MPI
By default, OSC systems use the MVAPICH implementation of the Message Passing Interface (MPI), which is optimized for high-speed InfiniBand interconnects. MPI is a standardized library designed for parallel processing in distributed-memory environments. OSC also supports OpenMPI and Intel MPI. For more information on building MPI applications, please visit the MPI software page.
MPI programs are started with the srun command. For example,
#!/bin/bash
#SBATCH --nodes=2
#SBATCH --ntasks-per-node=8

srun [ options ] mpi_prog
The above job script will allocate 2 CPU nodes with 8 CPU cores each. The srun command will typically spawn one MPI process per task requested in a Slurm batch job. Use the --ntasks-per-node=n option to change that behavior. For example,
#!/bin/bash
#SBATCH --nodes=2
#SBATCH --ntasks-per-node=8

# Run 8 processes per node
srun ./mpi_prog

# Run 4 processes per node
srun --ntasks=8 --ntasks-per-node=4 ./mpi_prog
mpiexec or mpirun is still supported with Intel MPI and OpenMPI, but it may not be fully compatible with our Slurm environment. We recommend using srun in all cases.OpenMP
The Intel, oneAPI and GNU compilers understand the OpenMP set of directives, which support multithreaded programming. For more information on building OpenMP codes on OSC systems, please visit the OpenMP documentation.
An OpenMP program by default will use a number of threads equal to the number of CPUs requested in a Slurm batch job. To use a different number of threads, set the environment variable OMP_NUM_THREADS. For example,
#!/bin/bash
#SBATCH --nodes=1
#SBATCH --ntasks-per-node=8

# Run 8 threads
./omp_prog

# Run 4 threads
export OMP_NUM_THREADS=4
./omp_prog
To run a OpenMP job on an exclusive node:
#!/bin/bash
#SBATCH --nodes=1
#SBATCH --exclusive

./omp_prog
Hybrid (MPI + OpenMP)
An example of running a job for hybrid code:
#!/bin/bash
#SBATCH --nodes=2
#SBATCH --exclusive

# Each Cardinal node is equipped with 96 CPU cores
# Run 8 MPI processes on each node and 12 OpenMP threads spawned from a MPI process
export OMP_NUM_THREADS=12
srun --ntasks=16 --ntasks-per-node=8 --cpus-per-task=12 ./hybrid_prog
Tuning Parallel Program Performance: Process/Thread Placement
To get the maximum performance, it is important to make sure that processes/threads are located as close as possible to their data, and as close as possible to each other if they need to work on the same piece of data, with given the arrangement of node, sockets, and cores, with different access to RAM and caches.
While cache and memory contention between threads/processes are an issue, it is best to use scatter distribution for code.
Processes and threads are placed differently depending on the computing resources you requste and the compiler and MPI implementation used to compile your code. For the former, see the above examples to learn how to run a job on exclusive nodes. For the latter, this section summarizes the default behavior and how to modify placement.
OpenMP only
For all three compilers (Intel, GCC and oneAPI), purely threaded codes do not bind to particular CPU cores by default. In other words, it is possible that multiple threads are bound to the same CPU core.
The following table describes how to modify the default placements for pure threaded code:
| DISTRIBUTION | Compact | Scatter/Cyclic |
|---|---|---|
| DESCRIPTION | Place threads as closely as possible on sockets | Distribute threads as evenly as possible across sockets |
| INTEL/ONEAPI | KMP_AFFINITY=compact | KMP_AFFINITY=scatter |
| GNU | OMP_PLACES=sockets[1] | OMP_PROC_BIND=true OMP_PLACES=cores |
- Threads in the same socket might be bound to the same CPU core.
MPI Only
For MPI-only codes, MVAPICH first binds as many processes as possible on one socket, then allocates the remaining processes on the second socket so that consecutive tasks are near each other. Intel MPI and OpenMPI alternately bind processes on socket 1, socket 2, socket 1, socket 2 etc, as cyclic distribution.
For process distribution across nodes, all MPIs first bind as many processes as possible on one node, then allocates the remaining processes on the second node.
The following table describe how to modify the default placements on a single node for MPI-only code with the command srun:
| DISTRIBUTION (single node) |
Compact | Scatter/Cyclic |
|---|---|---|
| DESCRIPTION | Place processs as closely as possible on sockets | Distribute process as evenly as possible across sockets |
| MVAPICH[1] | Default | MVP_CPU_BINDING_POLICY=scatter |
| INTEL MPI | SLURM_DISTRIBUTION=block:block srun -B "2:*:1" ./mpi_prog |
SLURM_DISTRIBUTION=block:cyclic srun -B "2:*:1" ./mpi_prog |
| OPENMPI | SLURM_DISTRIBUTION=block:block srun -B "2:*:1" ./mpi_prog |
SLURM_DISTRIBUTION=block:cyclic srun -B "2:*:1" ./mpi_prog |
MVP_CPU_BINDING_POLICYwill not work ifMVP_ENABLE_AFFINITY=0is set.- To distribute processes evenly across nodes, please set
SLURM_DISTRIBUTION=cyclic.
Hybrid (MPI + OpenMP)
For hybrid codes, each MPI process is allocated a number of cores defined by OMP_NUM_THREADS, and the threads of each process are bound to those cores. All MPI processes, along with the threads bound to them, behave similarly to what was described in the previous sections.
The following table describe how to modify the default placements on a single node for Hybrid code with the command srun:
| DISTRIBUTION (single node) |
Compact | Scatter/Cyclic |
|---|---|---|
| DESCRIPTION | Place processs as closely as possible on sockets | Distribute process as evenly as possible across sockets |
| MVAPICH[1] | Default | MVP_HYBRID_BINDING_POLICY=scatter |
| INTEL MPI[2] | SLURM_DISTRIBUTION=block:block | SLURM_DISTRIBUTION=block:cyclic |
| OPENMPI[2] | SLURM_DISTRIBUTION=block:block | SLURM_DISTRIBUTION=block:cyclic |
Summary
The above tables list the most commonly used settings for process/thread placement. Some compilers and Intel libraries may have additional options for process and thread placement beyond those mentioned on this page. For more information on a specific compiler/library, check the more detailed documentation for that library.
Using HBM
326 dense compute nodes are available with 512 GB of DDR memory and 128 GB of High Bandwidth memory (HBM). Memory-bound application in particular are expected to benefit from the use of HBM but other codes may also show some benefits by using HBM.
All nodes in the cpu partition have the HBM configured in flat mode, meaning that HBM is visible to your application as addessable memory. By default, your code will use DDR memory only. To enable your application to use HBM memory, first load the numactl/2.0.18 module and then prepend the appropriate numactl command to your run command as shown in the table below.
| Execution Model | DDR | HBM |
|---|---|---|
| Serial | ./a.out | numactl --preferred-many=8-15 ./a.out |
| MPI | srun ./a.out |
srun numactl --preferred-many=8-15 ./a.out |
Please visit our HBM documentation for more information.
GPU Programming
132 NVIDIA H100 GPUs are available on Cardinal. Please visit our GPU documentation.
Reference
Cardinal Software Environment
The Cardinal cluster is now running on Red Hat Enterprise Linux (RHEL) 9, introducing several software-related changes compared to the RHEL 7 environment used on the Pitzer cluster. These updates provide access to modern tools and libraries but may also require adjustments to your workflows. Key software changes and available software are outlined in the following sections.
Updated Compilers and Toolchains
The system GCC (GNU Compiler Collection) is now at version 11. Additionally, newer versions of GCC and other compiler suites, including the Intel Compiler Classic and Intel oneAPI, are available and can be accessed through the modules system. These new compiler versions may impact code compilation, optimization, and performance. We encourage users to test and validate their applications in this new environment to ensure compatibility and performance.
Python Upgrades
The system Python has been upgraded to version 3.9, and the system Python 2 is no longer available on Cardinal. Additionaly, newer versions of Python 3 are available through the modules system. This change may impact scripts and packages that rely on older versions of Python. We recommend users review and update their code to ensure compatibility or create custom environments as needed.
Available Software
To view the software currently installed on the Cardinal cluster, visit Browse Software and select "Cardinal" under the "System". If the software required for your research is not available, please contact OSC Help to reqeust the software.
Key change
A key change is that you are now required to specify the module version when loading any modules. For example, instead of using module load intel, you must use module load intel/2021.10.0. Failure to specify the version will result in an error message.
Below is an example message when loading gcc without specifying the version:
$ module load gcc
Lmod has detected the following error:  These module(s) or extension(s) exist but cannot be loaded as
requested: "gcc"

   You encountered this error for one of the following reasons:
   1. Missing version specification: You must specify an available version.
   2. Missing required modules: Ensure you have loaded the appropriate compiler and MPI modules.

   Try: "module spider gcc" to view available versions or required modules.

   If you need further assistance, please contact oschelp@osc.edu with the subject line "lmod error: gcc"
Revised Software Modules
Some modules have been updated, renamed, or removed to align with the standards of the package managent system. For more details, please refer to the software page of the specific software you are interested in. Notable changes include:
| Package | Pitzer | Cardinal |
|---|---|---|
| Default MPI | mvapich2/2.3.3 | mvapich/3.0 |
| GCC | gnu | gcc |
| Intel MKL | intel, mkl | intel-oneapi-mkl |
| Intel VTune | intel | intel-oneapi-vtune |
| Intel TBB | intel | intel-oneapi-tbb |
| Intel MPI | intelmpi | intel-oneapi-mpi |
| NetCDF | netcdf | netcdf-c, netcdf-cxx4, netcdf-fortran |
| BLAST+ | blast | blast-plus |
| Java | java | openjdk |
| Quantum Espresso | espresso | quantum-espresso |
Licensed Software
All licensed software packages have been installed on Cardinal including: Abaqus, ANSYS, COMSOL, Schrödinger, STAR-CCM+, Stata, and LS-DYNA.
Known Issues
We are actively identifying and addressing issues in the new environment. Please report any problems to the support team by contacting OSC Help to ensure a smooth transition. Notable issues include:
| Software | Versions | Issues |
|---|---|---|
| STAR-CCM+ | All | |
| OpenMPI | All | |
| GCC | 13.2.0 | |
| MVAPICH | 3.0 |
Additional known issues can be found on our Known Issues page. To view issues related to the Cardinal cluster, select "Cardinal" under the "Category".
Citation
For more information about citations of OSC, visit https://www.osc.edu/citation.
To cite Cardinal, please use the following information:
Ohio Supercomputer Center. (2024). Cardinal Cluster. Ohio Supercomputer Center. https://doi.org/10.82404/AGSZ-1952
BibTeX:
@MISC{Ohio_Supercomputer_Center2024-dl,
  title     = "Cardinal Cluster",
  author    = "{Ohio Supercomputer Center}",
  publisher = "Ohio Supercomputer Center",
  year      =  "2024",
  doi       = "10.82404/agsz-1952"
}
ris:
TY  - MISC
AU  - Ohio Supercomputer Center
TI  - Cardinal Cluster
PY  - 2024
DA  - 2024
PB  - Ohio Supercomputer Center
DO  - 10.82404/agsz-1952
UR  - http://dx.doi.org/10.82404/agsz-1952
Batch Limit Rules
sbatch (instead of qsub) command to submit jobs. Refer to the Slurm migration page to understand how to use Slurm. Memory limit
It is strongly suggested to consider the memory use to the available per-core memory when users request OSC resources for their jobs.
Summary
| Node type | Partition | default memory per core | max usable memory per node (96 usable cores/node) |
|---|---|---|---|
| regular compute | cpu | 4956 MB (4.84 GB) | 475,776 MB (464.6 GB) |
| regular compute | cache | 4956 MB (4.84 GB) | 475,776 MB (464.6 GB) |
| gpu | gpu | 9216 MB (9 GB) | 884,736 MB (864 GB) |
| huge memory | hugemem | 19843 MB (19.37 GB) | 1,904,928MB (1860.28 GB) |
It is recommended to let the default memory apply unless more control over memory is needed.
Note that if an entire node is requested, then the job is automatically granted the entire node's memory. On the other hand, if a partial node is requested, then memory is granted based on the default memory per core.
See a more detailed explanation below.
Regular Dense Compute Node
Default memory limits
A job can request resources and allow the default memory to apply. If a job requires 180 GB for example:
#SBATCH --ntasks-per-node=1
#SBATCH --cpus-per-task=30
This requests 30 cores, and each core will automatically be allocated 4.84 GB of memory (30 core * 4.84 GB memory = 115.2 GB memory).
Explicit memory requests
If needed, an explicit memory request can be added:
#SBATCH --ntasks-per-node=1
#SBATCH --mem=180G
Job charging is determined either by number of cores or amount of memory.
See Job and storage charging for details.
Multi-node job request
On Cardinal, it is allowed to request partical nodes for a multi-node job ( nodes>1 ) . This is an example of a job requesting 2 nodes with 1 core per node:
#SBATCH --ntasks-per-node=1\
#SBATCH --cpus-per-task=1
#SBATCH --nodes=2
Here, job charging is determined by number of cores requested in the job script.
Whole-node request
To request the whole node regardless of the number of nodes, you should either request the max number of usable cores per node (96) or add --exclusive as
#SBATCH --ntasks-per-node=96
or
#SBATCH --exclusive
Here, job is allocated and charged for the whole-node.
Huge Memory Node
To request a partial or whole huge memory node, specify the memory request between 864GB and 1978GB, i.e., 886GB <= mem < 1978GB. You can also user the flag --partition=hugemem. Note: you can only use interger for request
Debug
On Cardinal, the debug queue has available both the CPU-only and GPU nodes. These should be used for short jobs (less than an hour) in order to test code. If you submit a job request via "sinteractive" that is able to scheduled to the debug queue, it will automatically be routed there.
Debug can also be manually requested with the partition flag --partition=debug. There is currently no way to request a debug partition through an OnDemand job.
GPU Jobs
There are 4 GPUs per GPU node on Cardinal. Jobs may request only parts of gpu node.
Requests two gpus for one task:
#SBATCH --time=5:00:00
#SBATCH --nodes=1
#SBATCH --ntasks-per-node=1
#SBATCH --cpus-per-task=20
#SBATCH --gpus-per-task=2
Requests two gpus, one for each task:
#SBATCH --time=5:00:00
#SBATCH --nodes=1
#SBATCH --ntasks-per-node=2
#SBATCH --cpus-per-task=10
#SBATCH --gpus-per-task=1
Of course, jobs can request all the gpus of a dense gpu node as well. Request an entire dense gpu node:
#SBATCH --nodes=1
#SBATCH --ntasks-per-node=1
#SBATCH --cpus-per-task=96
#SBATCH --gpus-per-node=4
See this GPU computing page for more information.
Partition time and job size limits
Here is the walltime and node limits per job for different queues/partitions available on Cardinal:
|
NAME |
MAX TIME LIMIT |
MIN JOB SIZE |
MAX JOB SIZE |
NOTES |
|---|---|---|---|---|
|
cpu |
7-00:00:00 |
1 core |
12 nodes |
This partition can not request gpus. 322 nodes in total. HBM configured in flat mode. See this HBM page for more info. |
|
longcpu |
14-00:00:00 |
1 core |
1 nodes |
This partition can not request gpus. 322 nodes in total Restricted access. |
| cache | 7-00:00:00 | 1 core | 4 nodes |
This partition can not request gpus. 4 nodes in total. HBM configured in cache mode. See this HBM page for more info. Must add the flag |
| gpu |
7-00:00:00 |
1 core |
12 nodes |
The max number of GPUs per job is reached with 6 nodes of all 4 GPUs. |
| debug | 1:00:00 |
1 core (1 gpu) |
2 nodes | For small interactive and test jobs (both CPU and GPU) --partition=debug |
| hugemem | 7-00:00:00 | 1 core | 1 node |
Usually, you do not need to specify the partition for a job and the scheduler will assign the right partition based on the requested resources. To specify a partition for a job, either add the flag --partition=<partition-name> to the sbatch command at submission time or add this line to the job script:
#SBATCH --paritition=<partition-name>
Job/Core Limits
| Max Running Job Limit | Max Core/Processor Limit | Max Node Limit | |||||
|---|---|---|---|---|---|---|---|
| For all types | GPU jobs | Regular debug jobs | GPU debug jobs | For all types | GPU | hugemem | |
| Individual User | 384 | n/a | 4 | 4 | 5184 | 24 | 8 |
| Project/Group | 576 | n/a | n/a | n/a | 5184 | 24 | 8 |
An individual user can have up to the max concurrently running jobs and/or up to the max processors/cores in use. However, among all the users in a particular group/project, they can have up to the max concurrently running jobs and/or up to the max processors/cores in use.
Cardinal SSH key fingerprints
These are the public key fingerprints for Cardinal:
cardinal: ssh_host_rsa_key.pub = 73:f2:07:6c:76:b4:68:49:86:ed:ef:a3:55:90:58:1b
cardinal: ssh_host_ed25519_key.pub = 93:76:68:f0:be:f1:4a:89:30:e2:86:27:1e:64:9c:09
cardinal: ssh_host_ecdsa_key.pub = e0:83:14:8f:d4:c3:c5:6c:c6:b6:0a:f7:df:bc:e9:2e
These are the SHA256 hashes:
cardinal: ssh_host_rsa_key.pub = SHA256:RznzsAFLAqiOIwNCZ/0ZlXqU4/t2nznsRkM1lrcqBPI
cardinal: ssh_host_ed25519_key.pub = SHA256:AQ/cDcms8EPV3bd9x8w2SVrl6sJMDSdITBEbNCQ5w+A
cardinal: ssh_host_ecdsa_key.pub = SHA256:TeiEzjue7Il36e9ftfytCE1OvvaVVRwKB2/+geJyQhA
Migrating jobs from other clusters
Hardware Specification
Below is a summary of the hardware information:
- 326 "dense compute" nodes (96 usable cores, 128 GB HBM2e and 512 GB DDR5 memory)
- 32 GPU nodes (96 usable cores, 1 TB DDR5 memory, 4 NVIDIA H100 GPUs each with 94 GB HBM2e memory and NVIDIA NVLink)
- 16 large memory nodes (96 usable cores, 128 GB HBM2e and 2 TB DDR5 memory)
See the Cardinal page and Technical Specifications page for more information.
File Systems
Cardinal accesses the same OSC mass storage environment as our other clusters. Therefore, users have the same home directory, project space, and scratch space as on the other clusters.
Software Environment
The Cardinal cluster runs on Red Hat Enterprise Linux (RHEL) 9, introducing several software-related changes compared to the RHEL 7 environment used on the Pitzer cluster. These updates provide access to modern tools and libraries but may also require adjustments to your workflows. Please refer to the Cardinal Software Environment page for key software changes and available software.
Cardinal uses the same module system as the other clusters.
Use module load <package> to add a software package to your environment. Use module list to see what modules are currently loaded and module avail to see the modules that are available to load. To search for modules that may not be visible due to dependencies or conflicts, use module spider .
You can keep up to on the software packages that have been made available on Cardinal by viewing the Software by System page and selecting the Cardinal system.
Programming Environment
The Cardinal cluster supports programming in C, C++, and Fortran. The available compiler suites include Intel, oneAPI, and GCC. Additionally, users have access to high-bandwidth memory (HBM), which is expected to enhance the performance of memory-bound applications. Other codes may also benefit from HBM, depending on their workload characteristics.
Please refer to the Cardinal Programming Environment page for details on compiler commands, parallel and GPU computing, and instructions on how to effectively utilize HBM.
Batch Specifics
The PBS compatibility layer is disabled on Cardinal so PBS batch scripts WON'T work on Cardinal, though they will continue to work on the Pitzer cluster. In addition, you need to use sbatch (instead of qsub) command to submit jobs. Refer to the Slurm migration page to understand how to use Slurm and the batch limit page about scheduling policy during the Program.
Some specifics you will need to know to create well-formed batch scripts:
- Follow the Slurm job script page to convert the PBS batch scripts to Slurm scripts if you have not done so
- Refer to the job management page on how to manage and monitor jobs.
- Jobs may request partial nodes, including both serial (
node=1) and multi-node (nodes>1) jobs. -
Most dense compute nodes have the HBM configured in flat mode, but 4 nodes are configured in cache mode. Please refer to the HBM page on detailed discussions about flat and cache modes and the batch limit page on how to request different modes.
Pitzer
OSC's original Pitzer cluster was installed in late 2018 and is a Dell-built, Intel® Xeon® 'Skylake' processor-based supercomputer with 260 nodes.
In September 2020, OSC installed additional 398 Intel® Xeon® 'Cascade Lake' processor-based nodes as part of a Pitzer Expansion cluster.
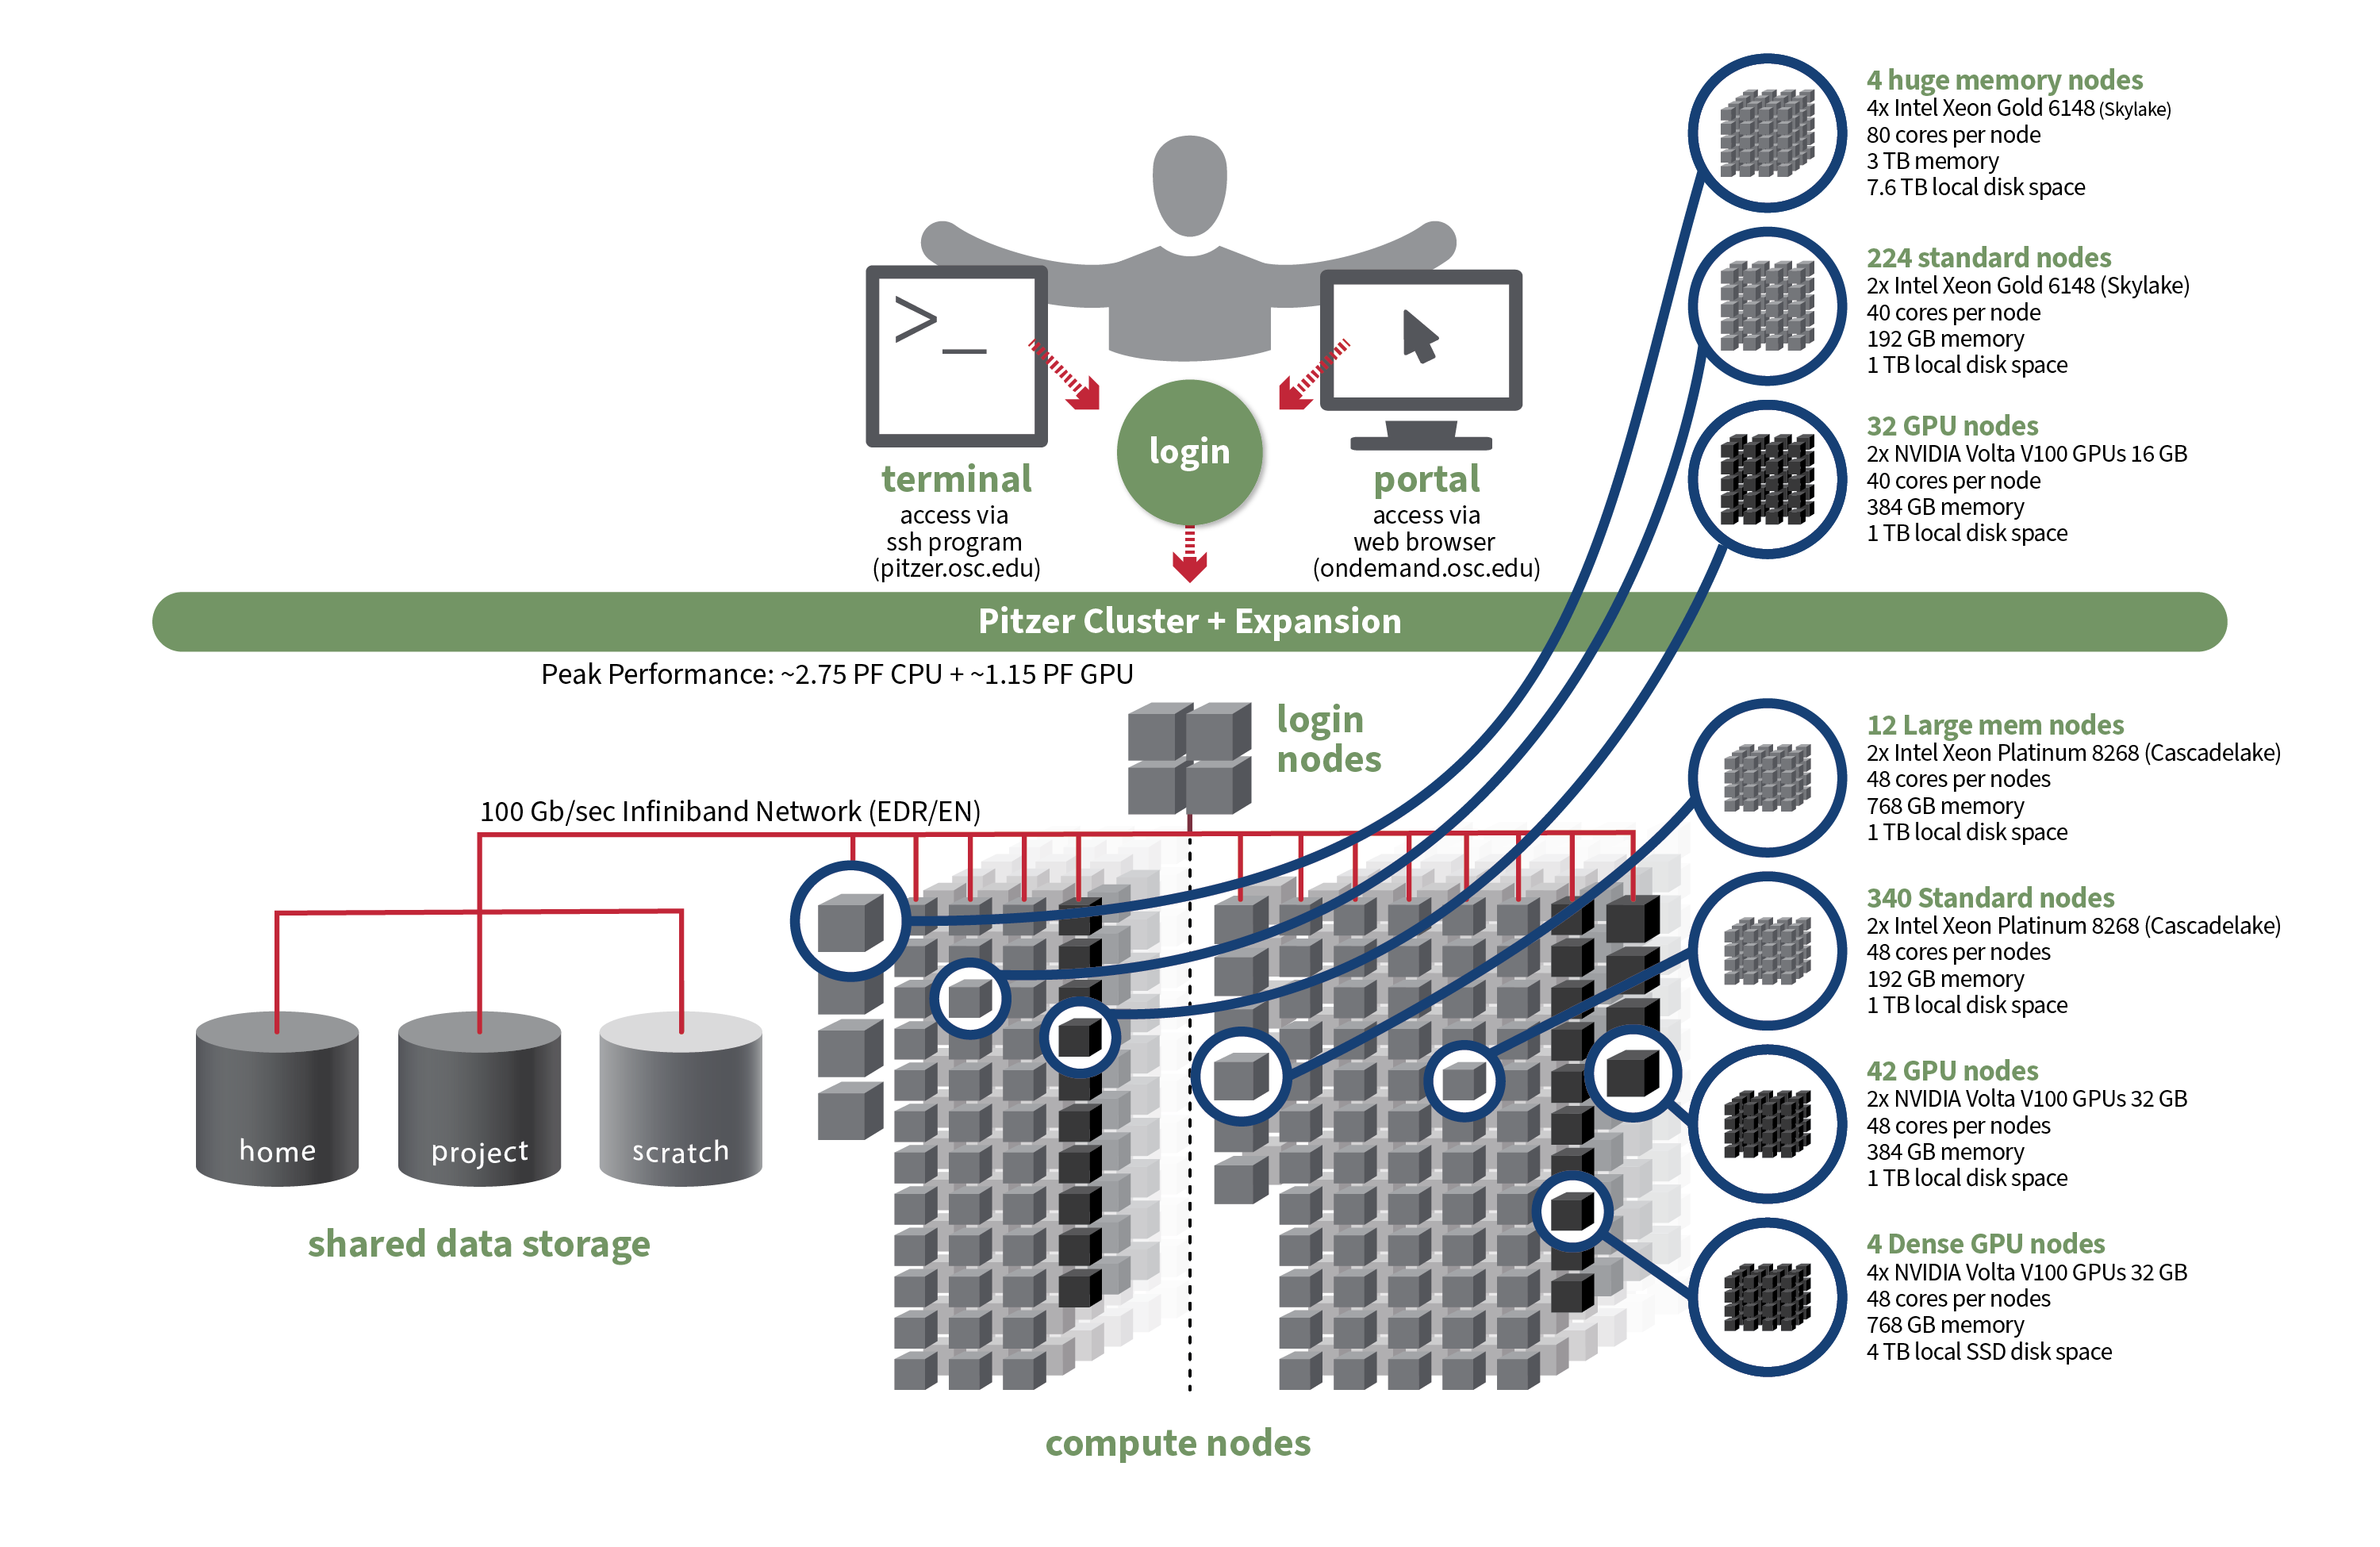
Hardware

Detailed system specifications:
| Deployed in 2018 | Deployed in 2020 | Total | |
|---|---|---|---|
| Total Compute Nodes | 260 Dell nodes | 398 Dell nodes | 658 Dell nodes |
| Total CPU Cores | 10,560 total cores | 19,104 total cores | 29,664 total cores |
| Standard Dense Compute Nodes |
224 nodes
|
340 nodes
|
564 nodes |
| Dual GPU Compute Nodes | 32 nodes
|
42 nodes
|
74 dual GPU nodes |
| Quad GPU Compute Nodes | N/A | 4 nodes
|
4 quad GPU nodes |
| Large Memory Compute Nodes | 4 nodes
|
12 nodes
|
16 nodes |
| Interactive Login Nodes |
4 nodes
|
4 nodes | |
| InfiniBand High-Speed Network | Mellanox EDR (100 Gbps) Infiniband networking | Mellanox EDR (100 Gbps) Infiniband networking | |
| Theoretical Peak Performance |
~850 TFLOPS (CPU only) ~450 TFLOPS (GPU only) ~1300 TFLOPS (total) |
~1900 TFLOPS (CPU only) ~700 TFLOPS (GPU only) ~2600 TFLOPS (total) |
~2750 TFLOPS (CPU only) ~1150 TFLOPS (GPU only) ~3900 TFLOPS (total) |
How to Connect
-
SSH Method
To login to Pitzer at OSC, ssh to the following hostname:
pitzer.osc.edu
You can either use an ssh client application or execute ssh on the command line in a terminal window as follows:
ssh <username>@pitzer.osc.edu
You may see a warning message including SSH key fingerprint. Verify that the fingerprint in the message matches one of the SSH key fingerprints listed here, then type yes.
From there, you are connected to the Pitzer login node and have access to the compilers and other software development tools. You can run programs interactively or through batch requests. We use control groups on login nodes to keep the login nodes stable. Please use batch jobs for any compute-intensive or memory-intensive work. See the following sections for details.
-
OnDemand Method
You can also login to Pitzer at OSC with our OnDemand tool. The first step is to log into OnDemand. Then once logged in you can access Pitzer by clicking on "Clusters", and then selecting ">_Pitzer Shell Access".
Instructions on how to connect to OnDemand can be found at the OnDemand documentation page.
File Systems
Pitzer accesses the same OSC mass storage environment as our other clusters. Therefore, users have the same home directory as on the old clusters. Full details of the storage environment are available in our storage environment guide.
Software Environment
The module system on Pitzer is the same as on the Owens and Ruby systems. Use module load <package> to add a software package to your environment. Use module list to see what modules are currently loaded and module avail to see the modules that are available to load. To search for modules that may not be visible due to dependencies or conflicts, use module spider . By default, you will have the batch scheduling software modules, the Intel compiler, and an appropriate version of mvapich2 loaded.
You can keep up to the software packages that have been made available on Pitzer by viewing the Software by System page and selecting the Pitzer system.
Compiling Code to Use Advanced Vector Extensions (AVX2)
The Skylake processors that make Pitzer support the Advanced Vector Extensions (AVX2) instruction set, but you must set the correct compiler flags to take advantage of it. AVX2 has the potential to speed up your code by a factor of 4 or more, depending on the compiler and options you would otherwise use.
In our experience, the Intel and PGI compilers do a much better job than the gnu compilers at optimizing HPC code.
With the Intel compilers, use -xHost and -O2 or higher. With the gnu compilers, use -march=native and -O3 . The PGI compilers by default use the highest available instruction set, so no additional flags are necessary.
This advice assumes that you are building and running your code on Pitzer. The executables will not be portable. Of course, any highly optimized builds, such as those employing the options above, should be thoroughly validated for correctness.
See the Pitzer Programming Environment page for details.
Batch Specifics
Refer to this Slurm migration page to understand how to use Slurm on the Pitzer cluster. Some specifics you will need to know to create well-formed batch scripts:
- OSC enables PBS compatibility layer provided by Slurm such that PBS batch scripts that used to work in the previous Torque/Moab environment mostly still work in Slurm.
- Pitzer is a heterogeneous system with mixed types of CPUs after the expansion as shown in the above table. Please be cautious when requesting resources on Pitzer and check this page for more detailed discussions
- Jobs on Pitzer may request partial nodes.
Using OSC Resources
For more information about how to use OSC resources, please see our guide on batch processing at OSC and Slurm migration. For specific information about modules and file storage, please see the Batch Execution Environment page.
Technical Specifications
- Login Specifications
-
4 Intel Xeon Gold 6148 (Skylake) CPUs
- 40 cores/node and 384 GB of memory/node
Technical specifications for 2018 Pitzer:
- Number of Nodes
-
260 nodes
- Number of CPU Sockets
-
528 (2 sockets/node for standard node)
- Number of CPU Cores
-
10,560 (40 cores/node for standard node)
- Cores Per Node
-
40 cores/node (80 cores/node for Huge Mem Nodes)
- Local Disk Space Per Node
-
1 TB for standard and GPU nodes
- Compute CPU Specifications
-
Intel Xeon Gold 6148 (Skylake) for compute
- 2.4 GHz
- 20 cores per processor
- Computer Server Specifications
-
- 224 Dell PowerEdge C6420
- 32 Dell PowerEdge R740 (for accelerator nodes)
- 4 Dell PowerEdge R940
- Accelerator Specifications
-
NVIDIA V100 "Volta" GPUs 16GB memory
- Number of Accelerator Nodes
-
32 total (2 GPUs per node)
- Total Memory
-
~67 TB
- Memory Per Node
-
- 192 GB for standard nodes
- 384 GB for accelerator nodes
- 3 TB for Huge Mem Nodes
- Memory Per Core
-
- 4.8 GB for standard nodes
- 9.6 GB for accelerator nodes
- 76.8 GB for Huge Mem
- Interconnect
-
Mellanox EDR Infiniband Networking (100Gbps)
-
- Special Nodes
-
4 Huge Memory Nodes
- Dell PowerEdge R940
- 4 Intel Xeon Gold 6148 (Skylake)
- 20 Cores
- 2.4 GHz
- 80 cores (20 cores/CPU)
- 3 TB Memory
- 2x Mirror 1 TB Drive (1 TB usable)
- 7.6 TB SSD disk space
Technical specifications for 2020 Pitzer:
- Number of Nodes
-
398 nodes
- Number of CPU Sockets
-
796 (2 sockets/node for all nodes)
- Number of CPU Cores
-
19,104 (48 cores/node for all nodes)
- Cores Per Node
-
48 cores/node for all nodes
- Local Disk Space Per Node
-
- 1 TB for most nodes
- 4 TB for quad GPU nodes
- Compute CPU Specifications
-
Intel Xeon 8268s Cascade Lakes for most compute
- 2.9 GHz
- 24 cores per processor
- Computer Server Specifications
-
- 352 Dell PowerEdge C6420
- 42 Dell PowerEdge R740 (for dual GPU nodes)
- 4 Dell Poweredge c4140 (for quad GPU nodes)
- Accelerator Specifications
-
- NVIDIA V100 "Volta" GPUs 32GB memory for dual GPU
- NVIDIA V100 "Volta" GPUs 32GB memory and NVLink for quad GPU
- Number of Accelerator Nodes
-
- 42 dual GPU nodes (2 GPUs per node)
- 4 quad GPU nodes (4 GPUs per node)
- Total Memory
-
~95 TB
- Memory Per Node
-
- 192 GB for standard nodes
- 384 GB for dual GPU nodes
- 768 GB for quad and Large Mem Nodes
- Memory Per Core
-
- 4.0 GB for standard nodes
- 8.0 GB for dual GPU nodes
- 16.0 GB for quad and Large Mem Nodes
- Interconnect
-
Mellanox EDR Infiniband Networking (100Gbps)
- Special Nodes
-
4 quad GPU Nodes
- Dual Intel Xeon 8260s Cascade Lakes
- Quad NVIDIA Volta V100s w/32GB GPU memory and NVLink
- 48 cores per node @ 2.4GHz
- 768GB memory
- 4 TB SSD disk space
12 Large Memory Nodes- Dual Intel Xeon 8268 Cascade Lakes
- 48 cores per node @ 2.9GHz
- 768GB memory
- 1 TB HDD disk space
Pitzer Programming Environment
Compilers
The Pitzer cluster (on RHEL 9) supports C, C++, and Fortran programming languages. The available compiler suites include Intel, oneAPI, and GCC. By default, the Intel development toolchain is loaded. The table below lists the compiler commands and recommended options for compiling serial programs. For more details and best practices, please refer to our compilation guide.
The Skylake and Cascade Lake processors that make up Pitzer support the Advanced Vector Extensions (AVX512) instruction set, but you must set the correct compiler flags to take advantage of it. AVX512 has the potential to speed up your code by a factor of 8 or more, depending on the compiler and options you would otherwise use. However, bear in mind that clock speeds decrease as the level of the instruction set increases. So, if your code does not benefit from vectorization it may be beneficial to use a lower instruction set.
In our experience, the Intel compiler usually does the best job of optimizing numerical codes and we recommend that you give it a try if you’ve been using another compiler.
With the Intel or oneAPI compilers, use -xHost and -O2 or higher. With the GNU compilers, use -march=native and -O3.
This advice assumes that you are building and running your code on Pitzer. The executables will not be portable. Of course, any highly optimized builds, such as those employing the options above, should be thoroughly validated for correctness.
| LANGUAGE | INTEL | GNU | ONEAPI |
|---|---|---|---|
| C | icc -O2 -xHost hello.c |
gcc -O3 -march=native hello.c |
icx -O2 -xHost hello.c |
| Fortran | ifort -O2 -xHost hello.F |
gfortran -O3 -march=native hello.F |
ifx -O2 -xHost hello.F |
| C++ | icpc -O2 -xHost hello.cpp |
g++ -O3 -march=native hello.cpp |
icpx -O2 -xHost hello.cpp |
Parallel Programming
MPI
By default, OSC systems use the MVAPICH implementation of the Message Passing Interface (MPI), which is optimized for high-speed InfiniBand interconnects. MPI is a standardized library designed for parallel processing in distributed-memory environments. OSC also supports OpenMPI and Intel MPI. For more information on building MPI applications, please visit the MPI software page.
MPI programs are started with the srun command. For example,
#!/bin/bash
#SBATCH --nodes=2
#SBATCH --ntasks-per-node=8

srun [ options ] mpi_prog
The above job script will allocate 2 CPU nodes with 8 CPU cores each. The srun command will typically spawn one MPI process per task requested in a Slurm batch job. Use the --ntasks-per-node=n option to change that behavior. For example,
#!/bin/bash
#SBATCH --nodes=2
#SBATCH --ntasks-per-node=8

# Run 8 processes per node
srun ./mpi_prog

# Run 4 processes per node
srun --ntasks=8 --ntasks-per-node=4 ./mpi_prog
mpiexec or mpirun is still supported with Intel MPI and OpenMPI, but it may not be fully compatible with our Slurm environment. We recommend using srun in all cases.OpenMP
The Intel, oneAPI and GNU compilers understand the OpenMP set of directives, which support multithreaded programming. For more information on building OpenMP codes on OSC systems, please visit the OpenMP documentation.
An OpenMP program by default will use a number of threads equal to the number of CPUs requested in a Slurm batch job. To use a different number of threads, set the environment variable OMP_NUM_THREADS. For example,
#!/bin/bash
#SBATCH --nodes=1
#SBATCH --ntasks-per-node=8

# Run 8 threads
./omp_prog

# Run 4 threads
export OMP_NUM_THREADS=4
./omp_prog
To run a OpenMP job on an exclusive node:
#!/bin/bash
#SBATCH --nodes=1
#SBATCH --exclusive

./omp_prog
Hybrid (MPI + OpenMP)
An example of running a job for hybrid code:
#!/bin/bash
#SBATCH --nodes=2
#SBATCH --exclusive

# Each Pitzer node is equipped with 40 or 48 CPU cores
# Run 4 MPI processes on each node and 12 OpenMP threads spawned from a MPI process
export OMP_NUM_THREADS=12
srun --ntasks-per-node=4 --cpus-per-task=12 ./hybrid_prog
Tuning Parallel Program Performance: Process/Thread Placement
To get the maximum performance, it is important to make sure that processes/threads are located as close as possible to their data, and as close as possible to each other if they need to work on the same piece of data, with given the arrangement of node, sockets, and cores, with different access to RAM and caches.
While cache and memory contention between threads/processes are an issue, it is best to use scatter distribution for code.
Processes and threads are placed differently depending on the computing resources you requste and the compiler and MPI implementation used to compile your code. For the former, see the above examples to learn how to run a job on exclusive nodes. For the latter, this section summarizes the default behavior and how to modify placement.
OpenMP only
For all three compilers (Intel, GCC and oneAPI), purely threaded codes do not bind to particular CPU cores by default. In other words, it is possible that multiple threads are bound to the same CPU core.
The following table describes how to modify the default placements for pure threaded code:
| DISTRIBUTION | Compact | Scatter/Cyclic |
|---|---|---|
| DESCRIPTION | Place threads as closely as possible on sockets | Distribute threads as evenly as possible across sockets |
| INTEL/ONEAPI | KMP_AFFINITY=compact | KMP_AFFINITY=scatter |
| GNU | OMP_PLACES=sockets[1] | OMP_PROC_BIND=true OMP_PLACES=cores |
- Threads in the same socket might be bound to the same CPU core.
MPI Only
For MPI-only codes, MVAPICH first binds as many processes as possible on one socket, then allocates the remaining processes on the second socket so that consecutive tasks are near each other. Intel MPI and OpenMPI alternately bind processes on socket 1, socket 2, socket 1, socket 2 etc, as cyclic distribution.
For process distribution across nodes, all MPIs first bind as many processes as possible on one node, then allocates the remaining processes on the second node.
The following table describe how to modify the default placements on a single node for MPI-only code with the command srun:
| DISTRIBUTION (single node) |
Compact | Scatter/Cyclic |
|---|---|---|
| DESCRIPTION | Place processs as closely as possible on sockets | Distribute process as evenly as possible across sockets |
| MVAPICH[1] | Default | MVP_CPU_BINDING_POLICY=scatter |
| INTEL MPI | SLURM_DISTRIBUTION=block:block srun -B "2:*:1" ./mpi_prog |
SLURM_DISTRIBUTION=block:cyclic srun -B "2:*:1" ./mpi_prog |
| OPENMPI | SLURM_DISTRIBUTION=block:block srun -B "2:*:1" ./mpi_prog |
SLURM_DISTRIBUTION=block:cyclic srun -B "2:*:1" ./mpi_prog |
MVP_CPU_BINDING_POLICYwill not work ifMVP_ENABLE_AFFINITY=0is set.- To distribute processes evenly across nodes, please set
SLURM_DISTRIBUTION=cyclic.
Hybrid (MPI + OpenMP)
For hybrid codes, each MPI process is allocated a number of cores defined by OMP_NUM_THREADS, and the threads of each process are bound to those cores. All MPI processes, along with the threads bound to them, behave similarly to what was described in the previous sections.
The following table describe how to modify the default placements on a single node for Hybrid code with the command srun:
| DISTRIBUTION (single node) |
Compact | Scatter/Cyclic |
|---|---|---|
| DESCRIPTION | Place processs as closely as possible on sockets | Distribute process as evenly as possible across sockets |
| MVAPICH[1] | Default | MVP_HYBRID_BINDING_POLICY=scatter |
| INTEL MPI[2] | SLURM_DISTRIBUTION=block:block | SLURM_DISTRIBUTION=block:cyclic |
| OPENMPI[2] | SLURM_DISTRIBUTION=block:block | SLURM_DISTRIBUTION=block:cyclic |
Summary
The above tables list the most commonly used settings for process/thread placement. Some compilers and Intel libraries may have additional options for process and thread placement beyond those mentioned on this page. For more information on a specific compiler/library, check the more detailed documentation for that library.
GPU Programming
164 NVIDIA V100 GPUs are available on Pitzer. Please visit our GPU documentation.
Reference
Pitzer Software Environment
The Pitzer RHEL 9 cluster (hereafter referred to as "Pitzer") is now running on Red Hat Enterprise Linux (RHEL) 9, introducing several software-related changes compared to the RHEL 7 environment used on the Pitzer. These updates provide access to modern tools and libraries but may also require adjustments to your workflows. Key software changes and available software are outlined in the following sections.
Updated Compilers and Toolchains
The system GCC (GNU Compiler Collection) is now at version 11. Additionally, newer versions of GCC and other compiler suites, including the Intel Compiler Classic and Intel oneAPI, are available and can be accessed through the modules system. These new compiler versions may impact code compilation, optimization, and performance. We encourage users to test and validate their applications in this new environment to ensure compatibility and performance.
Python Upgrades
The system Python has been upgraded to version 3.9, and the system Python 2 is no longer available on Pitzer. Additionaly, newer versions of Python 3 are available through the modules system. This change may impact scripts and packages that rely on older versions of Python. We recommend users review and update their code to ensure compatibility or create custom environments as needed.
Available Software
Selected software packages have been installed on Pitzer . You can use module spider to view the available packages after logging into Pitzer. Additionally, check this page to see the available packages. Please note that the package list on the webpage is not yet complete.
After the Pitzer cluster goes into full production (tentatively on March 31), you can view the installed software by visiting Browse Software and select "Pitzer" under the "System".
If the software required for your research is not available, please contact OSC Help to reqeust the software.
Key change
A key change is that you are now required to specify the module version when loading any modules. For example, instead of using module load intel, you must use module load intel/2021.10.0. Failure to specify the version will result in an error message.
Below is an example message when loading gcc without specifying the version:
$ module load gcc
Lmod has detected the following error:  These module(s) or extension(s) exist but cannot be loaded as requested: "gcc".

You encountered this error for one of the following reasons:
1. Missing version specification: On Pitzer, you must specify an available version.
2. Missing required modules: Ensure you have loaded the appropriate compiler and MPI modules.

Try: "module spider gcc" to view available versions or required modules.

If you need further assistance, please contact oschelp@osc.edu with the subject line "lmod error: gcc"
Revised Software Modules
Some modules have been updated, renamed, or removed to align with the standards of the package managent system. For more details, please refer to the software page of the specific software you are interested in. Notable changes include:
| Package | Pitzer (RHEL 7) | Pitzer |
|---|---|---|
| Default MPI | mvapich2/2.3.3 | mvapich/3.0 |
| GCC | gnu | gcc |
| Intel MKL | intel, mkl | intel-oneapi-mkl |
| Intel VTune | intel | intel-oneapi-vtune |
| Intel TBB | intel | intel-oneapi-tbb |
| Intel MPI | intelmpi | intel-oneapi-mpi |
| NetCDF | netcdf | netcdf-c, netcdf-cxx4, netcdf-fortran |
| BLAST+ | blast | blast-plus |
| Java | java | openjdk |
| Quantum Espresso | espresso | quantum-espresso |
Licensed Software
All licensed software has been moved to Cardinal. No licensed software is available on Pitzer.
Known Issues
We are actively identifying and addressing issues in the new environment. Please report any problems to the support team by contacting OSC Help to ensure a smooth transition. Notable issues include:
| Software | Versions | Issues |
|---|---|---|
Additional known issues can be found on our Known Issues page. To view issues related to the Pitzer cluster, select "Pitzer" under the "Category".
Using Software on Pitzer RHEL 7
While OSC has upgraded the Pitzer cluster to RHEL 9, you may encounter challenges when migrating jobs from RHEL 7 to the new system. To support your ongoing research, please refer to the guide Using Software on Pitzer RHEL 7 for instructions on how to continue running your workflows in the RHEL 7 environment.
Batch Limit Rules
Memory limit
A small portion of the total physical memory on each node is reserved for distributed processes. The actual physical memory available to user jobs is tabulated below.
Summary
| Node type | default and max memory per core | max memory per node |
|---|---|---|
| Skylake 40 core - regular compute | 4.449 GB | 177.96 GB |
| Cascade Lake 48 core - regular compute | 3.708 GB | 177.98 GB |
| large memory | 15.5 GB | 744 GB |
| huge memory | 37.362 GB | 2988.98 GB |
| Skylake 40 core dual gpu | 9.074 GB | 363 GB |
| Cascade 48 core dual gpu | 7.562 GB | 363 GB |
| quad gpu (48 core) | 15.5 GB |
744 GB |
A job may request more than the max memory per core, but the job will be allocated more cores to satisfy the memory request instead of just more memory.
e.g. The following slurm directives will actually grant this job 3 cores, with 10 GB of memory
(since 2 cores * 4.5 GB = 9 GB doesn't satisfy the memory request).
#SBATCH --ntasks-per-node=2

 #SBATCH --mem=10g
It is recommended to let the default memory apply unless more control over memory is needed.
Note that if an entire node is requested, then the job is automatically granted the entire node's main memory. On the other hand, if a partial node is requested, then memory is granted based on the default memory per core.
See a more detailed explanation below.
Regular Compute Node
- For the regular 'Skylake' processor-based node, it has 40 cores/node. The physical memory equates to 4.8 GB/core or 192 GB/node; while the usable memory equates to 4,556 MB/core or 182,240 MB/node (177.96 GB/node).
- For the regular 'Cascade Lake' processor-based node, it has 48 cores/node. The physical memory equates to 4.0 GB/core or 192 GB/node; while the usable memory equates to 3,797 MB/core or 182,256 MB/node (177.98 GB/node).
Jobs requesting no more than 1 node
If your job requests less than a full node, it may be scheduled on a node with other running jobs. In this case, your job is entitled to a memory allocation proportional to the number of cores requested (4,556 MB/core or 3,797 MB/core depending on which type of node your job lands on). For example, without any memory request ( --mem=XX ):
- A job that requests
--ntasks-per-node=1and lands on a 'Skylake' node will be assigned one core and should use no more than 4556 MB of RAM; a job that requests--ntasks-per-node=1and lands on a 'Cascade Lake' node will be assigned one core and should use no more than 3797 MB of RAM - A job that requests
--ntasks-per-node=3and lands on a 'Skylake' node will be assigned 3 cores and should use no more than 3*4556 MB of RAM; a job that requests--ntasks-per-node=3and lands on a 'Cascade Lake' node will be assigned 3 cores and should use no more than 3*3797 MB of RAM - A job that requests
--ntasks-per-node=40and lands on a 'Skylake' node will be assigned the whole node (40 cores) with 178 GB of RAM; a job that requests--ntasks-per-node=40and lands on a 'Cascade Lake' node will be assigned 40 cores (partial node) and should use no more than 40* 3797 MB of RAM - A job that requests
--exclusiveand lands on a 'Skylake' node will be assigned the whole node (40 cores) with 178 GB of RAM; a job that requests--exclusiveand lands on a 'Cascade Lake' node will be assigned the whole node (48 cores) with 178 GB of RAM - A job that requests
--exclusive --constraint=40corewill land on a 'Skylake' node and will be assigned the whole node (40 cores) with 178 GB of RAM.
For example, with a memory request: - A job that requests
--ntasks-per-node=1 --mem=16000MBand lands on 'Skylake' node will be assigned 4 cores and have access to 16000 MB of RAM, and charged for 4 cores worth of usage; a job that requests--ntasks-per-node=1 --mem=16000MBand lands on 'Cascade Lake' node will be assigned 5 cores and have access to 16000 MB of RAM, and charged for 5 cores worth of usage - A job that requests
--ntasks-per-node=8 --mem=16000MBand lands on 'Skylake' node will be assigned 8 cores but have access to only 16000 MB of RAM , and charged for 8 cores worth of usage; a job that requests--ntasks-per-node=8 --mem=16000MBand lands on 'Cascade Lake' node will be assigned 8 cores but have access to only 16000 MB of RAM , and charged for 8 cores worth of usage
Jobs requesting more than 1 node
A multi-node job ( --nodes > 1 ) will be assigned the entire nodes and charged for the entire nodes regardless of --ntasks-per-node request. For example, a job that requests --nodes=10 --ntasks-per-node=1 and lands on 'Skylake' node will be charged for 10 whole nodes (40 cores/node*10 nodes, which is 400 cores worth of usage); a job that requests --nodes=10 --ntasks-per-node=1 and lands on 'Cascade Lake' node will be charged for 10 whole nodes (48 cores/node*10 nodes, which is 480 cores worth of usage).
Large Memory Node
On Pitzer, it has 48 cores per node. The physical memory equates to 16.0 GB/core or 768 GB/node; while the usable memory equates to 15,872 MB/core or 761,856 MB/node (744 GB/node).
For any job that requests no less than 363 GB/node but less than 744 GB/node, the job will be scheduled on the large memory node.To request no more than a full large memory node, you need to specify the memory request between 363 GB and 744 GB, i.e., 363GB <= mem <744GB. --mem is the total memory per node allocated to the job. You can request a partial large memory node, so consider your request more carefully when you plan to use a large memory node, and specify the memory based on what you will use.
Huge Memory Node
On Pitzer, it has 80 cores per node. The physical memory equates to 37.5 GB/core or 3 TB/node; while the usable memory equates to 38,259 MB/core or 3,060,720 MB/node (2988.98 GB/node).
To request no more than a full huge memory node, you have two options:
- The first is to specify the memory request between 744 GB and 2988 GB, i.e.,
744GB <= mem <=2988GB). - The other option is to use the combination of
--ntasks-per-nodeand--partition, like--ntasks-per-node=4 --partition=hugemem. When no memory is specified for the huge memory node, your job is entitled to a memory allocation proportional to the number of cores requested (38,259 MB/core). Note,--ntasks-per-nodeshould be no less than 20 and no more than 80
Debug
On Pitzer, the debug queue has available the 40 core and 48 core nodes, both with and without GPUs. These should be used for short jobs (less than an hour) in order to test code. If you submit a job request via "sinteractive" that is able to scheduled to the debug queue, it will automatically be routed there.
Debug can also be manually requested with the respective partition flag indicated below. There is currently no way to request a debug partition through an OnDemand job.
Summary
In summary, for serial jobs, we will allocate the resources considering both the # of cores and the memory request. For parallel jobs (nodes>1), we will allocate the entire nodes with the whole memory regardless of other requests. Check requesting resources on pitzer for information about the usable memory of different types of nodes on Pitzer. To manage and monitor your memory usage, please refer to Out-of-Memory (OOM) or Excessive Memory Usage.
GPU Jobs
Dual GPU Node
- For the dual GPU node with 'Skylake' processor, it has 40 cores/node. The physical memory equates to 9.6 GB/core or 384 GB/node; while the usable memory equates to 9292 MB/core or 363 GB/node. Each node has 2 NVIDIA Volta V100 w/ 16 GB GPU memory.
- For the dual GPU node with 'Cascade Lake' processor, it has 48 cores/node. The physical memory equates to 8.0 GB/core or 384 GB/node; while the usable memory equates to 7744 MB/core or 363 GB/node. Each node has 2 NVIDIA Volta V100 w/32GB GPU memory.
For serial jobs, we will allow node sharing on GPU nodes so a job may request either 1 or 2 GPUs (--ntasks-per-node=XX --gpus-per-node=1 or --ntasks-per-node=XX --gpus-per-node=2)
For parallel jobs (nodes>1), we will not allow node sharing. A job may request 1 or 2 GPUs ( gpus-per-node=1 or gpus-per-node=2 ) but both GPUs will be allocated to the job.
Quad GPU Node
For quad GPU node, it has 48 cores/node. The physical memory equates to 16.0 GB/core or 768 GB/node; while the usable memory equates to 15,872 MB/core or 744 GB/node.. Each node has 4 NVIDIA Volta V100s w/32 GB GPU memory and NVLink.
For serial jobs, we will allow node sharing on GPU nodes, so a job can land on a quad GPU node if it requests 3-4 GPUs per node (--ntasks-per-node=XX --gpus-per-node=3 or --ntasks-per-node=XX --gpus-per-node=4), or requests quad GPU node explicitly with using --gpus-per-node=v100-quad:4, or gets backfilled with requesting 1-2 GPUs per node with less than 4 hours long.
For parallel jobs (nodes>1), only up to 2 quad GPU nodes can be requested in a single job. We will not allow node sharing and all GPUs will be allocated to the job.
Partition time and job size limits
Here is the walltime and node limits per job for different queues/partitions available on Pitzer:
| Partition | Max walltime limit | Min job size | Max job size | Note |
|---|---|---|---|---|
| cpu | 7-00:00:00 (168 hours) | 1 core | 20 nodes |
Standard nodes: 40 cores per node without GPU |
| cpu-exp | 7-00:00:00 (168 hours) | 1 core | 36 nodes | Standard nodes: 48 cores per node without GPU |
| longcpu | 14-00:00:00 | 1 core | 1 node |
|
| gpu | 7-00:00:00 (168 hours) | 1 core | 4 nodes | Dual GPU nodes: 40 cores per node, 16GB V100s |
| gpu-exp | 7-00:00:00 (168 hours) | 1 core | 6 nodes | Dual GPU nodes: 48 cores per node, 32GB V100s |
| gpu-quad | 7-00:00:00 (168 hours) | 1 core | 1 node | Quad GPU nodes, 32GB V100s |
| debug-cpu | 1:00:00 (1 hour) | 1 core | 2 nodes |
Standard nodes: 40 cores per node without GPU
|
| debug-exp | 1:00:00 (1 hour) | 1 core | 2 nodes |
Standard nodes: 48 cores per node without GPU
|
| gpudebug | 1:00:00 (1 hour) | 1 core | 2 nodes |
Dual GPU nodes: 40 cores per node, 16GB V100s |
| gpudebug-exp | 1:00:00 (1 hour) | 1 core | 2 nodes |
Dual GPU nodes: 48 cores per node, 32GB V100s
|
| hugemem | 1-00:00:00 (24 hours) | 1 core | 1 node | There are only 4 huge memory nodes |
| largemem | 1-00:00:00 (24 hours) | 1 core | 1 node | There are 12 large memory nodes |
To specify a partition for a job, either add the flag --partition=<partition-name> to the sbatch command at submission time or add this line to the job script:
#SBATCH --partition=<partition-name>
To access one of the restricted queues, please contact OSC Help. Generally, access will only be granted to these queues if the performance of the job cannot be improved, and job size cannot be reduced by splitting or checkpointing the job.
Job/Core Limits
| Max Running Job Limit | Max Core/Processor Limit | Max node Limit | |||||
|---|---|---|---|---|---|---|---|
| For all types | GPU jobs | Regular debug jobs | GPU debug jobs | For all types | largemem | hugemem | |
| Individual User | 576 | 140 | 4 | 4 | 6480 | 12 | 3 |
| Project/Group | 576 | 140 | n/a | n/a | 6480 | 12 | 3 |
An individual user can have up to the max concurrently running jobs and/or up to the max processors/cores in use. However, among all the users in a particular group/project, they can have up to the max concurrently running jobs and/or up to the max processors/cores in use.
Citation
For more information about citations of OSC, visit https://www.osc.edu/citation.
To cite Pitzer, please use the following information:
Ohio Supercomputer Center. (2018). Pitzer Cluster. Ohio Supercomputer Center. https://doi.org/10.82404/GYT1-JH87
BibTeX:
@MISC{Ohio_Supercomputer_Center2018-dl,
  title     = "Pitzer Cluster",
  author    = "{Ohio Supercomputer Center}",
  publisher = "Ohio Supercomputer Center",
  year      =  "2018",
  doi       = "10.82404/gyt1-jh87"
}
ris:
TY  - MISC
AU  - Ohio Supercomputer Center
TI  - Pitzer Cluster
PY  - 2018
DA  - 2018
PB  - Ohio Supercomputer Center
DO  - 10.82404/GYT1-JH87
UR  - http://dx.doi.org/10.82404/GYT1-JH87
Pitzer SSH key fingerprints
These are the public key fingerprints for Pitzer:
pitzer: ssh_host_rsa_key.pub = 8c:8a:1f:67:a0:e8:77:d5:4e:3b:79:5e:e8:43:49:0e
pitzer: ssh_host_ed25519_key.pub = 6d:19:73:8e:b4:61:09:a9:e6:0f:e5:0d:e5:cb:59:0b
pitzer: ssh_host_ecdsa_key.pub = 6f:c7:d0:f9:08:78:97:b8:23:2e:0d:e2:63:e7:ac:93
These are the SHA256 hashes:
pitzer: ssh_host_rsa_key.pub = SHA256:oWBf+YmIzwIp+DsyuvB4loGrpi2ecow9fnZKNZgEVHc
pitzer: ssh_host_ed25519_key.pub = SHA256:zUgn1K3+FK+25JtG6oFI9hVZjVxty1xEqw/K7DEwZdc
pitzer: ssh_host_ecdsa_key.pub = SHA256:8XAn/GbQ0nbGONUmlNQJenMuY5r3x7ynjnzLt+k+W1M
Guidance After Pitzer Upgrade to RHEL9
We upgraded the operating system on the Pitzer cluster from RHEL7 to RHEL9 on July 28 2025. This upgrade introduces several software-related changes compared to the RHEL7 environment used on the Pitzer and provides access to modern tools and libraries but may also require adjustments to your workflows. Please refer to
- Pitzer Software Environment on RHEL 9 for key software changes and available software
- Pitzer Programming Environment on RHEL 9 for details on compiler commands, parallel and GPU computing
Key changes
- PBS compatibility layer provided by Slurm is disabled so you need to convert your PBS batch scripts to Slurm scripts. See this Slurm migration page for more guidance.
- You are now required to specify the module version when loading any modules. For example, instead of using
module load intel, you must usemodule load intel/2021.10.0. Failure to specify the version will result in an error message. Below is an example message when loading gcc without specifying the version:$ module load gcc Lmod has detected the following error: These module(s) or extension(s) exist but cannot be loaded as requested: "gcc". You encountered this error for one of the following reasons: 1. Missing version specification: On Ascend, you must specify an available version. 2. Missing required modules: Ensure you have loaded the appropriate compiler and MPI modules. Try: "module spider gcc" to view available versions or required modules. If you need further assistance, please contact oschelp@osc.edu with the subject line "lmod error: gcc"
Guidance on Requesting Resources on Pitzer
In late 2018, OSC installed 260 Intel® Xeon® 'Skylake' processor-based nodes as the original Pitzer cluster. In September 2020, OSC installed additional 398 Intel® Xeon® 'Cascade Lake' processor-based nodes as part of a Pitzer Expansion cluster. This expansion makes Pitzer a heterogeneous cluster, which means that the jobs may land on different types of CPU and behaves differently if the user submits the same job script repeatedly to Pitzer but does not request the resources properly. This document provides you some general guidance on how to request resources on Pitzer due to this heterogeneous nature.
Step 1: Identify your job type
| Nodes the job may be allocated on | # of cores per node | Usable Memory | GPU | |
|---|---|---|---|---|
| Jobs requesting standard compute node(s) | Dual Intel Xeon 6148s Skylake @2.4GHz | 40 |
178 GB memory/node 4556 MB memory/core |
N/A |
| Dual Intel Xeon 8268s Cascade Lakes @2.9GHz | 48 |
178 GB memory/node 3797 MB memory/core |
N/A | |
| Jobs requesting dual GPU node(s) |
Dual Intel Xeon 6148s Skylake @2.4GHz |
40 |
363 GB memory/node 9292 MB memory/core |
2 NVIDIA Volta V100 w/ 16GB GPU memory |
| Dual Intel Xeon 8268s Cascade Lakes @2.9GHz | 48 |
363 GB memory/node 7744 MB memory/core |
2 NVIDIA Volta V100 w/32GB GPU memory | |
| Jobs requesting quad GPU node(s) | Dual Intel Xeon 8260s Cascade Lakes @2.4GHz | 48 |
744 GB memory/node 15872 MB memory/core |
4 NVIDIA Volta V100s w/32GB GPU memory and NVLink |
| Jobs requesting large memory node(s) | Dual Intel Xeon 8268s Cascade Lakes @2.9GHz | 48 |
744 GB memory/node 15872 MB memory/core |
N/A |
| Jobs requesting huge memory node(s) | Quad Processor Intel Xeon 6148 Skylakes @2.4GHz | 80 |
2989 GB memory/node 38259 MB memory/core |
N/A |
According to this table,
- If your job requests standard compute node(s) or dual GPU node(s), it can potentially land on different types of nodes and may result in different job performance. Please follow the steps below to determine whether you would like to restrain your job to a certain type of node(s).
- If your job requests quad GPU node(s), large memory node(s), or huge memory node(s), please check pitzer batch limit rules on how to request these special types of resources properly.
Step 2: Perform test
This step is to submit your jobs requesting the same resources to different types of nodes on Pitzer. For your job script is prepared with either PBS syntax or Slurm syntax:
Request 40 or 48 core nodes
#SBATCH --constraint=40core
#SBATCH --constraint=48core
Request 16gb, 32gb gpu
#SBATCH --constraint=v100
#SBATCH --constraint=v100-32g --partition=gpuserial-48core
Once the script is ready, submit your jobs to Pitzer and wait till the jobs are completed.
Step 3: Compare the results
Once the jobs are completed, you can compare the job performances in terms of core-hours, gpu-hours, walltime, etc. to determine how your job is sensitive to the type of the nodes. If you would like to restrain your job to land on a certain type of nodes based on the testing, you can add #SBATCH --constraint=. The disadvantage of this is that you may have a longer queue wait time on the system. If you would like to have your jobs scheduled as fast as possible and do not care which type of nodes your job will land on, do not include the constraint in the job request.
GPU Computing
OSC offers GPU computing on all its systems. While GPUs can provide a significant boost in performance for some applications, the computing model is very different from the CPU. This page will discuss some of the ways you can use GPU computing at OSC.
Accessing GPU Resources
To request nodes with a GPU add the --gpus-per-node=x attribute to the directive in your batch script, for example, on Pitzer:
#SBATCH --gpus-per-node=1
In most cases you'll need to load the cuda module (module load cuda) to make the necessary Nvidia libraries available.
Setting the GPU compute mode (optional)
The GPUs on any cluster can be set to different compute modes as listed here. They can be set by adding the following to the GPU specification when using the srun command. By default it is set to shared.
srun --gpu_cmode=exclusive
or
srun --gpu_cmode=shared
The compute mode shared is the default on GPU nodes if a compute mode is not specified. With this compute mode, mulitple CUDA processes on the same GPU device are allowed.
Example GPU Jobs
Single-node/Multi-GPU Job Script
#!/bin/bash
#SBATCH --account <Project-ID>
#SBATCH --job-name Pytorch_Example
#SBATCH --nodes=1
#SBATCH --time=00:10:00
#SBATCH --gpus-per-node=4

ml miniconda3/4.10.3-p37 cuda/11.8.0

source activate pytorch

python example.py
Multi-node/Multi-GPU Job Script
#!/bin/bash
#SBATCH --account <Project-ID>
#SBATCH --job-name Pytorch_Example
#SBATCH --nodes=2
#SBATCH --time=00:10:00
#SBATCH --gpus-per-node=4

ml miniconda3/4.10.3-p37 cuda/11.8.0

source activate pytorch

python example.py
If you are using Nsight GPU profiler, you may expereince an error as follows;
==ERROR== Profiling failed because a driver resource was unavailable. Ensure that no other tool (like DCGM) is concurrently collecting profiling data. See https://docs.nvidia.com/nsight-compute/ProfilingGuide/index.html#faq for more details.
This is because GPU monitoring service (DCGM) that we are running on the nodes by default. You can disable it and use Nisght by adding Slurm option --gres=nsight. More information about Nsight is available on the NVHPC page.
Using GPU-enabled Applications
We have several supported applications that can use GPUs. This includes
- Machine learning / Neural networks
- Molecular mechanics / dynamics
- General mathematics
- Engineering and Quantum Chemistry applications are expected to follow.
Please see the software pages for each application. They have different levels of support for multi-node jobs, cpu/gpu work sharing, and environment set-up.
Libraries with GPU Support
There are a few libraries that provide GPU implementations of commonly used routines. While they mostly hide the details of using a GPU there are still some GPU specifics you'll need to be aware of, e.g. device initialization, threading, and memory allocation. These are available at OSC:
MAGMA
MAGMA is an implementation of BLAS and LAPACK with multi-core (SMP) and GPU support. There are some differences in the API of standard BLAS and LAPACK.
cuBLAS and cuSPARSE
cuBLAS is a highly optimized BLAS from NVIDIA. There are a few versions of this library, from very GPU-specific to nearly transparent. cuSPARSE is a BLAS-like library for sparse matrices.
The MAGMA library is built on cuBLAS.
cuFFT
cuFFT is NVIDIA's Fourier transform library with an API similar to FFTW.
cuDNN
cuDNN is NVIDIA's Deep Neural Network machine learning library. Many ML applications are built on cuDNN.
Direct GPU Programming
GPUs present a different programming model from CPUs so there is a significant time investment in going this route.
OpenACC
OpenACC is a directives-based model similar to OpenMP. Currently this is only supported by the Portland Group C/C++ and Fortran compilers.
OpenCL
OpenCL is a set of libraries and C/C++ compiler extensions supporting GPUs (NVIDIA and AMD) and other hardware accelerators. The CUDA module provides an OpenCL library.
CUDA
CUDA is the standard NVIDIA development environment. In this model explicit GPU code is written in the CUDA C/C++ dialect, compiled with the CUDA compiler NVCC, and linked with a native driver program.
Running Multiple GPU Tasks in the Same Job
If your job has low GPU utilization, consider running multiple GPU tasks within the same job using the --overlapoption, as demonstrated in the sample script below.
#!/bin/bash
#SBATCH --job-name=shared-gpu
#SBATCH --nodes=1
#SBATCH --ntasks-per-node=4
#SBATCH --gpus-per-node=1
#SBATCH --gpu_cmode=shared
#SBATCH --time=1:00:00

# Running 4 tasks on a shared GPU
srun --overlap --gpus=1 -n 1 ./my-gpu-task1 &
srun --overlap --gpus=1 -n 1 ./my-gpu-task2 &
srun --overlap --gpus=1 -n 1 ./my-gpu-task3 &
srun --overlap --gpus=1 -n 1 ./my-gpu-task4 &
wait
About GPU Hardware
OSC currently operates three HPC systems, the Cardinal, Ascend, and Pitzer clusters. These systems provide of a mix of x86 CPU cores and NVIDIA GPU devices in a range of configurations. You can find detail on available compute resources on the Cluster Computing page.
A summary of available GPU configurations is provided below:
- NVIDIA H100s with 96 GB device memory and NVLink (four per node)
- NVIDIA A100s with 80 GB device memory and NVLink (four per node)
- NVIDIA A100s with 40 GB device memory (two per node)
- NVIDIA Volta V100 with 32 GB device memory and NVLink (four per node)
- NVIDIA Volta V100 with 16 or 32 GB device memory (two per node)
- NVIDIA A100 with 40GB memory each(three per node)
High Bandwidth Memory
Overview
Each dense compute node on Cardinal contains 2 Intel Xeon CPU Max 9470. In addition to the DDR5 memory that is available on all other nodes on our systems, these CPUs also contain 128 GB of high bandwidth memory HBM2e which should especially speedup memory-bound codes.
HBM Modes
All nodes on Cardinal are configured clustering in SNC4 mode. This means that the 64 GB of HBM memory on a socket is further divided into 4 independent NUMA regions, each with 16 GB of HBM Memory. This is also true of the DDR memory, which is partitioned into NUMA-aware applications in particular will benefit from this configuration.
The HBM on these nodes can be configured in two modes: flat mode or cache mode. Nodes in the cpu partition on Cardinal are configured with memory in flat mode. A few nodes in the cache partition are configured with memory in cache mode.
Flat mode
In flat mode, HBM is visible to applications as addessable memory. On each node, NUMA nodes 0-7 correspond to DDR memory while nodes 8-15 corrrespond to the HBM. In order to use the HBM, the numactl tool can be used to bind memory to the desired NUMA region.
All nodes in the cpu partition is configured in flat mode.
Cache mode
In cache mode, HBM is available to applications as a level 4 cache for DDR memory. This means that no changes are required to your application or submission script in order to utilize the HBM. Unlike flat mode, you do not have explicit control of when to use HBM vs DDR. This does, however, come at the cost of slightly lower performance for most applications due to higher latency for cache misses. However, if your application has a high rate of data reuse that fits in HBM, it may be a good candidate for running in cache mode.
There are currently 4 nodes configured in cache mode in the cache partition.
Using HBM
Flat mode
The simplest way to ensure that your application uses HBM is to use numactl . We recommend using the --preferrred-many=8-15 flag to bind to the HBM memory. This ensures that your application will attempt to use the HBM memory if it is available. If your application requests more than the available 128 GB of HBM, it will allocate as much on HBM as fits and then allocate the rest on DDR memory. To enable your application to use HBM memory, first load the numactl/2.0.18 module and then prepend the appropriate numactl command to your run command as shown in the table below.
| Execution Model | DDR | HBM |
|---|---|---|
| Serial | ./a.out | numactl --preferred-many=8-15 ./a.out |
| MPI | srun ./a.out |
srun numactl --preferred-many=8-15 ./a.out |
For more fine-grained control, libraries such as libnumactl can be used to modify your code and explicitly set which memory is used to store data in your application.
Cache mode
If running on a node configured in cache mode, no modifications are necessary to your run script.
Profiling HBM Usage
To check how much of the HBM memory is being used. We provide a wrapper script that can be used to generate logs of memory usage using numastat. The script is located at ~support/scripts/numastat_wrapper. To use it, prepend before numactl (or before the executable if not using numactl). For example, if you run with
srun numactl --preferred-many=8-15 ./a.out
then to use the wrapper, run
srun numastat_wrapper numactl --preferred-many=8-15 ./a.out
This will generate a logfile for each parallel process in the current run directory. By default, the logs will be updated every 10 seconds with new numastat information. Depending on length of your job this may generate a large number of log files. To change the sampling frequency, set the environment variable NUMASTAT_SAMPLE_INTERVALto how many seconds there should be between samples.
The script ~support/scripts/summarize-numastat-logs that can be used to gather information from the logs. For instance, if you ran a job with the numastat_wrapper and you should get log files called <jobname>.<jid>.<pid1>.log, <jobname>.<jid>.<pid2>.log, <jobname>.<jid>.<pid3>.log, etc, then you can call summarize-numastat-logs <jobname>.<jid>.<pid1>.log . This will generate a file called <jobname>.<jid>.<pid1>.log.summary.txt. Other output file names can be select with the -o flag. If your output file is a .mp4 file then a video showing memory usage over time will be generated. Note that you can use the summary script even before your job has completed.
HBM-optimized Applications
Some applications are launched with custom scripts and the suggestions above using numactl may not work as expected. If you do not see benefits from running your application with HBM, please contact OSC Help for additional guidance.
The following applications have HBM-optimized versions installed as separate modules:
Tutorials & Training
Training is an important part of our services. We are working to expand our portfolio; we currently provide the following:
- Training classes. OSC provides training classes, at our facility, on-site and remotely.
- HOWTOs. Step-by-step guides to accomplish certain tasks on our systems.
- Tutorials. Online content designed for self-paced learning.
Other good sources for information:
- Knowledge Base. Useful information that does not fit our existing documentation.
- FAQ. List of commonly asked questions.
Seminar: What can OSC do for you? Services for Faculty Research and Teaching
OSC offers a one hour seminar targeting faculty who are unfamiliar with OSC to introduce the Center and the services we provide. The aim of this seminar is to provide a brief overview of OSC, what computational patterns are good candidates to consider using our services, and to point at entry points to begin. We can offer this seminar on your campus, with slight modifications to suit the audience, but offer a copy of the materials here for individuals to review.
If you have more questions or would like a presentation of this material at your campus, please reach out to start@osc.edu
Batch Processing at OSC
Please see the slurm migration pages for information about how to convert commands.
Batch processing
Efficiently using computing resources at OSC requires using the batch processing system. Batch processing refers to submitting requests to the system to use computing resources.
The only access to significant resources on the HPC machines is through the batch process. This guide will provide an overview of OSC's computing environment, and provide some instruction for how to use the batch system to accomplish your computing goals.
The menu at the right provides links to all the pages in the guide, or you can use the navigation links at the bottom of the page to step through the guide one page at a time. If you need additional assistance, please do not hesitate to contact OSC Help.
Batch System Concepts
The only access to significant resources on the HPC machines is through the batch process.
Why use a batch system?
Access to the OSC clusters is through a system of login nodes. These nodes are reserved solely for the purpose of managing your files and submitting jobs to the batch system. Acceptable activities include editing/creating files, uploading and downloading files of moderate size, and managing your batch jobs. You may also compile and link small-to-moderate size programs on the login nodes.
CPU time and memory usage are severely limited on the login nodes. There are typically many users on the login nodes at one time. Extensive calculations would degrade the responsiveness of those nodes.
The batch system allows users to submit jobs requesting the resources (nodes, processors, memory, GPUs) that they need. The jobs are queued and then run as resources become available. The scheduling policies in place on the system are an attempt to balance the desire for short queue waits against the need for efficient system utilization.
Interactive vs. batch
When you type commands in a login shell and see a response displayed, you are working interactively. To run a batch job, you put the commands into a text file instead of typing them at the prompt. You submit this file to the batch system, which will run it as soon as resources become available. The output you would normally see on your display goes into a log file. You can check the status of your job interactively and/or receive emails when it begins and ends execution.
Terminology
The batch system used at OSC is Slurm. A central manager slurmctld, monitors resources and work. You’ll need to understand the terms cluster, node, and processor (core) in order to request resources for your job. See HPC basics if you need this background information.
The words “parallel” and “serial” as used by Slurm can be a little misleading. From the point of view of the batch system a serial job is one that uses just one node, regardless of how many processors it uses on that node. Similarly, a parallel job is one that uses more than one node. More standard terminology considers a job to be parallel if it involves multiple processes.
Batch processing overview
Here is a very brief overview of how to use the batch system.
Choose a cluster
Before you start preparing a job script you should decide which cluster you want your job to run on, Cardinal or Pitzer. This decision will probably be based on the resources available on each system. Remember which cluster you’re using because the batch systems are independent.
Prepare a job script
Your job script is a text file that includes Slurm directives as well as the commands you want executed. The directives tell the batch system what resources you need, among other things. The commands can be anything you would type at the login prompt. You can prepare the script using any editor.
Submit the job
You submit your job to the batch system using the sbatch command, with the name of the script file as the argument. The sbatch command responds with the job ID that was given to your job, typically a 6- or 7-digit number.
Wait for the job to run
Your job may wait in the queue for minutes or days before it runs, depending on system load and the resources requested. It may then run for minutes or days. You can monitor your job’s progress or just wait for an email telling you it has finished.
Retrieve your output
The log file (screen output) from your job will be in the directory you submitted the job from by default. Any other output files will be wherever your script put them.
Batch Execution Environment
Shell and initialization
Your batch script executes in a shell on a compute node. The environment is identical to what you get when you connect to a login node except that you have access to all the resources requested by your job. The shell that Slurm uses is determined by the first line of the job script (it is by default #!/bin/bash). The appropriate “dot-files” ( .login , .profile , .cshrc ) will be executed, the same as when you log in. (For information on overriding the default shell, see the Job Scripts section.)
The job begins in the directory that it was submitted from. You can use the cd command to change to a different directory. The environment variable $SLURM_SUBMIT_DIR makes it easy to return to the directory from which you submitted the job:
cd $SLURM_SUBMIT_DIR
Modules
There are dozens of software packages available on OSC’s systems, many of them with multiple versions. You control what software is available in your environment by loading the module for the software you need. Each module sets certain environment variables required by the software.
If you are running software that was installed by OSC, you should check the software documentation page to find out what modules to load.
Several modules are automatically loaded for you when you login or start a batch script. These default modules include
- modules required by the batch system
- the Intel compiler suite
- an MPI package compatible with the default compiler (for parallel computing)
The module command has a number of subcommands. For more details, type module help.
Certain modules are incompatible with each other and should never be loaded at the same time. Examples are different versions of the same software or multiple installations of a library built with different compilers.
Note to those who build or install their own software: Be sure to load the same modules when you run your software that you had loaded when you built it, including the compiler module.
Each module has both a name and a version number. When more than one version is available for the same name, one of them is designated as the default. For example, the following modules are available for the Intel compilers on Cardinal: (Note: The versions shown might be out of date but the concept is the same.)
- intel/2021.4.0 (defauls)
- intel/2021.5.0
If you specify just the name, it refers to the default version or the currently loaded version, depending on the context. If you want a different version, you must give the entire string including the version information.
You can have only one compiler module loaded at a time, either intel, pgi, or gnu. The intel module is loaded initially; to change to pgi or gnu, do a module swap (see example below).
Some software libraries have multiple installations built for use with different compilers. The module system will load the one compatible with the compiler you have loaded. If you swap compilers, all the compiler-dependent modules will also be swapped.
Special note to gnu compiler users: While the gnu compilers are always in your path, you should load the gnu compiler module to ensure you are linking to the correct library versions.
To list the modules you have loaded:
module list
To see all modules that are compatible with your currently loaded modules:
module avail
To see all modules whose names start with fftw:
module avail fftw
To see all possible modules:
module spider
To see all possible modules whose names start with fftw:
module spider fftw
To load the fftw3 module that is compatible with your current compiler:
module load fftw3
To unload the fftw3 module:
module unload fftw3
To load the default version of the abaqus module (not compiler-dependent):
module load abaqus
To load a different version of the abaqus module:
module load abaqus/6.8-4
To unload whatever abaqus module you have loaded:
module unload abaqus
To unload all modules:
module purge
To reset to default starting modules:
module reset
To swap the intel compilers for the pgi compilers (unloads intel, loads pgi):
module swap intel pgi
To swap the default version of the intel compilers for a different version:
module swap intel intel/12.1.4.319
To display help information for the mkl module:
module help mkl
To display the commands run by the mkl module:
module show mkl
To use a locally installed module, first import the module directory:
module use [/path/to/modulefiles]
And then load the module:
module load localmodule
Slurm environment variables
Your batch execution environment has all the environment variables that your login environment has plus several that are set by the batch system. This section gives examples for using some of them. For more information see man sbatch.
Directories
Several directories may be useful in your job.
The absolute path of the directory your job was submitted from is $SLURM_SUBMIT_DIR.
Each job has a temporary directory, $TMPDIR , on the local disk of each node assigned to it. Access to this directory is much faster than access to your home or project directory. The files in this directory are not visible from all the nodes in a parallel job; each node has its own directory. The batch system creates this directory when your job starts and deletes it when your job ends. To copy file input.dat to $TMPDIR on your job’s first node:
cp input.dat $TMPDIR
For parallel job, to copy file input.dat to $TMPDIR on all your job’s nodes:
sbcast input.dat $TMPDIR/input.dat
Each job also has a temporary directory, $PFSDIR , on the parallel scratch file system, if users add node attribute "pfsdir" in the batch request (--gres=pfsdir). This is a single directory shared by all the nodes a job is running on. Access is faster than access to your home or project directory but not as fast as $TMPDIR . The batch system creates this directory when your job starts and deletes it when your job ends. To copy the file output.dat from this directory to the directory you submitted your job from:
cp $PFSDIR/output.dat $SLURM_SUBMIT_DIR
The $HOME environment variable refers to your home directory. It is not set by the batch system but is useful in some job scripts. It is better to use $HOME than to hardcode the path to your home directory. To access a file in your home directory:
cat $HOME/myfile
Job information
A list of the nodes and cores assigned to your job is obtained using srun hostname |sort -n
For GPU jobs, a list of the GPUs assigned to your job is in the file $SLURM_GPUS_ON_NODE. To display this file:
cat $SLURM_GPUS_ON_NODE
If you use a job array, each job in the array gets its identifier within the array in the variable $SLURM_ARRAY_JOB_ID. To pass a file name parameterized by the array ID into your application:
./a.out input_$SLURM_ARRAY_JOB_ID.dat
To display the numeric job identifier assigned by the batch system:
echo $SLURM_JOB_ID
To display the job name:
echo $SLURM_JOB_NAME
Use fast storage
If your job does a lot of file-based input and output, your choice of file system can make a huge difference in the performance of the job.
Shared file systems
Your home directory is located on shared file systems, providing long-term storage that is accessible from all OSC systems. Shared file systems are relatively slow. They cannot handle heavy loads such as those generated by large parallel jobs or many simultaneous serial jobs. You should minimize the I/O your jobs do on the shared file systems. It is usually best to copy your input data to fast temporary storage, run your program there, and copy your results back to your home directory.
Batch-managed directories
Batch-managed directories are temporary directories that exist only for the duration of a job. They exist on two types of storage: disks local to the compute nodes and a parallel scratch file system.
A big advantage of batch-managed directories is that the batch system deletes them when a job ends, preventing clutter on the disk.
A disadvantage of batch-managed directories is that you can’t access them after your job ends. Be sure to include commands in your script to copy any files you need to long-term storage. To avoid losing your files if your job ends abnormally, for example by hitting its walltime limit, include a trap command in your script (Note: trap commands do not work in csh and tcsh shell batch scripts). The following example creates a subdirectory in $SLURM_SUBMIT_DIR and copies everything from $TMPDIR into it in case of abnormal termination.
trap "cd $SLURM_SUBMIT_DIR;mkdir $SLURM_JOB_ID;cp -R $TMPDIR/* $SLURM_SUBMIT_DIR;exit" TERM
If a node your job is running on crashes, the trap command may not be executed. It may be possible to recover your batch-managed directories in this case. Contact OSC Help for assistance. For other details on retrieving files from unexpectedly terminated jobs, see this FAQ.
Local disk space
The fastest storage is on a disk local to the node your job is running on, accessed through the environment variable $TMPDIR . The main drawback to local storage is that each node of a parallel job has its own directory and cannot access the files on other nodes.
Local disk space should be used only through the batch-managed directory created for your job. Please do not use /tmp directly because your files won’t be cleaned up properly.
Parallel file system
The parallel file system, including project directory and scratch directory, is faster than the shared file systems for large-scale I/O and can handle a much higher load. It is efficient for reading and writing data in large blocks and should not be used for I/O involving many small accesses.
The scratch file system can be used through the batch-managed directory created for your job. The path for this directory is in the environment variable $PFSDIR . You should use it when your files must be accessible by all the nodes in your job and also when your files are too large for the local disk.
You may also create a directory for yourself in scratch file system and use it the way you would use any other directory. This directory will not be backed up; files are subject to deletion after some number of months.
Note: You should not copy your executable files to $PFSDIR. They should be run from your home directories or from $TMPDIR.
Job Scripts
A job script is a text file containing job setup information for the batch system followed by commands to be executed. It can be created using any text editor and may be given any name. Some people like to name their scripts something like myscript.job or myscript.sh, but myscript works just as well.
A job script is simply a shell script. It consists of Slurm directives, comments, and executable statements. The # character indicates a comment, although lines beginning with #SBATCH are interpreted as Slurm directives. Blank lines can be included for readability.
Contents
- SBATCH header lines
- Resource limits
- Executable section
- Considerations for parallel jobs
- Batch script examples
SBATCH header lines
A job script must start with a shabang #! (#!/bin/bash is commonly used but you can choose others) following by several lines starting with #SBATCH. These are Slurm SBATCH directives or header lines. They provide job setup information used by Slurm, including resource requests, email options, and more. The header lines may appear in any order, but they must precede any executable lines in your script. Alternatively, you may provide these directives (without the #SBATCH notation) on the command line with the sbatch command.
$ sbatch --jobname=test_job myscript.sh
Resource limits
Options used to request resources, including nodes, memory, time, and software flags, as described below.
Walltime
The walltime limit is the maximum time your job will be allowed to run, given in seconds or hours:minutes:seconds. This is elapsed time. If your job exceeds the requested time, the batch system will kill it. If your job ends early, you will be charged only for the time used.
The default value for walltime is 1:00:00 (one hour).
To request 20 hours of wall clock time:
#SBATCH --time=20:00:00
It is important to carefully estimate the time your job will take. An underestimate will lead to your job being killed. A large overestimate may prevent your job from being backfilled or fitting into an empty time slot.
Tasks, cores (cpu), nodes and GPUs
Resource limits specify not just the number of nodes but also the properties of those nodes. The properties differ between clusters but may include the number of cores per node, the number of GPUs per node (gpus), and the type of node.
SLURM uses the term task, which can be thought of as number of processes started.
Making sure that the number of tasks versus cores per task is important when using an mpi launcher such as srun.
Serial job
e.g. A node contians 40 cores, and a job requests 20 cores. Another job requests 40 cores of the 40 core node.
These are serial jobs.
To request one CPU core (sequential job), do not add any SLURM directives. The default is one node, one core, and one task.
To request 6 CPU cores on one node, in a single process:
#SBATCH --ntasks-per-node=6
Parallel job
To request 4 nodes and run a task on each which uses 40 cores:
#SBATCH --nodes=4
#SBATCH --ntasks-per-node=10
To request 4 nodes with 10 tasks per node (the default is 1 core per task, unless using --ntasks-per-node to set manually):
#SBATCH --nodes=4 --ntasks-per-node=10
Computing nodes on Pitzer cluster have 40 or 48 cores per node. The job can be constrained on 40-core (or 48-core) nodes only by using --constraint:
#SBATCH --constraint=40core
GPU job
To request 2 nodes with 2 GPUs
#SBATCH --nodes=2
#SBATCH --gpus-per-node=2
To request one node with use of 12 cores and 2 GPU:
#SBATCH --ntasks-per-node=2
#SBATCH --cpus-per-task=6
#SBATCH --gpus-per-node=2
Memory
The memory limit is the total amount of memory needed across all nodes. There is no need to specify a memory limit unless you need a large-memory node or your memory requirements are disproportionate to the number of cores you are requesting. For parallel jobs you must multiply the memory needed per node by the number of nodes to get the correct limit; you should usually request whole nodes and omit the memory limit.
Default units are bytes, but values are usually expressed in megabytes (mem=4000MB) or gigabytes (mem=4GB).
To request 4GB memory (see note below):
#SBATCH --mem=4gb
or
#SBATCH --mem=4000mb
To request 24GB memory:
#SBATCH --mem=24000mb
Note: The amount of memory available per node is slightly less than the nominal amount. If you want to request a fraction of the memory on a node, we recommend you give the amount in MB, not GB; 24000MB is less than 24GB. (Powers of 2 vs. powers of 10 -- ask a computer science major.)
Software licenses
If you are using a software package with a limited number of licenses, you should include the license requirement in your script. See the OSC documentation for the specific software package for details.
Example requesting five abaqus licenses:
#SBATCH --licenses=abaqus@osc:5
Job name
You can optionally give your job a meaningful name. The default is the name of the batch script, or just "sbatch" if the script is read on sbatch's standard input. The job name is used as part of the name of the job log files; it also appears in lists of queued and running jobs. The name may be up to 15 characters in length, no spaces are allowed, and the first character must be alphabetic.
Example:
#SBATCH --job-name=my_first_job
Mail options
You may choose to receive email when your job begins, when it ends, and/or when it fails. The email will be sent to the address we have on record for you. You should use only one --mail-type=<type> directive and include all the options you want.
To receive an email when your job begins, ends or fails:
#SBATCH --mail-type=BEGIN,END,FAIL
To receive an email for all types:
#SBATCH --mail-type=ALL
The default email recipient is the submitting user, but you can include other users or email addresses:
#SBATCH --mail-user=osu1234,osu4321,username@osu.edu
Job log files
By default, Slurm directs both standard output and standard error to one log file. For job 123456, the log file will be named slurm-123456.out. You can specify name for the log file.
#SBATCH --output=myjob.out.%j
where the %j is replaced by the job ID.
Identify Project
Job scripts are required to specify a project account.
Get a list of current projects by using the OSCfinger command and looking in the SLURM accounts section:
OSCfinger userex
Login: userex                                     Name: User Example
Directory: /users/PAS1234/userex (CREATED)        Shell: /bin/bash
E-mail: user-ex@osc.edu
Contact Type: REGULAR
Primary Group: pas1234
Groups: pas1234,pas4321
Institution: Ohio Supercomputer Center
Password Changed: Dec 11 2020 21:05               Password Expires: Jan 12 2021 01:05 AM
Login Disabled: FALSE                             Password Expired: FALSE
SLURM Enabled: TRUE
SLURM Clusters: cardinal,pitzer
SLURM Accounts: pas1234,pas4321 <<===== Look at me !!
SLURM Default Account: pas1234
Current Logins:
To specify an account use:
#SBATCH --account=PAS4321
For more details on errors you may see when submitting a job, see messages from sbatch.
Executable section
The executable section of your script comes after the header lines. The content of this section depends entirely on what you want your job to do. We mention just two commands that you might find useful in some circumstances. They should be placed at the top of the executable section if you use them.
Command logging
The set -x command (set echo in csh) is useful for debugging your script. It causes each command in the batch file to be printed to the log file as it is executed, with a + in front of it. Without this command, only the actual display output appears in the log file.
To echo commands in bash or ksh:
set -x
To echo commands in tcsh or csh:
set echo on
Signal handling
Signals to gracefully and then immediately kill a job will be sent for various circumstances, for example if it runs out of wall time or is killed due to out-of-memory. In both cases, the job may stop before all the commands in the job script can be executed.
The sbatch flag --signal can be used to specify commands to be ran when these signals are received by the job.
Below is an example:
#!/bin/bash
#SBATCH --job-name=minimal_trap
#SBATCH --time=2:00
#SBATCH --nodes=1 --ntasks-per-node=1
#SBATCH --output=%x.%A.log
#SBATCH --signal=B:USR1@60

function my_handler() {
  echo "Catching signal"
  touch $SLURM_SUBMIT_DIR/job_${SLURM_JOB_ID}_caught_signal
  cd $SLURM_SUBMIT_DIR
  mkdir $SLURM_JOB_ID
  cp -R $TMPDIR/* $SLURM_JOB_ID
  exit
}

trap my_handler USR1
trap my_handler TERM

my_process &
wait
It is typically used to copy output files from a temporary directory to a home or project directory. The following example creates a directory in $SLURM_SUBMIT_DIR and copies everything from $TMPDIR into it. This executes only if the job terminates abnormally. In some cases, even with signal handling, the job still may not be able to execute the handler.
& wait is needed after starting the process so that user defined signal can be received by the process. See signal handling in slurm section of slurm migration issues for details.For other details on retrieving files from unexpectedly terminated jobs see this FAQ.
Considerations for parallel jobs
Each processor on our system is fast, but the real power of supercomputing comes from putting multiple processors to work on a task. This section addresses issues related to multithreading and parallel processing as they affect your batch script. For a more general discussion of parallel computing see another document.
Multithreading involves a single process, or program, that uses multiple threads to take advantage of multiple cores on a single node. The most common approach to multithreading on HPC systems is OpenMP. The threads of a process share a single memory space.
The more general form of parallel processing involves multiple processes, usually copies of the same program, which may run on a single node or on multiple nodes. These processes have separate memory spaces. When they need to communicate or share data, these processes typically use the Message-Passing Interface (MPI).
A program may use multiple levels of parallelism, employing MPI to communicate between nodes and OpenMP to utilize multiple processors on each node.
For more details on building and running MPI/OpenMP software, see the programing environment pages for Pitzer cluster and Cardinal cluster.
Script issues in parallel jobs
In a parallel job your script executes on just the first node assigned to the job, so it’s important to understand how to make your job execute properly in a parallel environment. These notes apply to jobs running on multiple nodes.
You can think of the commands (executable lines) in your script as falling into four categories.
- Commands that affect only the shell environment. These include such things as
cd,module, andexport(orsetenv). You don’t have to worry about these. The commands are executed on just the first node, but the batch system takes care of transferring the environment to the other nodes. - Commands that you want to have execute on only one node. These might include
dateorecho. (Do you really want to see the date printed 20 times in a 20-node job?) They might also includecpif your parallel program expects files to be available only on the first node. You don’t have to do anything special for these commands. - Commands that have parallel execution, including knowledge of the batch system, built in. These include
sbcast(parallel file copy) and some application software installed by OSC. You should consult the software documentation for correct parallel usage of application software. - Any other command or program that you want to have execute in parallel must be run using
srun. Otherwise, it will run on only one node, while the other nodes assigned to the job will remain idle. See examples below.
srun
The srun command runs a parallel job on cluster managed by Slurm. It is highly recommended to use srun while you run a parallel job with MPI libraries installed at OSC, including MVAPICH2, Intel MPI and OpenMPI.
The srun command has the form:
srun [srun-options] progname [prog-args]
where srun-options is a list of options to srun, progname is the program you want to run, and prog-args is a list of arguments to the program. Note that if the program is not in your path or not in your current working directory, you must specify the path as part of the name.
By default, srun runs as many copies of progname as there are tasks assigned to the job. For example, if your job requested --ntasks-per-node=8, the following command would run 8 a.out processes (with one core per task by default):
srun a.out
The example above can be modified to pass arguments to a.out. The following example shows two arguments:
srun a.out abc.dat 123
If the program is multithreaded, or if it uses a lot of memory, it may be desirable to run less processes per node. You can specify --ntasks-per-node to do this. By modifying the above example with --nodes=4, the following example would run 8 copies of a.out, two on each node:
 srun --ntasks-per-node=2 --cpus-per-task=20 a.out abc.dat 123
# start 2 tasks on each node, and each task is allocated 20 cores
System commands can also be run with srun. The following commands create a directory named data in the $TMPDIR directory on each node:
cd $TMPDIR srun -n $SLURM_JOB_NUM_NODES--ntasks-per-node=1 mkdir data
sbcast and sgather
If you use $TMPDIR in a parallel job, you probably want to copy files to or from all the nodes. The sbcast and sgather commands are used for this task.
To copy one file into the directory $TMPDIR on all nodes allocated to your job:
sbcast myprog $TMPDIR/myprog
To copy one file from the directory $TMPDIR on all nodes allocated to your job:
sgather -k $TMPDIR/mydata all_data
where the option -k will keep the file on the node, and all_data is the name of the file to be created with an appendix of source node name, meaning that you will see files all_data.node1_name, all_data.node2_name and more in the current working directory.
To recursively copy a directory from all nodes to the directory where the job is submitted:
sgather -k -r $TMPDIR $SLURM_SUBMIT_DIR/mydata
where mydata is the name of the directory to be created with an appendix of source node name.
sbcast and sgather.Environment variables for MPI
If your program combines MPI and OpenMP (or another multithreading technique), you should disable processor affinity by setting the environment variable MV2_ENABLE_AFFINITY to 0 in your script. If you don’t disable affinity, all your threads will run on the same core, negating any benefit from multithreading.
To set the environment variable in bash, include this line in your script:
export MV2_ENABLE_AFFINITY=0
To set the environment variable in csh, include this line in your script:
setenv MV2_ENABLE_AFFINITY 0
Environment variables for OpenMP
The number of threads used by an OpenMP program is typically controlled by the environment variable $OMP_NUM_THREADS. If this variable isn't set, the number of threads defaults to the number of cores you requested per node, although it can be overridden by the program.
If your job runs just one process per node and is the only job running on the node, the default behavior is what you want. Otherwise, you should set $OMP_NUM_THREADS to a value that ensures that the total number of threads for all your processes on the node does not exceed the ppn value your job requested.
For example, to set the environment variable to a value of 40 in bash, include this line in your script:
export OMP_NUM_THREADS=40
For example, to set the environment variable to a value of 40 in csh, include this line in your script:
setenv OMP_NUM_THREADS 40
Note: Some programs ignore $OMP_NUM_THREADS and determine the number of threads programmatically.
Batch script examples
Simple sequential job
The following is an example of a single-task sequential job that uses $TMPDIR as its working area. It assumes that the program mysci has already been built. The script copies its input file from the directory into $TMPDIR, runs the code in $TMPDIR, and copies the output files back to the original directory.
#!/bin/bash#SBATCH --account=pas1234 #SBATCH --job-name=myscience #SBATCH --time=40:00:00 cp mysci.in $TMPDIR cd $TMPDIR /usr/bin/time ./mysci > mysci.hist cp mysci.hist mysci.out $SLURM_SUBMIT_DIR
Serial job with OpenMP
The following example runs a multi-threaded program with 8 cores:
#!/bin/bash#SBATCH --account=pas1234 #SBATCH --job-name=my_job #SBATCH --time=1:00:00 #SBATCH --ntasks-per-node=8 cp a.out $TMPDIR cd $TMPDIR export OMP_NUM_THREADS=8 ./a.out > my_results cp my_results $SLURM_SUBMIT_DIR
Simple parallel job
Here is an example of a parallel job that uses 4 nodes, running one process per core. To illustrate the module command, this example assumes a.out was built with the GNU compiler. The module swap command is necessary when running MPI programs built with a compiler other than Intel.
#!/bin/bash#SBATCH --account=pas1234 #SBATCH --job-name=my_job #SBATCH --time=10:00:00 #SBATCH --nodes=4 #SBATCH --ntasks-per-node=28 module swap intel gnu sbcast a.out $TMPDIR/a.out cd $TMPDIR srun a.outsgather -k -r $TMPDIR$SLURM_SUBMIT_DIR/my_mpi_output
--ntasks-per-node . Cluster computing would be a good place to start.Parallel job with MPI and OpenMP
This example is a hybrid (MPI + OpenMP) job. It runs one MPI process per node with X threads per process, where X must be less than or equal to physical cores per node (see the note below). The assumption here is that the code was written to support multilevel parallelism. The executable is named hybrid-program.
#!/bin/bash
#SBATCH --account=pas1234
#SBATCH --job-name=my_job
#SBATCH --time=20:00:00
#SBATCH --nodes=4
#SBATCH --ntasks-per-node=28

export OMP_NUM_THREADS=14
export MV2_CPU_BINDING_POLICY=hybrid
sbcast hybrid-program $TMPDIR/hybrid-program
cd $TMPDIR
srun --ntasks-per-node=2 --cpus-per-task=14 hybrid-program
sgather -k -r $TMPDIR $SLURM_SUBMIT_DIR/my_hybrid_output
Note that computing nodes on different cluster have different cores per node. If you want X to be all physical cores per node and to be independent of clusters, use the input environment variable SLURM_CPUS_ON_NODE:
export OMP_NUM_THREADS=$SLURM_CPUS_ON_NODE
Job Submission
Job scripts are submitted to the batch system using the sbatch command. Be sure to submit your job on the system you want your job to run on, or use the --cluster=<system> option to specify one.
Standard batch job
Most jobs on our system are submitted as scripts with no command-line options. If your script is in a file named myscript:
sbatch myscript
In response to this command you’ll see a line with your job ID:
Submitted batch job 123456
You’ll use this job ID (numeric part only) in monitoring your job. You can find it again using the squeue -u <username>
When you submit a job, the script is copied by the batch system. Any changes you make subsequently to the script file will not affect the job. Your input files and executables, on the other hand, are not picked up until the job starts running.
Interactive batch
The batch system supports an interactive batch mode. This mode is useful for debugging parallel programs or running a GUI program that’s too large for the login node. The resource limits (memory, CPU) for an interactive batch job are the same as the standard batch limits.
Interactive batch jobs are generally invoked without a script file.
Custom sinteractive command
OSC has developed a script to make starting an interactive session simpler.
The sinteractive command takes simple options and starts an interactive batch session automatically. However, its behavior can be counterintuitive with respect to numbers of tasks and CPUs. In addition, jobs launched with sinteractive can show environmental differences compared to jobs launched via other means. As an alternative, try, e.g.:
salloc -A <proj-code> --time=500
Simple serial
The example below demonstrates using sinteractive to start a serial interactive job:
sinteractive -A <proj-code>
The default if no resource options are specified is for a single core job to be submitted.
Simple parallel (single node)
To request a simple parallel job of 4 cores on a single node:
sinteractive -A <proj-code> -c 4
To setup for OpenMP executables then enter this command:
export OMP_NUM_THREADS=$SLURM_CPUS_PER_TASK
Parallel (multiple nodes)
To request 2 whole nodes on Pitzer with a total of 96 cores between both nodes:
sinteractive -A <proj-code> -N 2 -n 96
But note that the slurm variables SLURM_CPUS_PER_TASK, SLURM_NTASKS, and SLURM_TASKS_PER_NODE are all 1, so subsequent srun commands to launch parallel executables must explicitly specify the task and cpu numbers desired. Unless one really needs to run in the debug queues it is in general simpler to start with an appropriate salloc command.
sinteractive --help to view all the options available and their default values.Using salloc and srun
An example of using salloc and srun:
salloc --account=pas1234 --x11 --nodes=2 --ntasks-per-node=28 --time=1:00:00
The salloc command requests the resources. Job is interactive. The --x11 flag enables X11 forwarding, which is necessary with a GUI. You will need to have a X11 server running on your computer to use X11 forwarding, see the getting connected page. The remaining flags in this example are resource requests with the same meaning as the corresponding header lines in a batch file.
After you enter this line, you’ll see something like the following:
salloc: Pending job allocation 123456
salloc: job 123456 queued and waiting for resources
Your job will be queued just like any job. When the job runs, you’ll see the following line:
salloc: job 123456 has been allocated resources
salloc: Granted job allocation 123456
salloc: Waiting for resource configuration
salloc: Nodes o0001 are ready for job
At this point, you have an interactive login shell on one of the compute nodes, which you can treat like any other login shell.
It is important to remember that OSC systems are optimized for batch processing, not interactive computing. If the system load is high, your job may wait for hours in the queue, making interactive batch impractical. Requesting a walltime limit of one hour or less is recommended because your job can run on nodes reserved for debugging.
Job arrays
If you submit many similar jobs at the same time, you should consider using a job array. With a single sbatch command, you can submit multiple jobs that will use the same script. Each job has a unique identifier, $SLURM_ARRAY_TASK_ID, which can be used to parameterize its behavior.
Individual jobs in a job array are scheduled independently, but some job management tasks can be performed on the entire array.
To submit an array of jobs numbered from 1 to 100, all using the script sim.job:
sbatch --array=1-100 sim.job
The script would use the environment variable $SLURM_ARRAY_TASK_ID, possibly as an input argument to an application or as part of a file name.
Job dependencies
It is possible to set conditions on when a job can start. The most common of these is a dependency relationship between jobs.
For example, to ensure that the job being submitted (with script sim.job) does not start until after job 123456 has finished:
sbatch --dependency=afterany:123456 sim.job
Job variables
It is possible to provide a list of environment variables that are exported to the job.
For example, to pass the variable and its value to the job with the script sim.job, use the command:
sbatch --export=var=value sim.job
Many other options are available, some quite complicated; for more information, see the sbatch online manual by using the command:
man sbatch
Monitoring and Managing Your Job
Several commands allow you to check job status, monitor execution, collect performance statistics or even delete your job, if necessary.
Status of queued jobs
There are many possible reasons for a long queue wait — read on to learn how to check job status and for more about how job scheduling works.
squeue
Use the squeue command to check the status of your jobs, including whether your job is queued or running and information about requested resources. If the job is running, you can view elapsed time and resources used.
Here are some examples for user usr1234 and job 123456.
By itself, squeue lists all jobs in the system.
To list all the jobs belonging to a particular user:
squeue -u usr1234
To list the status of a particular job, in standard or alternate (more useful) format:
squeue -j 123456
To get more detail about a particular job:
squeue -j 123456 -l
You may also filter output by the state of a job. To view only running jobs use:
squeue -u usr1234 -t RUNNING
Other states can be seen in the JOB STATE CODES section of squeue man page using man squeue.
Additionally, JOB REASON CODES may be retrieved using the -l with the command man squeue. These codes describe the nodes allocated to running jobs or the reasons a job is pending, which may include:
- Reason code "MaxCpuPerAccount": A user or group has reached the limit on the number of cores allowed. The rest of the user or group's jobs will be pending until the number of cores in use decreases.
- Reason code "Dependency": Dependencies among jobs or conditions that must be met before a job can run have not yet been satisfied.
You can place a hold on your own job using scontrol hold jobid. If you do not understand the state of your job, contact OSC Help for assistance.
To list blocked jobs:
squeue -u usr1234 -t PENDING
The --start option estimates the start time for a pending job. Unfortunately, these estimates are not at all accurate except for the highest priority job in the queue.
Why isn’t my job running?
There are many reasons that your job may have to wait in the queue longer than you would like, including:
- System load is high.
- A downtime has been scheduled and jobs that cannot complete by the start of that downtime are not being started. Check the system notices posted on the OSC Events page or the message of the day, displayed when you log in.
- You or your group are at the maximum processor count or running job count and your job is being held.
- Your job is requesting specialized resources, such as GPU nodes or large memory nodes or certain software licenses, that are in high demand and not available.
- Your job is requesting a lot of resources. It takes time for the resources to become available.
- Your job is requesting incompatible or nonexistent resources and can never run.
- Job is unnecessarily stuck in batch hold because of system problems (very rare).
Priority, backfill and debug reservations
Priority is a complicated function of many factors, including the processor count and walltime requested, the length of time the job has been waiting and more.
During each scheduling iteration, the scheduler will identify the highest priority job that cannot currently be run and find a time in the future to reserve for it. Once that is done, the scheduler will then try to backfill as many lower priority jobs as it can without affecting the highest priority job's start time. This keeps the overall utilization of the system high while still allowing reasonable turnaround time for high priority jobs. Short jobs and jobs requesting few resources are the easiest to backfill.
A small number of nodes are set aside during the day for jobs with a walltime limit of 1 hour or less, primarily for debugging purposes.
Observing a running job
You can monitor a running batch job as easily as you can monitor a program running interactively. Simply view the output file in read only mode to check the current output of the job.
Node status
You may check the status of a node while the job is running by visiting the OSC grafana page and using the "cluster metrics" report.
Managing your jobs
Deleting a job
Situations may arise that call for deletion of a job from the SLURM queue, such as incorrect resource limits, missing or incorrect input files or commands or a program taking too long to run (infinite loop).
The command to delete a batch job is scancel. It applies to both queued and running jobs.
Example:
scancel 123456
If you cannot delete one of your jobs, it may be because of a hardware problem or system software crash. In this case you should contact OSC Help.
Altering a queued job
You can alter certain attributes of a job in the queue using the scontrol update command. Use this command to make a change without losing your place in the queue. Please note that you cannot make any alterations to the executable portion of the script, nor can you make any changes after the job starts running.
The syntax is:
scontrol updatejob=<jobid> <args>
The optional arguments consist of one or more SLURM directives in the form of command-line options.
For example, to change the walltime limit on job 123456 to 5 hours and have email sent when the job ends (only):
scontrol update job=123456 timeLimit=5:00:00 mailType=End
Placing a hold on a queued job
If you want to prevent a job from running but leave it in the queue, you can place a hold on it using the scontrol hold command. The job will remain pending until you release it with the scontrol release command. A hold can be useful if you need to modify the input file for a job without losing your place in the queue.
Examples:
scontrol hold 123456
scontrol release 123456
Job statistics
Include the following commands in your batch script as appropriate to collect job statistics or performance information.
A simple way to view job information is to use this command at the end of the job:
scontrol show job=$SLURM_JOB_ID
XDMoD tool
You can use the online interactive tool XDMoD to look at usage statistics for jobs. See XDMoD overview for more information.
date
The date command prints the current date and time. It can be informative to include it at the beginning and end of the executable portion of your script as a rough measure of time spent in the job.
time
The time utility is used to measure the performance of a single command. It can be used for serial or parallel processes. Add /usr/bin/time to the beginning of a command in the batch script:
/usr/bin/time myprog arg1 arg2
The result is provided in the following format:
- user time (CPU time spent running your program)
- system time (CPU time spent by your program in system calls)
- elapsed time (wallclock)
- percent CPU used
- memory, pagefault and swap statistics
- I/O statistics
These results are appended to the job's error log file. Note: Use the full path “/usr/bin/time” to get all the information shown.
Scheduling Policies and Limits
The batch scheduler is configured with a number of scheduling policies to keep in mind. The policies attempt to balance the competing objectives of reasonable queue wait times and efficient system utilization. The details of these policies differ slightly on each system. Exceptions to the limits can be made under certain circumstances; contact oschelp@osc.edu for details.
Hardware limits
Each system differs in the number of processors (cores) and the amount of memory and disk they have per node. We commonly find jobs waiting in the queue that cannot be run on the system where they were submitted because their resource requests exceed the limits of the available hardware. Jobs never migrate between systems, so please pay attention to these limits.
Notice in particular the large number of standard nodes and the small number of large-memory nodes. Your jobs are likely to wait in the queue much longer for a large-memory node than for a standard node. Users often inadvertently request slightly more memory than is available on a standard node and end up waiting for one of the scarce large-memory nodes, so check your requests carefully.
See cluster computing for details on the number of nodes for each type.
Walltime limits per job
Serial jobs (that is, jobs which request only one node) can run for up to 168 hours, while parallel jobs may run for up to 96 hours.
Users who can demonstrate a need for longer serial job time may request access to the longserial queue, which allows single-node jobs of up to 336 hours. Longserial access is not automatic. Factors that will be considered include how efficiently the jobs use OSC resources and whether they can be broken into smaller tasks that can be run separately.
Limits per user and group
An individual user can only have a certain number of concurrently running jobs as well as a limited number of cores and GPU's that are being used simultaneously. These limits reduce the number of resources that a user can use, beyond the limit on the number of resources per job. These limits also apply to a group, though they are increased as it is anticipated that an entire group may need to utilize more resources.
To find the limits of the specific system that you are using, you can look up the Batch Limit Rules of your system. All jobs submitted in excess of these limits will be queued but will not be scheduled until other jobs have exited and freed the resources for the user or group.
A user may have no more than 1000 jobs submitted to both the parallel and serial job queue separately. Jobs submitted in excess of this limit will be rejected.
Priority
The priority of a job is influenced by a large number of factors, including the processor count requested, the length of time the job has been waiting, and how much other computing has been done by the user and their group over the last several days. However, having the highest priority does not necessarily mean that a job will run immediately, as there must also be enough processors and memory available to run it.
GPU Jobs
All GPU nodes are reserved for jobs that request gpus. Short non-GPU jobs are allowed to backfill on these nodes to allow for better utilization of cluster resources.
Slurm Directives Summary
Slurm directives may appear as header lines in a batch script or as options on the sbatch command line. They specify the resource requirements of your job and various other attributes. Many of the directives are discussed in more detail elsewhere in this document. The online manual page for sbatch (man sbatch) describes many of them.
Slurm header lines must come before any executable lines in your script. Their syntax is:
#SBATCH [option]
where option can be one of the options in the table below (there are others which can be found in the manual). For example, to request 4 nodes with 40 processors per node:
#SBATCH --nodes=4
#SBTACH --ntasks-per-node=40
#SBATCH --constraint=40core
The syntax for including an option on the command line is:
sbatch [option]
For example, the following line submits the script myscript.job but adds the --time nodes directive:
sbatch --time=00:30:00 myscript.job
| Option | Description |
|---|---|
| --time=dd-hh:mm:ss |
Requests the amount of time needed for the job. |
| --nodes=n | Number of nodes to request. Default is one node. |
| --ntasks-per-node=m |
Number of cores on a single node or number of tasks per requested node. |
| --gpus-per-node=g | Number of gpus per node. Default is none. |
| --mem=xgb | Specify the (RAM) main memory required per node. |
| --licenses=pkg@osc:N | Request use of N licenses for package {software flag}@osc:N. |
| --job-name=my_name | Sets the job name, which appears in status listings and is used as the prefix in the job’s output and error log files. The job name must not contain spaces. |
| --mail-type=START | Sets when to send mail to users when the job starts. There are other mail_type options including: END, FAIL. |
| --mail-user=<email> | Email address(es) separated by commas to send notifications to based on the mail type. |
| --x11 | Enable x11 forwarding for use of graphical applications. |
| --account=PEX1234 | Use the specified for job resource charging. |
| --cluster=pitzer | Explicitly specify which cluster to submit the job to. |
| --partition=p | Request a specific partition for the resource allocation instead of let the batch system assign a default partition. |
| --gres=pfsdir | Request use of $PFSDIR. See scratch space for details. |
Slurm defaults
It is also possible to create a file which tells slurm to automatically apply certain directives to jobs.
To start, create file ~/.slurm/defaults
One option is to have the file automatically use a certain project account for job submissions. Simply add the following line to ~/.slurm/defaults
account=PEX1234
The account can also be separated by cluster.
cardinal:account=PEX1234
pitzer:account=PEX4321
Or even separated to only use the defaults with the sbatch command.
sbatch:*:account=PEX1234
Finally, many of the options available for the sbatch command can be set as a default. Here are some examples.
# always request two cores
ntasks-per-node=2
# on pitzer only, request a 2 hour time limit
pitzer:time=2:00:00
--cluster=pitzer option while on Cardinal will not use the defaults defined for Pitzer.Using default options may make the
sinteractive command unusable and the interactive session requests from ondemand unusable as well.Please contact OSC Help if there are questions.
Batch Environment Variable Summary
The batch system provides several environment variables that you may want to use in your job script. This section is a summary of the most useful of these variables. Many of them are discussed in more detail elsewhere in this document. The ones beginning with SLURM_ are described in the online manual page for sbatch (man sbatch).
| Environment Variable | Description |
$TMPDIR |
The absolute path and name of the temporary directory created for this job on the local file system of each node |
$PFSDIR |
The absolute path and name of the temporary directory created for this job on the parallel file system |
$SLURM_SUBMIT_DIR |
The absolute path of the directory from which the batch script was started |
$SLURM_GPUS_ON_NODE |
Number of GPUs allocated to the job on each node (works with --exclusive jobs). |
$SLURM_ARRAY_JOB_ID |
Unique identifier assigned to each member of a job array |
$SLURM_JOB_ID |
The job identifier assigned to the job by the batch system |
$SLURM_JOB_NAME |
The job name supplied by the user |
The following environment variables are often used in batch scripts but are not directly related to the batch system.
| Environment Variable | Description | Comments |
$OMP_NUM_THREADS |
The number of threads to be used in an OpenMP program | See the discussion of OpenMP elsewhere in this document. Set in your script. Not all OpenMP programs use this value. |
$MV2_ENABLE_AFFINITY |
Thread affinity option for MVAPICH2. | Set this variable to 0 in your script if your program uses both MPI and multithreading. Not needed with MPI-1. |
$HOME |
The absolute path of your home directory. | Use this variable to avoid hard-coding your home directory path in your script. |
Batch-Related Command Summary
This section summarizes two groups of batch-related commands: commands that are run on the login nodes to manage your jobs and commands that are run only inside a batch script. Only the most common options are described here.
Many of these commands are discussed in more detail elsewhere in this document. All have online manual pages (example: man sbatch ) unless otherwise noted.
In describing the usage of the commands we use square brackets [like this] to indicate optional arguments. The brackets are not part of the command.
Important note: The batch systems on Pitzer, Ascend, and Cardinal are entirely separate. Be sure to submit your jobs on a login node for the system you want them to run on. All monitoring while the job is queued or running must be done on the same system also. Your job output, of course, will be visible from both systems.
Commands for managing your jobs
These commands are typically run from a login node to manage your batch jobs. The batch systems on Pitzer, Ascend, and Cardinal are completely separate, so the commands must be run on the system where the job is to be run.
sbatch
The sbatch command is used to submit a job to the batch system.
| Usage | Desctiption | Example |
sbatch [ options ] script |
Submit a script for a batch job. The options list is rarely used but can augment or override the directives in the header lines of the script. | sbatch sim.job |
sbatch -t array_request [ options ] jobid |
Submit an array of jobs | sbatch -t 1-100 sim.job |
sinteractive [ options ] |
Submit an interactive batch job | sinteractive -n 4 |
squeue
The squeue command is used to display the status of batch jobs.
| Usage | Desctiption | Example |
squeue |
Display all jobs currently in the batch system. | squeue |
squeue -j jobid |
Display information about job jobid. The -j flag uses an alternate format. |
squeue -j 123456 |
squeue -j jobid -l |
Display long status information about job jobid. | squeue -j 123456 -l |
squeue -u username [-l] |
Display information about all the jobs belonging to user username. | squeue -u usr1234 |
scancel
The scancel command may be used to delete a queued or running job.
| Usage | Description | Example |
scancel jobid |
Delete job jobid. |
|
scancel jobid |
Delete all jobs in job array jobid. |
scancel 123456 |
qdel jobid[jobnumber] |
Delete jobnumber within job array jobid. |
scancel 123456_14 |
slurm output file
There is an output file which stores the stdout and stderr for a running job which can be viewed to check the running job output. It is by default located in the dir where the job was submitted and has the format slurm-<jobid>.out
The output file can also be renamed and saved in any valid dir using the option --output=<filename pattern>
sbatch command at job submission.e.g.
sbatch --output=$HOME/test_slurm.out <job-script> works#SBATCH --output=$HOME/test_slurm.out does NOT work in job scriptSee slurm migration issues for details.
scontrol
The scontrol command may be used to modify the attributes of a queued (not running) job. Not all attributes can be altered.
| Usage | Description | Example |
scontrol update jobid=<jobid> [ option ] |
Alter one or more attributes a queued job. The options you can modify are a subset of the directives that can be used when submitting a job. |
|
scontrol show job=$SLURM_JOB_IDscontrol hold/release
The qhold command allows you to place a hold on a queued job. The job will be prevented from running until you release the hold with the qrls command.
| Usage | Description | Example |
scontrol hold jobid |
Place a user hold on job jobid |
scontrol hold 123456 |
scontrol release jobid |
Release a user hold previously placed on job jobid |
scontrol release 123456 |
scontrol show
The scontrol show command can be used to provide details about a job that is running.
scontrol show job=$SLURM_JOB_ID
| Usage | Description | Example |
scontrol show job=<jobid> |
Check the details of a running job. | scontrol show job=123456 |
estimating start time
The squeue command can try to estimate when a queued job will start running. It is extremely unreliable, often making large errors in either direction.
| Usage | Description | Example |
squeue -j jobid \ --Format=username,jobid,account,startTime |
Display estimate of start time. |
squeue -j 123456 \ --Format=username,jobid,account,startTime |
Commands used only inside a batch job
These commands can only be used inside a batch job.
srun
Generally used to start an mpi process during a job. Can use most of the options available also from the sbatch command.
| Usage | Example |
|---|---|
| srun <prog> | srun --ntasks-per-node=4 a.out |
sbcast/sgather
Tool for copying files to/from all nodes allocated in a job.
| Usage |
|---|
| sbcast <src_file> <nodelocaldir>/<dest_file> |
| sgather <src_file> <shareddir>/<dest_file> sgather -r <src_dir> <sharedir>/dest_dir> |
Note: sbcast does not have a recursive cast option, meaning you can't use sbcast -r to scatter multiple files in a directory. Instead, you may use a loop command similar to this:
cd ${the directory that has the files}
for FILE in *dosbcast -p $FILE $TMPDIR/some_directory/$FILEdone
mpiexec
Use the mpiexec command to run a parallel program or to run multiple processes simultaneously within a job. It is a replacement program for the script mpirun , which is part of the mpich package.
The OSC version of mpiexec is customized to work with our batch environment. There are other mpiexec programs in existence, but it is imperative that you use the one provided with our system.
| Usage | Description | Example |
mpiexec progname [ args ] |
Run the executable program progname in parallel, with as many processes as there are processors (cores) assigned to the job (nodes*ppn). |
|
mpiexec - ppn 1 progname [ args ] |
Run only one process per node. | mpiexec -ppn 1 myprog |
mpiexec - ppn num progname [ args ] |
Run the specified number of processes on each node. | mpiexec -ppn 3 myprog |
mpiexec -tv [ options ] progname [ args ] |
Run the program with the TotalView parallel debugger. |
|
mpiexec -np num progname [ args ] |
Run only the specified number of processes. ( -n and -np are equivalent.) Does not spread processes out evenly across nodes. |
mpiexec -n 3 myprog |
pbsdcp
The pbsdcp command is a distributed copy command for the Slurm environment. It copies files to or from each node of the cluster assigned to your job. This is needed when copying files to directories which are not shared between nodes, such as $TMPDIR.
Options are -r for recursive and -p to preserve modification times and modes.
| Usage | Description | Example |
pbsdcp [-s] [ options ] srcfiles target |
“Scatter”. Copy one or more files from shared storage to the target directory on each node (local storage). The -s flag is optional. |
|
pbsdcp -g [ options ] srcfiles target |
“Gather”. Copy the source files from each node to the shared target directory. Wildcards must be enclosed in quotes. | pbsdcp -g '$TMPDIR/outfile*' $PBS_O_WORKDIR |
Note: In gather mode, if files on different nodes have the same name, they will overwrite each other. In the -g example above, the file names may have the form outfile001 , outfile002 , etc., with each node producing a different set of files.
License software flag usage information
We have licensed applications such as ansys, abaqus, and Schrodinger. These applications have a license server with a limited number of licenses, and you need to check out the licenses when you use the software each time. One problem is that the job scheduler, Slurm, doesn't communicate with the license server. As a result, a job can be launched even there are not enough licenses available, and it fails due to insufficient licenses.
In order to prevent this happen, you need to add the software flag to your job script. The software flag will register your license requests to the Slurm license pool so that Slrum can prevent launching jobs without enough licenses available.
Additonally, we sometimes restrict the number of licenses per group for a specific software to allow for multiple groups to utilize the software.
The syntax for software flags is
#SBATCH -L {software flag}@osc:N
where N is the requesting number of the licenses. If you need more than one software flags, you can use
#SBATCH -L {software flag1}@osc:N,{software flag2}@osc:M
For example, if you need 1 ansys and 10 ansyspar license features, then you can use
$SBATCH -L ansys@osc:1,ansyspar@osc:10
For interactive jobs, you can use, for example,
sinteractive -A {project account} -L ansys@osc:1
When you use the OnDemand VDI, Desktop, or Schrodinger apps, you can put software flags on the "Licenses" field. For OnDemand Abaqus/CAE, COMSOL Multiphysics, and Stata, the software flags will be placed automatically. And, for OnDemand Ansys Workbench, please check on "Reserve ANSYS Parallel Licenses," if you need "ansyspar" license features.
We have the full list of software associated with software flags in the table below. For more information, please click the link on the software name.
| Software flag | Note | |
|---|---|---|
| abaqus |
abaqus(350), abaquscae(10) |
|
| ansys | ansys(50), ansyspar(900) | |
| comsol | comsolscript(3) | |
| schrodinger | epik(10), glide(20)[16], ligprep(10), macromodel(10), qikprep(10) | |
| starccm | starccm(80), starccmpar(4,000) | |
| stata | stata(5) | |
| usearch | usearch(1) | |
| ls-dyna, mpp-dyna | lsdyna(1,000) |
*The number within the parentheses refers to the total number of licenses for each software flag
*The number within the brackets refers to the number of licenses per group for each software flag
It is critical you follow our instructions because your incomplete actions can affect others' jobs as well. We are actively monitoring the software flag usages, and we will reach out to you if you miss our instructions. Failing to make corrections may result in temporary removal from the license server. We have a Grafana dashboard showing the license and software flag usages. There are software flag requests represented as "SLURM", and actual license usages as "License Server".
License usage checking tool
If you want to make sure your license usage, you can use ~support/bin/myLicenseCheck.
  usage: ~support/bin/myLicenseCheck [-h,--help] SOFTWARE

    -h, --help      print help messages
    SOFTWARE        supported software: ansys, abaqus, comsol, schrodinger, and starccm.
This tool will tell you how many licenses you are actually using from the license server and how many licenses you have requested to the Slurm. But, this won't tell you about each job. So, if you want to figure out for a specific job, please make sure that the job is the only running job while you use the tool.
For assistance
Contact OSC Help for assistance if there are any questions.
Messages from sbatch
sbatch messages
shell warning
Submitting a job without specifying the proper shell will return a warning like below:
sbatch: WARNING: Job script lacks first line beginning with #! shell. Injecting '#!/bin/bash' as first line of job script.
Errors
If an error is encountered, the job is rejected.
Not specifying a project account
It is required to specify an account for a job to run. Please use the --account=<project-code> option to do this.
sbatch: error: ERROR: Job invalid: Must specify account for job
sbatch: error: Job submit/allocate failed: Unspecified error
Incorrrect resource configuration
If one makes a request for a node that doesn't exist, the job is rejected.
salloc: error: Job submit/allocate failed: Requested node configuration is not available
An example is requesting a regaular compute node, while also requesting a larger amount of memory than a compute node has.
Specify wrong account
If a user tries to set the --account option with a project that they are not on, then the job is rejected.
sbatch: error: Job submit/allocate failed: Invalid account or account/partition combination specified
Using a restricted project in a slurm job
If a user submits a job and uses a project that is restricted, the following message will be shown and the job will not be submitted:
sbatch: error: AssocGrpSubmitJobsLimit
sbatch: error: Batch job submission failed: Job violates accounting/QOS policy (job submit limit, user's size and/or time limits)
Leading whitespace in job name
Leading whitespace is not supported in Slurm job names. Your job will be rejected with an error message if you submit a job with a space in the job name:
sbatch: error: Invalid directive found in batch script: name
You can fix this by removing leading whitespace in the job name.
Script is empty or only contains whitespace
An empty file is not permitted to be submitted (included whitespace only files).
sbatch: error: Batch script is empty!
or
sbatch: error: Batch script contains only whitespace!
Troubleshooting Batch Problems
License problems
If you get a license error when you try to run a third-party software application, it means either the licenses are all in use or you’re not on the access list for the license. Very rarely there could be a problem with the license server. You should read the software page for the application you’re trying to use and make sure you’ve complied with all the procedures and are correctly requesting the license. Contact OSC Help with any questions.
My job is running slower than it should
Here are a few of the reasons your job may be running slowly:
- Your job has exceeded available physical memory and is swapping to disk. This is always a bad thing in an HPC environment as it can slow down your job dramatically. Either cut down on memory usage, request more memory, or spread a parallel job out over more nodes.
- Your job isn’t using all the nodes and/or cores you intended it to use. This is usually a problem with your batch script.
- Your job is spawning more threads than the number of cores you requested. Context switching involves enough overhead to slow your job.
- You are doing too much I/O to the network file servers (home and project directories), or you are doing an excessive number of small I/O operations to the parallel file server. An I/O-bound program will suffer severe slowdowns with improperly configured I/O.
- You didn’t optimize your program sufficiently.
- You got unlucky and are being hurt by someone else’s misbehaving job. As much as we try to isolate jobs from each other, sometimes a job can cause system-level problems. If you have run your job before and know that it usually runs faster, OSC staff can check for problems.
Someone deleted my job!
If your job is misbehaving, it may be necessary for OSC staff to delete it. Common problems are using up all the virtual memory on a node or performing excessive I/O to a network file server. If this happens you will be contacted by OSC Help with an explanation of the problem and suggestions for fixing it. We appreciate your cooperation in this situation because, much as we try to prevent it, one user’s jobs can interfere with the operation of the system.
Occasionally a problem not caused by your job will cause an unrecoverable situation and your job will have to be deleted. You will be contacted if this happens.
Why can’t I delete my job?
If you can’t delete your job, it usually means a node your job was running on has crashed and the job is no longer running. OSC staff will delete the job.
My job is stuck.
There are multiple reasons that your job may appear to be stuck. If a node that your job is running on crashes, your job may remain in the running job queue long after it should have finished. In this case you will be contacted by OSC and will probably have to resubmit your job.
If you conclude that your job is stuck based on what you see in the slurm output file, it’s possible that the problem is an illusion. This comment applies primarily to code you develop yourself. If you print progress information, for example, “Input complete” and “Setup complete”, the output may be buffered for efficiency, meaning it’s not written to disk immediately, so it won’t show up. To have it written immediate, you’ll have to flush the buffer; most programming languages provide a way to do this.
My job crashed. Can I recover my data?
If your job failed due to a hardware failure or system problem, it may be possible to recover your data from $TMPDIR. If the failure was due to hitting the walltime limit, the data in $TMPDIR would have been deleted immediately. Contact OSC Help for more information.
The trap command can be used in your script to save your data in case your job terminates abnormally.
Contacting OSC Help
If you are having a problem with the batch system on any of OSC's machines, you should send email to oschelp@osc.edu. Including the following information will assist HPC Client Services staff in diagnosing your problem quickly:
- Name
- OSC User ID (username)
- Name of the system you are using
- Job ID
- Job script
- Job output and/or error messages (preferably in context)
Or use the support request page.
batch email notifications
Occasionally, jobs that experience problems may generate emails from staff or automated systems at the center with some information about the nature of the problem. This page provides additional information about the various emails sent, and steps that can be taken to address the problem.
batch emails
All emails from osc about jobs will come from slurm@osc.edu, oschelp@osc.edu, or an email address with the domain @osc.edu
regular job emails
These emails can be turned on/off using the appropriate slurm directives. Other email addresses can also be specified. See the mail options section of job scripts page.
| Email type | Description |
|---|---|
| job began/end | Job began or ended. These are normal emails. |
| job aborted | Job has ended in an abnormal state. |
other emails
There is no option to turn these emails off, as they require us to contact the user that submitted the job. We can work with you if they will be expected. Please contact OSC Help in this case.
| Email type | Description |
|---|---|
| Deleted by administrator |
OSC staff may delete running jobs if:
OSC staff may delete queued jobs if:
|
| Emails exceed expected volume | Job emails may be delayed if too many are queued to be sent to a single email address. This is to prevent OSC from being blacklisted by the email server. |
| failure due to hardware/software problem | The node(s) or software that a job was using had a critical issue and the job failed. |
| overuse of physical memory (RAM) |
The node that was in use crashed due to it being out of memory. See out-of-memory (OOM) or excessive memory usage page for more information. |
| Job requeued | A job may be requeued explicitly by a system administrator or after a node failure. |
| GPFS unmount |
An issue with gpfs may have affected the job. This includes directories located in:
|
| Filling up /tmp |
Job failed after exhausting the space in a node's local /tmp directory. Please request either an entire node or use scratch. |
For assistance
Contact OSC Help for assistance if there are any questions.
Slurm Migration
Overview
Slurm, which stands for Simple Linux Utility for Resource Management, is a widely used open-source HPC resource management and scheduling system that originated at Lawrence Livermore National Laboratory.
It is decided that OSC will be implementing Slurm for job scheduling and resource management, to replace the Torque resource manager and Moab scheduling system that it currently uses, over the course of 2020.
Phases of Slurm Migration
It is expected that on Jan 1, 2021, both Pitzer and Owens clusters will be using Slurm. OSC will be switching to Slurm on Pitzer with the deployment of the new Pitzer hardware in September 2020. Owens migration to Slurm will occur later this fall.
PBS Compatibility Layer
During Slurm migration, OSC enables PBS compatibility layer provided by Slurm in order to make the transition as smooth as possible. Therefore, PBS batch scripts that used to work in the previous Torque/Moab environment mostly still work in Slurm. However, we encourage you to start to convert your PBS batch scripts to Slurm scripts because
- PBS compatibility layer usually handles basic cases, and may not be able to handle some complicated cases
- Slurm has many features that are not available in Moab/Torque, and the layer will not provide access to those features
- OSC may turn off the PBS compatibility layer in the future
Please check the following pages on how to submit a Slurm job:
- How to prepare Slurm job scripts
- How to submit, monitor and manage jobs
- Step-by-step instructions on how to submit jobs
- Slurm migration issues
- Slides for Sept 23, 2020 Workshop
Further Reading
How to Prepare Slurm Job Scripts
As the first step, you can submit your PBS batch script as you did before to see whether it works or not. If it does not work, you can either follow this page for step-by-step instructions, or read the tables below to convert your PBS script to Slurm script by yourself. Once the job script is prepared, you can refer to this page to submit and manage your jobs.
Job Submission Options
| Use | Torque/Moab | Slurm Equivalent |
|---|---|---|
| Script directive | #PBS |
#SBATCH |
| Job name | -N <name> |
--job-name=<name> |
| Project account | -A <account> |
--account=<account> |
| Queue or partition | -q queuename |
--partition=queuename |
|
Wall time limit |
-l walltime=hh:mm:ss |
--time=hh:mm:ss |
| Node count | -l nodes=N |
--nodes=N |
| Process count per node | -l ppn=M |
--ntasks-per-node=M |
| Memory limit | -l mem=Xgb |
--mem=Xgb (it is MB by default) |
| Request GPUs | -l nodes=N:ppn=M:gpus=G |
--nodes=N --ntasks-per-node=M --gpus-per-node=G |
| Request GPUs in default mode | -l nodes=N:ppn=M:gpus=G:default |
|
| Require pfsdir | -l nodes=N:ppn=M:pfsdir |
--nodes=N --ntasks-per-node=M --gres=pfsdir |
| Require 'vis' | -l nodes=N:ppn=M:gpus=G:vis |
--nodes=N --ntasks-per-node=M --gpus-per-node=G --gres=vis |
|
Require special property |
-l nodes=N:ppn=M:property |
--nodes=N --ntasks-per-node=M --constraint=property |
|
Job array |
-t <array indexes> |
--array=<indexes> |
|
Standard output file |
-o <file path> |
--output=<file path>/<file name> (path must exist, and you must specify the name of the file) |
|
Standard error file |
-e <file path> |
--error=<file path>/<file name> (path must exist, and you must specify the name of the file) |
|
Job dependency |
-W depend=after:jobID[:jobID...]
|
--dependency=after:jobID[:jobID...]
|
| Request event notification | -m <events> |
|
| Email address | -M <email address> |
--mail-user=<email address> |
| Software flag | -l software=pkg1+1%pkg2+4 |
--licenses=pkg1@osc:1,pkg2@osc:4 |
| Require reservation | -l advres=rsvid |
--reservation=rsvid |
Job Environment Variables
| Info | Torque/Moab Environment Variable | Slurm Equivalent |
|---|---|---|
| Job ID | $PBS_JOBID |
$SLURM_JOB_ID |
| Job name | $PBS_JOBNAME |
$SLURM_JOB_NAME |
| Queue name | $PBS_QUEUE |
$SLURM_JOB_PARTITION |
| Submit directory | $PBS_O_WORKDIR |
$SLURM_SUBMIT_DIR |
| Node file | cat $PBS_NODEFILE |
srun hostname |sort -n |
| Number of processes | $PBS_NP |
$SLURM_NTASKS |
| Number of nodes allocated | $PBS_NUM_NODES |
$SLURM_JOB_NUM_NODES |
| Number of processes per node | $PBS_NUM_PPN |
$SLURM_TASKS_PER_NODE |
| Walltime | $PBS_WALLTIME |
$SLURM_TIME_LIMIT |
| Job array ID | $PBS_ARRAYID |
$SLURM_ARRAY_JOB_ID |
| Job array index | $PBS_ARRAY_INDEX |
$SLURM_ARRAY_TASK_ID |
Environment Variables Specific to OSC
| Environment variable | Description |
|---|---|
$TMPDIR |
Path to a node-specific temporary directory (/tmp) for a given job |
$PFSDIR |
Path to the scratch storage; only present if --gres request includes pfsdir. |
$SLURM_GPUS_ON_NODE |
Number of GPUs allocated to the job on each node (works with --exclusive jobs) |
$SLURM_JOB_GRES |
The job's GRES request |
$SLURM_JOB_CONSTRAINT |
The job's constraint request |
$SLURM_TIME_LIMIT |
Job walltime in seconds |
Commands in a Batch Job
| Use | Torque/Moab Environment Variable | Slurm Equivalent |
|---|---|---|
| Launch a parallel program inside a job | mpiexec <args> |
srun <args> |
| Scatter a file to node-local file systems | pbsdcp <file> <nodelocaldir> |
* Note: sbcast does not have a recursive cast option, meaning you can't use
|
| Gather node-local files to a shared file system | pbsdcp -g <file> <shareddir> |
|
How to Submit, Monitor and Manage Jobs
Submit Jobs
| Use | Torque/Moab Command | Slurm Equivalent |
|---|---|---|
| Submit batch job | qsub <jobscript> |
sbatch <jobscript> |
| Submit interactive job | qsub -I [options] |
|
One can use
--mail-type=ALL option in their script to receive notifications about their jobs. Please see the slurm sbatch man page for more information.Another option is to disable the resubmission using
--no-requeue so that the job does get submitted on node failure.A final note is that if the job does not get requeued after a failure, then there will be a charged incurred for the time that the job ran before it failed.
Interactive jobs
Submitting interactive jobs is a bit different in Slurm. When the job is ready, one is logged into the login node they submitted the job from. From there, one can then login to one of the reserved nodes.
You can use the custom tool sinteractive as:
[xwang@pitzer-login04 ~]$ sinteractive
salloc: Pending job allocation 14269
salloc: job 14269 queued and waiting for resources
salloc: job 14269 has been allocated resources
salloc: Granted job allocation 14269
salloc: Waiting for resource configuration
salloc: Nodes p0591 are ready for job
...
...
[xwang@p0593 ~] $
# can now start executing commands interactively
Or, you can use salloc as:
[user@pitzer-login04 ~] $ salloc -t 00:05:00 --ntasks-per-node=3
salloc: Pending job allocation 14209
salloc: job 14209 queued and waiting for resources
salloc: job 14209 has been allocated resources
salloc: Granted job allocation 14209
salloc: Waiting for resource configuration
salloc: Nodes p0593 are ready for job

# normal login display
$ squeue
JOBID PARTITION     NAME     USER ST       TIME  NODES NODELIST(REASON)
14210 serial-48     bash     usee  R       0:06      1 p0593
[user@pitzer-login04 ~]$ srun --jobid=14210 --pty /bin/bash
# normal login display
[user@p0593 ~] $
# can now start executing commands interactively
Manage Jobs
| Use | Torque/Moab Command | Slurm Equivalent |
|---|---|---|
| Delete a job* | qdel <jobid> |
scancel <jobid> |
| Hold a job | qhold <jobid> |
scontrol hold <jobid> |
| Release a job | qrls <jobid> |
scontrol release <jobid> |
* User is eligible to delete his own jobs. PI/project admin is eligible to delete jobs submitted to the project he is an admin on.
Monitor Jobs
| Use | Torque/Moab Command | Slurm Equivalent |
|---|---|---|
| Job list summary | qstat or showq |
squeue |
| Detailed job information | qstat -f <jobid> or checkjob <jobid> |
sstat -a <jobid> or scontrol show job <jobid> |
| Job information by a user | qstat -u <user> |
squeue -u <user> |
|
View job script (system admin only) |
js <jobid> |
jobscript <jobid> |
| Show expected start time | showstart <job ID> |
|
Steps on How to Submit Jobs
How to Submit Interactive jobs
There are different ways to submit interactive jobs.
Using sinteractive
You can use the custom tool sinteractive as:
[xwang@pitzer-login04 ~]$ sinteractive
salloc: Pending job allocation 14269
salloc: job 14269 queued and waiting for resources
salloc: job 14269 has been allocated resources
salloc: Granted job allocation 14269
salloc: Waiting for resource configuration
salloc: Nodes p0591 are ready for job
...
...
[xwang@p0593 ~] $
# can now start executing commands interactively
Using salloc
It is a little complicated if you use salloc . Below is a simple example:
[user@pitzer-login04 ~] $ salloc -t 00:30:00 --ntasks-per-node=3 srun --pty /bin/bash
salloc: Pending job allocation 2337639
salloc: job 2337639 queued and waiting for resources
salloc: job 2337639 has been allocated resources
salloc: Granted job allocation 2337639
salloc: Waiting for resource configuration
salloc: Nodes p0002 are ready for job

# normal login display
[user@p0002 ~]$
# can now start executing commands interactively
How to Submit Non-interactive jobs
Submit Slurm job Script
A job can be submitted non-interactively via a Slurm job script. Below is a simple Slurm job script slurm_job.sh that calls for a parallel run:
#!/bin/bash
#SBATCH --time=1:00:00
#SBATCH --nodes=2
#SBATCH --ntasks-per-node=40
#SBATCH --job-name=hello
#SBATCH --account=PZS0712

cd $SLURM_SUBMIT_DIR
module load intel
mpicc -O2 hello.c -o hello
srun ./hello > hello_results
Submit this script using the command sbatch slurm_job.sh , and this job is scheduled successfully as shown below:
[xwang@cardinal-login04 slurm]$ sbatch slurm_job.sh
Submitted batch job 421618
Check the Job
You can use the jobscript command to check the job information:
[xwang@cardinal-login04 slurm]$ jobscript 421618
----- BEGIN jobid=421618 workdir=/users/oscgen/xwang/slurm -----
#!/bin/bash
#SBATCH --time=1:00:00
#SBATCH --nodes=2
#SBATCH --ntasks-per-node=40
#SBATCH --job-name=hello
#SBATCH --account=PZS0712

cd $SLURM_SUBMIT_DIR
module load intel
mpicc -O2 hello.c -o hello
srun ./hello > hello_results

----- END jobid=421618 workdir=/users/oscgen/xwang/slurm -----
Slurm Migration Issues
This page documents the known issues for migrating jobs from Torque to Slurm.
$PBS_NODEFILE and $SLURM_JOB_NODELIST
Please be aware that $PBS_NODEFILE is a file while $SLURM_JOB_NODELIST is a string variable.
The analog on Slurm to cat $PBS_NODEFILE is srun hostname | sort -n
Environment variables are not evaluated in job script directives
Environment variables do not work in a slurm directive inside a job script.
The job script job.txt including #SBATCH --output=$HOME/jobtest.out won't work in Slurm. Please use the following instead:
sbatch --output=$HOME/jobtest.out job.txt
Using mpiexec with Intel MPI
Intel MPI (all versions through 2019.x) is configured to support PMI and Hydra process managers. It is recommended to use srun as the MPI program launcher. This is a possible symptom of using mpiexec/mpirun:
as well as:
MPI startup(): Warning: I_MPI_PMI_LIBRARY will be ignored since the hydra process manager was found
If you prefer using mpiexec/mpirun with SLURM, please add the following code to the batch script before running any MPI executable:
unset I_MPI_PMI_LIBRARY
export I_MPI_JOB_RESPECT_PROCESS_PLACEMENT=0   # the option -ppn only works if you set this before
Executables with a certain MPI library using SLURM PMI2 interface
e.g.
Stopping mpi4py python processes during an interactive job session only from a login node:
pbsdcp with Slurm
pbsdcp with gather option sometimes does not work correctly. It is suggested to use sbcast for scatter option and sgather for gather option instead of pbsdcp. Please be aware that there is no wildcard (*) option for sbcast / sgather . And there is no recursive option for sbcast.In addition, the destination file/directory must exist.
Here are some simple examples:
sbcast <src_file> <nodelocaldir>/<dest_file>
sgather <src_file> <shareddir>/<dest_file>
sgather -r --keep <src_dir> <sharedir>/dest_dir>
Signal handling in slurm
The below script needs to use a wait command for the user-defined signal USR1 to be received by the process.
The sleep process is backgrounded using & wait so that the bash shell can receive signals and execute the trap commands instead of ignoring the signals while the sleep process is running.
#!/bin/bash
#SBATCH --job-name=minimal_trap
#SBATCH --time=2:00
#SBATCH --nodes=1 --ntasks-per-node=1
#SBATCH --output=%x.%A.log
#SBATCH --signal=B:USR1@60

function my_handler() {
  echo "Catching signal"
  touch $SLURM_SUBMIT_DIR/job_${SLURM_JOB_ID}_caught_signal
  exit
}

trap my_handler USR1
trap my_handler TERM

sleep 3600 &
wait
reference: https://bugs.schedmd.com/show_bug.cgi?id=9715
'mail' does not work; use 'sendmail'
The 'mail' does not work in a batch job; use 'sendmail' instead as:
sendmail user@example.com <<EOF
subject: Output path from $SLURM_JOB_ID
from: user@example.com
...
EOF
srun' with no arguments is to allocate a single task when using 'sinteractive'
srun with no arguments is to allocate a single task when using sinteractive to request an interactive job, even you request more than one task. Please pass the needed arguments to srun:
[xwang@owens-login04 ~]$ sinteractive -n 2 -A PZS0712
...
[xwang@o0019 ~]$ srun hostname
o0019.ten.osc.edu
[xwang@o0019 ~]$ srun -n 2 hostname
o0019.ten.osc.edu
o0019.ten.osc.edu
Be careful not to overwrite a Slurm batch output file for a running job
Unlike a PBS batch output file, which lived in a user-non-writeable directory while the job was running, a Slurm batch output file resides under the user's home directory while the job is running. File operations, such as editing and copying, are permitted. Please be careful to avoid such operations while the job is running. In particular, this batch script idiom is no longer correct (e.g., for the default job output file of name $SLURM_SUBMIT_DIR/slurm-jobid.out):
Please submit any issue using the webform below:
Knowledge Base
This knowledge base is a collection of important, useful information about OSC systems that does not fit into a guide or tutorial, and is too long to be answered in a simple FAQ.
Account Consolidation Guide
Single Account / Multiple Projects
If you work with several research groups, you had a separate account for each group. This meant multiple home directories, multiple passwords, etc. Over the years there have been requests for a single login system. We've now put that in place.
How will this affect you?
If you work with multiple groups, you'll need to be aware of how this works.
- It will be very important to use the correct project code for batch job charging.
- Managing the sharing of files between your projects (groups) is a little more complicated.
- In most cases, you will only need to fill out software license agreements once.
The single username
We requested those with multiple accounts to choose a preferred username. If one was not selected by the user, we selected one for them.
The preferred username will be your only active account; you will not be able to log in or submit jobs with the other accounts.
Checking the groups of a username
To check all groups of a username (USERID), use the command:
groups USERID
or
OSCfinger USERID
The first one from the output is your primary group, which is the project code (PROJECTID) this username (USERID) was created under.
All project codes your user account is under is determined by the groups displayed. One can also use the OSC Client Portal to look at their current projects.
Changing the primary group for a login session
You can change the primary group of your username (USERID) to any UNIX group (GROUP) that username (USERID) belongs to during the login session using the command:
newgrp GROUP
This change is only valid during this login session. If you log out and log back in, your primary group is changed back to the default one.
Check previous user accounts
There is no available tool to check all of your previous active accounts. We sent an email to each impacted user providing the information on your preferred username and previous accounts. Please refer to that email (sent on July 11, subject "Multiple OSC Accounts - Your Single Username").
Batch job
How to specify the charging project
Specify a project to charge the job to using the -A flag. e.g. The following example will charge to project PAS1234.
#SBATCH -A PAS1234
Batch limits policy
The job limit per user remains the same. That is to say, though your jobs are charged against different project codes, the total number of jobs and cores your user account can use on each system is still restricted by the previous user-based limit. Therefore, consolidating multiple user accounts into one preferred user account may affect the work of some users.
Please check our batch limit policy on each system for more details.
Data Management
Managing multiple home directories
Data from your non-preferred accounts will remain in those home directories; the ownership of the files will be updated to your preferred username, the newly consolidated account. You can access your other home directories using the command cd /absolute/path/to/file
You will need to consolidate all files to your preferred username as soon as possible because we plan to purge the data in future. Please contact OSC Help if you need the information on your other home directories to access the files.
Previous files associated with your other usernames
- Files associated with your non-preferred accounts will have their ownership changed to your preferred username.
- These files won't count against your home directory file quota.
- There will be no change to files and quotas on the project and scratch file systems.
Change group of a file
Log in with preferred username (P_ USERID) and create a new file of which the owner and group is your preferred username (P_ USERID) and primary project code (P_PROJECTID). Then change the group of the newly created file (FILE) using the command:
chgrp PROJECTID FILE
Managing file sharing in a batch job
In the Linux file system, every file has an owner and a group. By default, the group (project code) assigned to a file is the primary group of the user who creates it. This means that even if you change the charged account for a batch job, any files created will still be associated with your primary group.
To change the group for new files you will need to update your primary group prior to submitting your slurm script using the newgrp command.
It is important to remember that groups are used in two different ways: for resource use charging and file permissions. In the simplest case, if you are a member of only one research group/project, you won't need either option above. If you are in multiple research groups and/or multiple projects, you may need something like:
newgrp PAS0002
sbatch -A PAS0002 myjob.sh
OnDemand users
If you use the OnDemand Files app to upload files to the OSC filesystem, the group ownership of uploaded files will be your primary group.
Software licenses
- We will merge all your current agreements if you have multiple accounts.
-
In many cases, you will only need to fill out software license agreements once.
- Some vendors may require you to sign an updated agreement.
- Some vendors may also require the PI of each of your research groups/project codes to sign an agreement.
Community Accounts
Some projects may wish to have a common account to allow for different privileges than their regular user accounts. These are called community accounts, in that they are shared among multiple users, belong to a project, and may be able to submit jobs. Community accounts are accessed using the sudo command.
A community sudo account has the following characteristics:
- Selected users in the project have sudo privileges to become the community sudo user.
- The community sudo account has different privileges than the other users in the project, which may or may not include job submission.
- Community accounts can not be used to SSH into OSC systems directly.
- The community sudo account can only be accessed after logging in as a regular user and then using the sudo command described below. The community sudo account does not have a regular password set and is therefore is not subject to the normal password change policy.
- SSH key exchange to access OSC systems from outside of OSC with community accounts is disabled. Key exchange may be used to SSH between hosts within an OSC cluster.
How to Request a Community Account
The PI of the project looking to create a community account needs to send an email to OSC Help with the following information:
- A preferred username for the community account
- The project code that the community account will be created under
- The elevated privileges desired (such as job submission)
- The users who will able to access the account via sudo
- The desired shell for the community account
OSC will then evaluate the request.
Logging into a Community Account
Users who have been given access to the community account by the PI will be able to use the following command to log in:
sudo -u <community account name> /bin/bash
Once you successfully enter your own password you will assume the identity of the community account user.
Submitting Jobs From a Community Account
You can submit jobs the same as your normal user account. The email associated with the community account is noreply@osc.edu. Please add email recipients in your job script if you would like to receive notifications from the job.
Add multiple email recipients in a job using
#SBATCH --mail-user=<email address>
Adding Users to a Community Account
The PI of the project needs to send an email to OSC Help with the username of the person that they would like to add.
Checking jobs in XDMoD
To check the statistics of the jobs submitted by the community account in XDMoD, the PI of the project will need to send an email to OSC Help with the username of the community account.
Data Management
The owner of the data on the community account will be the community account user. Any user that has assumed the community account user identity will have access.
Access via OnDemand
The only way to access a community account is via a terminal session. This can be either via an SSH client or the terminal app within OnDemand. Other apps within OnDemand such as Desktops or specific software can not be utilized with a community account.
Compilation Guide
Pitzer Compilers
The Skylake processors that make up the original Pitzer cluster and the Cascade Lake processors in its expansion support the AVX512 instruction set, but you must set the correct compiler flags to take advantage of it. AVX512 has the potential to speed up your code by a factor of 8 or more, depending on the compiler and options you would otherwise use.
With the Intel compilers, use -xHost and -O2 or higher. With the gnu compilers, use -march=native and -O3. The PGI compilers by default use the highest available instruction set, so no additional flags are necessary.
This advice assumes that you are building and running your code on Pitzer. The executables will not be portable. Of course, any highly optimized builds, such as those employing the options above, should be thoroughly validated for correctness.
Intel (recommended)
| NON-MPI | MPI | |
|---|---|---|
| FORTRAN 90 | ifort |
mpif90 |
| C | icc |
mpicc |
| C++ | icpc |
mpicxx |
Recommended Optimization Options
The -O2 -xHost options are recommended with the Intel compilers. (For more options, see the "man" pages for the compilers.
OpenMP
Add this flag to any of the above: -qopenmp
PGI
| NON-MPI | MPI | |
|---|---|---|
| FORTRAN 90 | pgfortran or pgf90 |
mpif90 |
| C | pgcc |
mpicc |
| C++ | pgc++ |
mpicxx |
Recommended Optimization Options
The -fast option is appropriate with all PGI compilers. (For more options, see the "man" pages for the compilers)
OpenMP
Add this flag to any of the above: -mp
GNU
| NON-MPI | MPI | |
|---|---|---|
| FORTRAN 90 | gfortran |
mpif90 |
| C | gcc |
mpicc |
| C++ | g++ |
mpicxx |
Recommended Optimization Options
The -O2 -march=native options are recommended with the GNU compilers. (For more options, see the "man" pages for the compilers)
OpenMP
Add this flag to any of the above: -fopenmp
Intel (recommended)
| NON-MPI | MPI | |
|---|---|---|
| FORTRAN 90 | ifort |
mpif90 |
| C | icc |
mpicc |
| C++ | icpc |
mpicxx |
Recommended Optimization Options
The -O2 -xHost options are recommended with the Intel compilers. (For more options, see the "man" pages for the compilers.
OpenMP
Add this flag to any of the above: -qopenmp or -openmp
PGI
| NON-MPI | MPI | |
|---|---|---|
| FORTRAN 90 | pgfortran or pgf90 |
mpif90 |
| C | pgcc |
mpicc |
| C++ | pgc++ |
mpicxx |
Recommended Optimization Options
The -fast option is appropriate with all PGI compilers. (For more options, see the "man" pages for the compilers)
OpenMP
Add this flag to any of the above: -mp
GNU
| NON-MPI | MPI | |
|---|---|---|
| FORTRAN 90 | gfortran |
mpif90 |
| C | gcc |
mpicc |
| C++ | g++ |
mpicxx |
Recommended Optimization Options
The -O2 -march=native options are recommended with the GNU compilers. (For more options, see the "man" pages for the compilers)
OpenMP
Add this flag to any of the above: -fopenmp
Further Reading:
Firewall and Proxy Settings
Connections to OSC
In order for users to access OSC resources through the web your firewall rules should allow for connections to the following publicly-facing IP ranges. Otherwise, users may be blocked or denied access to our services.
- 192.148.248.0/24
- 192.148.247.0/24
- 192.157.5.0/25
The followingg TCP ports should be opened:
- 80 (HTTP)
- 443 (HTTPS)
- 22 (SSH)
The following domain should be allowed:
- *.osc.edu
Users may follow the instructions below "Test your configuration" to ensure that your system is not blocked from accessing our services. If you are still unsure of whether their network is blocking theses hosts or ports should contact their local IT administrator.
Test your configuration
[Windows] Test your connection using PuTTY
- Open the PuTTY application.
- Enter IP address listed in "Connections to OSC" in the "Host Name" field.
- Enter 22 in the "Port" field.
- Click the 'Telnet' radio button under "Connection Type".
- Click "Open" to test the connection.
- Confirm the response. If the connection is successful, you will see a message that says "SSH-2.0-OpenSSH_5.3", as shown below. If you receive a PuTTY error, consult your system administrator for network access troubleshooting.
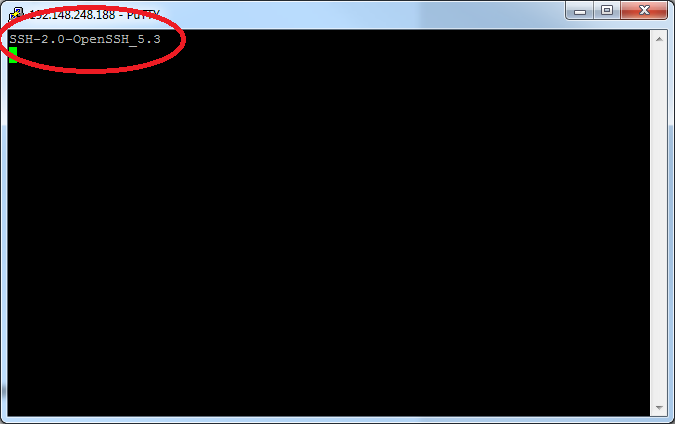
[OSX/Linux] Test your configuration using telnet
- Open a terminal.
- Type
telnet IPaddress 22(Here,IPaddressis IP address listed in "Connections to OSC"). - Confirm the connection.
Connections from OSC
All outbound network traffic from all of OSC's compute nodes are routed through a network address translation host (NAT) including the following IPs:
- 192.148.249.248
- 192.148.249.249
- 192.148.249.250
- 192.148.249.251
IT and Network Administrators
Please use the above information in order to assit users in acessing our resources.
Occasionally new services may be stood up using hosts and ports not described here. If you believe our list needs correcting please let us know at oschelp@osc.edu.
Job and storage charging
All others should contact OSC Sales for pricing information.
Job charging based on usage
Jobs are charged based length, number of cores, amount of memory, single node versus multi-node, and type of resource.
Length and number of cores
Jobs are recorded in terms of core-hours hours used. Core-hours can be calculated by:
number of cores * length of job
e.g.
A 4 core job that runs for 2 hours would have a total core-hour usage of:
4 cores * 2 hours = 8 core-hours
Amount of Memory
Each processor has a default amount of memory paired along with it, which differs by cluster. When requesting a specifc amount of memory that doesn't correlate with the default pairing, the charging uses an algorithm to determine if the effective cores should be used.
The value for effective cores will be used in place of the actual cores used if and only if it is larger than the explicit number of cores requested.
effective cores = memory / memory per core
e.g.
A job that requests nodes=1:ppn=3 will still be charged for 3 cores of usage.
However, a job that requests nodes=1:ppn=1,mem=12GB, where the default memory allocated per core is 4GB, then the job will be charged for 3 cores worth of usage.
effective cores = 12GB / (4GB/core) = 3 core
Single versus Multi-Node
If requesting a single node, then a job is charged for only the cores/processors requested. However, when requesting multiple nodes the job is charged for each entire node regardless of the number of cores/processors requested.
Type of resource
Depending on the type of node requested, it can change the dollar rate charged per core-hour. There are currently three types of nodes, regular, hugememory,and gpu.
If a gpu node is used, there are two metrics recorded, core-hours and gpu-hours. Each has a different dollar-rate, and these are combined to determine the total charges for usage.
All others should contact OSC Sales for pricing information.
e.g.
A job requests nodes=1:ppn=8:gpus=2 and runs for 1 hour.
The usage charge would be calculated using:
8 cores * 1 hour = 8 core-hours
and
2 gpus * 1 hour = 2 gpu-hours
and combined for:
8 core-hours + 2 gpu-hours
Project storage charging based on quota
Projects that request extra storage be added are charged for that storage based on the total space reserved (i.e. your quota).
The rates are in TB per month:
storage quota in TB * rate per month
All others should contact OSC Sales for pricing information.
Out-of-Memory (OOM) or Excessive Memory Usage
Problem description
A common problem on our systems is that a user's job causes a node out of memory or uses more than its allocated memory if the node is shared with other jobs.
If a job exhausts both the physical memory and the swap space on a node, it causes the node to crash. With a parallel job, there may be many nodes that crash. When a node crashes, the OSC staff has to manually reboot and clean up the node. If other jobs were running on the same node, the users have to be notified that their jobs failed.
If your job requests less than a full node, for example, --ntasks-per-node=4, it may be scheduled on a node with other running jobs. In this case, your job is entitled to a memory allocation proportional to the number of cores requested. For example, if a system has 4.5 GB per core and you request one core, it is your responsibility to make sure your job uses no more than 4.5 GB. Otherwise your job will interfere with the execution of other jobs.
In addition, our current GPFS file system is a distributed process with significant interactions between the clients. As the compute nodes being GPFS flle system clients, a certain amount of memory of each node needs to be reserved for these interactions. As a result, the maximum physical memory of each node allowed to be used by users' jobs is reduced, in order to keep the healthy performance of the file system. In addition, using swap memory is not allowed.
Example errors
# OOM in a parallel program launched through srun
slurmstepd: error: Detected 1 oom-kill event(s) in StepId=14604003.0 cgroup. Some of your processes may have been killed by the cgroup out-of-memory handler.

srun: error: o0616: task 0: Out Of Memory
# OOM in program run directly by the batch script of a job
slurmstepd: error: Detected 1 oom-kill event(s) in StepId=14604003.batch cgroup. Some of your processes may have been killed by the cgroup out-of-memory handler.
Background
Each node has a fixed amount of physical memory and a fixed amount of disk space designated as swap space. If your program and data don’t fit in physical memory, the virtual memory system writes pages from physical memory to disk as necessary and reads in the pages it needs. This is called swapping.
You can see the memory and swap values for a node by running the Linux command free on the node.
In the world of high-performance computing, swapping is almost always undesirable. If your program does a lot of swapping, it will spend most of its time doing disk I/O and won’t get much computation done. Swapping is not supported at OSC. Please consider the suggestions below.
Suggested solutions
Here are some suggestions for fixing jobs that use too much memory. Feel free to contact OSC Help for assistance with any of these options.
Some of these remedies involve requesting more processors (cores) for your job. As a general rule, we require you to request a number of processors proportional to the amount of memory you require. You need to think in terms of using some fraction of a node rather than treating processors and memory separately. If some of the processors remain idle, that’s not a problem. Memory is just as valuable a resource as processors.
Request whole node or more processors
Jobs requesting less than a whole node are those that request less than the total number of available cores. These jobs can be problematic for two reasons. First, they are entitled to use an amount of memory proportional to the cores requested; if they use more they interfere with other jobs. Second, if they cause a node to crash, it typically affects multiple jobs and multiple users.
If you’re sure about your memory usage, it’s fine to request just the number of processors you need, as long as it’s enough to cover the amount of memory you need. If you’re not sure, play it safe and request all the processors on the node.
Reduce memory usage
Consider whether your job’s memory usage is reasonable in light of the work it’s doing. The code itself typically doesn’t require much memory, so you need to look mostly at the data size.
If you’re developing the code yourself, look for memory leaks. In MATLAB look for large arrays that can be cleared.
An out-of-core algorithm will typically use disk more efficiently than an in-memory algorithm that relies on swapping. Some third-party software gives you a choice of algorithms or allows you to set a limit on the memory the algorithm will use.
Use more nodes for a parallel job
If you have a parallel job you can get more total memory by requesting more nodes. Depending on the characteristics of your code you may also need to run fewer processes per node.
Here’s an example. Suppose your job includes the following lines:
#SBATCH --nodes=2
#SBATCH --ntasks-per-node=48
…
mpiexec mycode
This job has 2 nodes worth of memory available to it (specifically 178GB * 2 nodes of memory). The mpiexec command by default runs one process per core, which in this case is 96 copies of mycode.
If this job uses too much memory you can spread those 96 processes over more nodes. The following lines request 4 nodes, giving you a total of 712 GB of memory (4 nodes *178 GB). The -ppn 24 option on the mpiexec command says to run 24 processes per node instead of 48, for a total of 96 as before.
#SBATCH --nodes=4
#SBATCH --ntasks-per-node=48
…
mpiexec -ppn 24 mycode
Since parallel jobs are always assigned whole nodes, the following lines will also run 24 processes per node on 4 nodes.
#SBATCH --nodes=4
#SBATCH --ntasks-per-node=24
…
mpiexec mycode
How to monitor your memory usage
Grafana
If a job is currently running, or you know the timeframe that it was running, then grafana can be used to look at the individual nodes memory usage for jobs. Look for the graph that shows memory usage.
OnDemand
You can also view node status graphically using the OSC OnDemand Portal. Under "Jobs" select "Active Jobs." Click on "Job Status" and scroll down to see memory usage.
XDMoD
To view detailed metrics about jobs after waiting a day after the jobs are completed, you can use the XDMoD tool. It can show the memory usage for jobs over time as well as other metrics. Please see the job view how-to for more information on looking jobs.
sstat
Slurm command sstat can be used to obtain info for running jobs.
sstat --format=AveRSS,JobID -j <job-id> -a
During job
Query the job's cgroup which is what controls the amount of memory a job can use:
# return current memory usage
cat /sys/fs/cgroup/memory/slurm/uid_$(id -u)/job_$SLURM_JOB_ID/memory.usage_in_bytes | numfmt --to iec-i
# return memory limit
cat /sys/fs/cgroup/memory/slurm/uid_$(id -u)/job_$SLURM_JOB_ID/memory.limit_in_bytes | numfmt --to iec-i
Notes
If it appears that your job is close to crashing a node, we may preemptively delete the job.
If your job is interfering with other jobs by using more memory than it should be, we may delete the job.
In extreme cases OSC staff may restrict your ability to submit jobs. If you crash a large number of nodes or continue to submit problematic jobs after we have notified you of the situation, this may be the only way to protect the system and our other users. If this happens, we will restore your privileges as soon as you demonstrate that you have resolved the problem.
For details on retrieving files from unexpectedly terminated jobs see this FAQ.
For assistance
OSC has staff available to help you resolve your memory issues. See our client support request page for contact information.
Thread Usage Best Practices
This document serves as a knowledge base for properly managing and diagnosing threading issues in user jobs. It focuses on OpenMP, Intel Math Kernel Library (MKL), and common thread-related misuse at OSC.
Understanding Threading with OpenMP and MKL
Intel MKL is widely used in HPC for linear algebra, FFTs, and statistical routines. MKL is multithreaded by default, which can significantly improve performance but only when correctly configured.
Key Environment Variables
|
Variable |
Applies To |
Description |
|---|---|---|
|
|
All OpenMP programs |
Sets the number of threads for OpenMP. Recognized by all compilers. |
|
|
Intel MKL libraries |
Sets the number of threads for MKL. Takes precedence over |
Behavior Summary
- MKL subjects to Slurm cgroup limits and defaults to all available cores if neither variable is set.
- If both are set, MKL uses
MKL_NUM_THREADSfor its internal operations, even ifOMP_NUM_THREADSis higher. - Compiler overrides: Thread count may be overridden by compiler-specific variables (
KMP_NUM_THREADS, etc.).
Common Thread Misuse Patterns
Users often run programs in parallel using MPI or other approaches without realizing that the program was built with MKL threading or OpenMP enabled. While they may request sufficient resources for their primary parallelization method, MKL threading can still be automatically activated (as described above), leading to CPU oversubscription and performance degradation.
Commonly affected applications at OSC include R, LAMMPS, and GROMACS.
Example: Uncontrolled Threading in an MPI Job
Consider an MPI job that requests 8 CPUs:
#!/bin/bash
#SBATCH --ntasks-per-node=8

srun /path/to/mpi/program
Without properly setting OMP_NUM_THREADS or MKL_NUM_THREADS, each MPI rank may spawn 8 threads by default. This results in a total of 64 threads (8 threads × 8 ranks), which exceeds the allocated CPU resources. Such oversubscription can severely degrade performance, interfere with other users' jobs on the same node, and in extreme cases, even crash the node.
Best Practice
- Set
MKL_NUM_THREADS=1unless performance tuning suggests otherwise. - For a hybrid OpenMP + MPI program, use
--cpus-per-task=Nand setOMP_NUM_THREADS=Naccordingly. - If you are unsure whether OpenMP is needed, set
OMP_NUM_THREADS=1to disable threading safely. - Always validate effective thread usage: MPI ranks × threads per rank ≤ allocated CPU cores.
Example: Properly Configured Job Script (8 OpenMP Threads per MPI Rank)
#!/bin/bash
#SBATCH --ntasks-per-node=8
#SBATCH --cpus-per-task=8

export MKL_NUM_THREADS=1
export OMP_NUM_THREADS=$SLURM_CPUS_PER_TASK
srun /path/to/mpi/program
Example: If OpenMP Threading Is Not Needed
#!/bin/bash
#SBATCH --ntasks-per-node=8

export MKL_NUM_THREADS=1
export OMP_NUM_THREADS=1
srun /path/to/mpi/program
Note on Implicit Threading via Libraries
There are several cases where the main program is not explicitly built with MKL threading or OpenMP enabled, but its dependent libraries are. A common example is a Python program that uses NumPy. Certain NumPy operations, such as np.dot, can leverage MKL or OpenMP internally and spawn multiple threads.
In such cases, if you are unsure whether threading is needed, it is safest to follow the example above and explicitly set:
export OMP_NUM_THREADS=1
export MKL_NUM_THREADS=1
This ensures controlled thread usage and prevents unexpected oversubscription.
Uncommon Thread Misuse Cases
Some programs not designed for HPC environments may spawn multiple subprocesses or determine the number of threads by directly reading system information from /proc/cpuinfo, ignoring Slurm-imposed resource limits. In such cases, the standard thread control methods described above may not work, as the internal settings override user-defined environment variables.
Sometimes, these programs offer command-line options or configuration parameters to control threading. Users should consult the program's documentation and explicitly set the number of threads as appropriate for their job's allocated resources.
XDMoD Tool
XDMoD Overview
XDMoD, which stands for XD Metrics on Demand, is an NSF-funded open source tool that provides a wide range of metrics pertaining to resource utilization and performance of high-performance computing (HPC) resources, and the impact these resources have in terms of scholarship and research.
How to log in
Visit OSC's XDMoD (xdmod.osc.edu) and click 'Sign In' in the upper left corner of the page.


XDMoD Tabs
When you first log in you will be directed to the Summary tab. The different XDMoD tabs are located near the top of the page. You will be able to change tabs simply by click on the one you would like to view. By default, you will see the data from the previous month, but you can change the start and end date and then click 'refresh' to update the timeframe being reported.

Summary:
The Summary tab is comprised of a duration selector toolbar, a summary information bar, followed by a select set of charts representative of the usage. The Summary tab provides a dashboard that presents summary statistics and selected charts that are useful to the role of the current user. More information can be found at the XDMoD User Manual.
Usage:
The Usage tab is comprised of a chart selection tree on the left, and a chart viewer to the right of the page. The usage tab provides a convenient way to browse all the realms present in XDMoD. More information can be found at the XDMoD User Manual.
Metric Explorer:
The Metric Explorer allows one to create complex plots containing multiple multiple metrics. It has many points and click features that allow the user to easily add, filter, and modify the data and the format in which it is presented. More information can be found at the XDMoD User Manual.
App Kernels:
The Application Kernels tab consists of three sub-tabs, and each has a specific goal in order to make viewing application kernels simple and intuitive. The three sub-tabs consist of the Application Kernels Viewer, Application Kernels Explorer, and the Reports subsidiary tabs. More information can be found at the XDMoD User Manual.
Report Generator:
This tab will allow you to manage reports. The left region provides a listing of any reports you have created. The right region displays any charts you have chosen to make available for building a report. More information can be found at the XDMoD User Manual.
Job Viewer:
The Job Viewer tab displays information about individual HPC jobs and includes a search interface that allows jobs to be selected based on a wide range of filters. This tab also contains the SUPReMM module. More information on the SUPReMM module can be found below in this documentation. More information can be found at the XDMoD User Manual.
About:
This tab will display information about XDMoD.
Different Roles
XDMoD utilizes roles to restrict access to data and elements of the user interface such as tabs. OSC client holds the 'User Role' by default after you log into OSC XDMoD using your OSC credentials. With 'User Role', users are able to view all data available to their personal utilization information. They are also able to view information regarding their allocations, quality of service data via the Application Kernel Explorer, and generate custom reports. We also support the 'Principal Investigator' role, who has access to all data available to a user, as well as detailed information for any users included on their allocations or project.
References, Resources, and Documentation
Job Viewer
The Job Viewer Tab displays information about individual HPC jobs and includes a search interface that allows jobs to be selected based on a wide range of filters:
1. Click on the Job Viewer tab near the top of the page.
2. Click Search in the top left-hand corner of the page

3. If you know the Resource and Job Number, use the quick search lookup form discussed in 4a. If you would like more options, use the advanced search discussed in 4b.
4a. For a quick job lookup, select the resource and enter the job number and click 'Search'.

4b. Within the Advanced Search form, select a timeframe and Add one or more filters. Click to run the search on the server.

5. Select one or more Jobs. Provide the 'Search Name', and click 'Save Results' at the bottom of this window to view data about the selected jobs.
6. To view data in more details for the selected job, under the Search History, click on the Tree and select a Job.
7. More information can be found in the section of 'Job Viewer' of the XDMoD User Manual.
XDMoD - Checking Job Efficiency
Intro
XDMoD can be used to look at the performance of past jobs. This tutorial will explain how to retreive this job performance data and how to use this data to best utilize OSC resources.
First, log into XDMoD.
You will be sent to the Summary Tab in XDMoD:
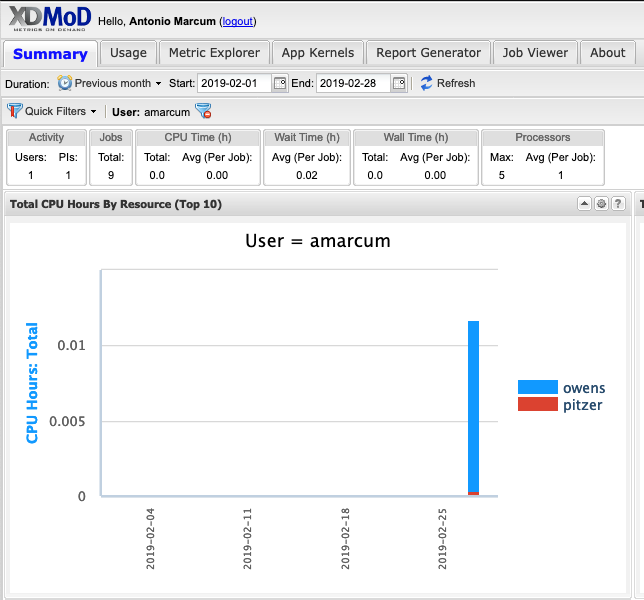
Click on the Metric Explorer tab, then navigate to the Metric Catalog click SUPREMM to show the various metric options, then Click the "Avg CPU %: User: weighted by core hour " metric.
A drop-down menu will appear for grouping the data to viewed. Group by "CPU User Value
 ":
":
This will provide a time-series chart showing the average 'CPU user % weighted by core hours, over all jobs that were executing' separated by groups of 10 for that 'CPU User value'.
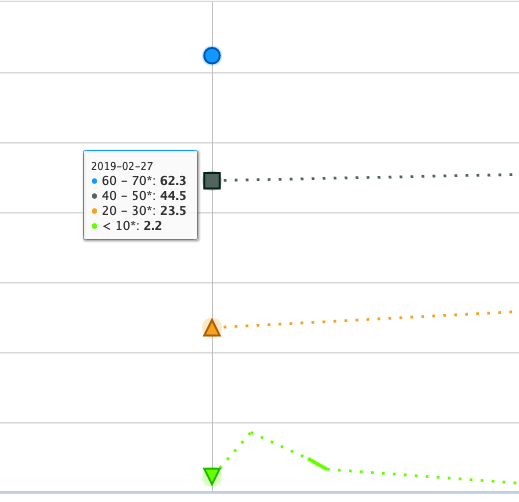
One can change the time period by adjusting the preset duration value or entering dates in the "start" and "end" boxes by selecting the calendar or manually entering dates in the format 'yyyy-mm-dd'. Once the desired time period is entered the "Refresh" button will be highlighted yellow, click the "Refresh" button to reload that time period data into the chart.

Once the data is loaded, click on one of the data points, then navigate to "Drilldown" and select "Job Wall Time". This will group the job data by the amount of wall time used.

Generally, the lower the CPU User Value, the less efficient that job was. This chart can now be used to go into some detailed information on specific jobs. Click one of the points again and select "Show raw data".
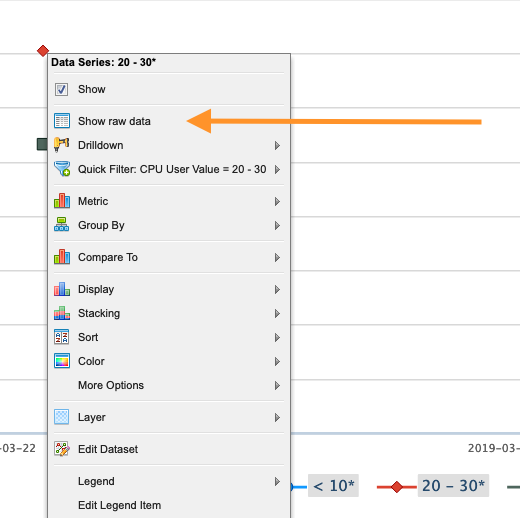
This will bring up a list of jobs included in that data point. Click one of the jobs shown.

After loading, this brings up the "Job Viewer" Tab for showing the details about the job selected.

It is important to explain some information about the values immediately visible such as the "CPU User", "CPU User Balance" and "Memory Headroom".
The "CPU User" section gives a ratio for the amount of CPU time used by the job during the time that job was executing, think of it as how much "work" the CPUs were doing doing execution.
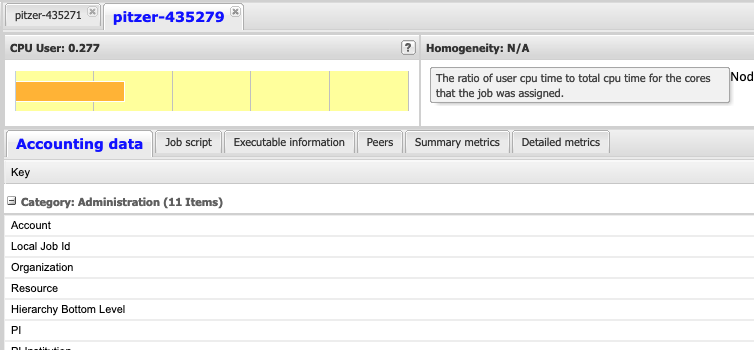
The "CPU User Balance" section gives a measure for how evenly spread the "work" was between all the CPUs that were allocated to this job while it was executing. (Work here means how well was the CPU utilized, and it is preferred that the CPUs be close to fully utilized during job execution.)
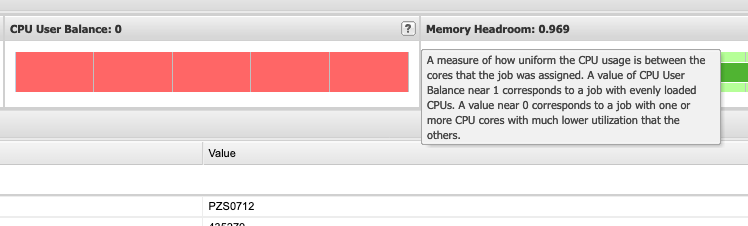
Finally, "Memory Headroom" gives a measure for the amount of memory used for that job. It can be difficult to understand what a good value is here. Generally, it is recommended to not specifically request an amount of memory unless the job requires it. When making those memory requests, it can be beneficial to investigate the amount of memory that is actually used by the job and plan accordingly. Below, a value closer to 0 means a job used most of the memory allocated to it and a value closer to 1 means that the job used less memory than the job was allocated.
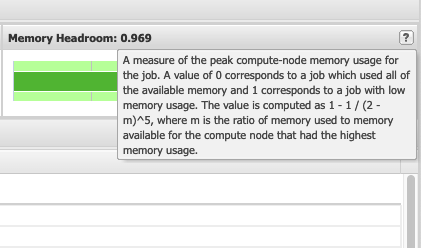
This information is useful for better utilizing OSC resources by having better estimates of the resources that jobs may require.