HOWTO
Our HOWTO collection contains short tutorials that help you step through some of the common (but potentially confusing) tasks users may need to accomplish, that do not quite rise to the level of requiring more structured training materials. Items here may explain a procedure to follow, or present a "best practices" formula that we think may be helpful.
Using Software on Pitzer RHEL 7
While OSC has upgraded the Pitzer cluster to RHEL 9, you may encounter difficulties when migrating jobs from RHEL 7 to the new system. To help you continue your research, we provide a containerized RHEL 7 environment on Pitzer RHEL 9. This container replicates the original RHEL 7 system and software environment used on Pitzer.
Note: This containerized RHEL7 environment is a temporary solution and may be terminated at any time without prior notice.
Reusing Job Scripts
Assume you have an existing job script that previously worked on Pitzer RHEL 7 (e.g., my_rhel7_job.sh):
#!/bin/bash
#SBATCH --nodes=1
#SBATCH --ntasks-per-node=4

my_rhel7_program
To run this script within the RHEL 7 container on Pitzer RHEL 9, prepare a new job script that uses the container wrapper, such as my_rhel7_job_in_container.sh:
#!/bin/bash
#SBATCH --nodes=1
#SBATCH --ntasks-per-node=4

/apps/share/tools/rhel7_wrapper.sh ./my_rhel7_job.sh
Then submit the job after making my_rhel7_job.sh an executable
chmod +x my_rhel7_job.sh
sbatch my_rhel7_job_in_container.sh
Running a MPI program
We have disabled Slurm support inside the container due to certain technical issues. Therefore, any Slurm-specific commands in your job script (such as srun or sbcast) will not work. You should replace them with alternatives such as mpirun/mpiexec and cp, respectively.
Please note that MVAPICH2 is built only with Slurm support, so there is no native mpirun/mpiexec command available for it inside the container. Instead, you can use Intel-MPI or OpenMPI, which provide their own mpiexec commands.
Below are example replacements for srun:
# OpenMPI
mpiexec --bind-to none <your_program>

# Intel-MPI
mpiexec -launcher ssh <your_program>
GPU support and extra bind path
If your job requires GPUs, append the --nv option:
/apps/share/tools/rhel7_wrapper.sh --nv ./my_rhel7_job.sh
By default, you can access your own home directory. If you need access to another user's home directory that has been shared with you, use the --bind option:
/apps/share/tools/rhel7_wrapper.sh --bind /someone/else/home ./my_rhel7_job.sh
Working Interactively in the RHEL 7 Environment
In some cases, you may need to recompile your program within the RHEL 7 environment. You can either use the job script mentioned above or launch an interactive container shell session after starting an interactive job:
/apps/share/tools/rhel7_shell.sh
Once inside the container shell, initialize the RHEL 7 environment by running:
source /etc/profile.d/lmod.sh
source /etc/profile.d/z00_StdEnv.sh
module rm xalt
Or, as a shortcut:
. /apps/share/tools/init_rhel7.sh
You can verify that the RHEL 7 environment is properly set up by running:
module list
The options --nv and --bind are also available in the rhel7_shell.sh script.
HOW TO: Look at requested time accuracy using XDMoD
The XDMoD tool at xdmod.osc.edu can be used to get an overview of how accurate the requested time of jobs are with the elapsed time of jobs.
To request an amount of time for a job, you can use the following header.
#SBATCH --time=xx:xx:xx
The elapsed time is how long the job ran for before completing. This can be obtained for completed jobs using the sacct command.
$ sacct -u <username> --format=jobid,account,elapsed
It is important to understand that the requested time is used when scheduling a submitted job. A longer requested time will also increase the wait time, as it will take longer to reserve the requested resources for that amount of time. This makes getting the requested job time as close to the expected elapsed time important for minimizing wait times.
The above method of checking elapsed time allows one to view the requested time accuracy for an individual job, but XDMoD can be used to do this for jobs submitted over a specified period of time.
First, login to xdmod.osc.edu. (See this page for more instructions.)
https://www.osc.edu/supercomputing/knowledge-base/xdmod_tool
Then, navigate to the Metric Explorer tab.
Look for the Metric Catalog on the left side of the page and expand the SUPREMM options. Select Wall Hours: Requested: Per Job and group by None.
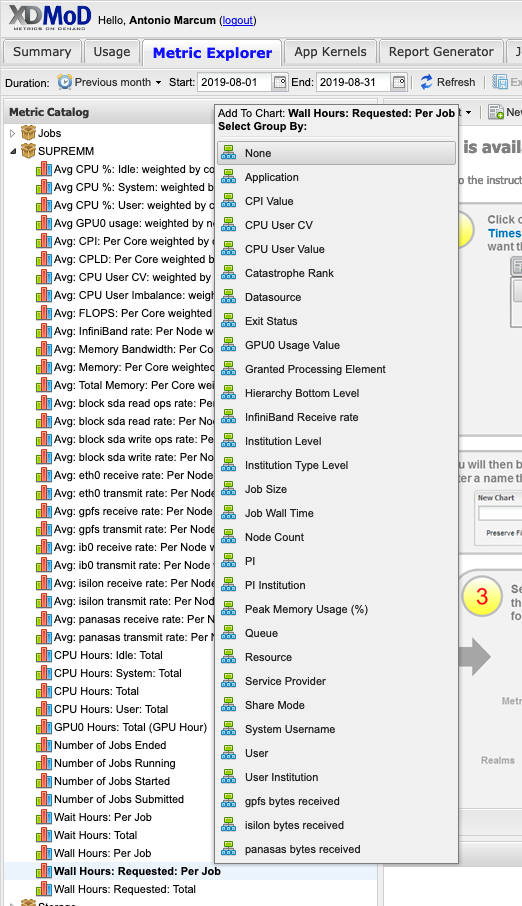
This will now show the average time requested.
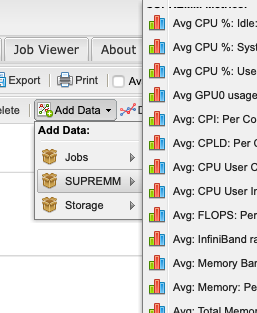
The actual time data can be added by navigating to Add Data -> SUPREMM -> Wall Hours: Per Job.

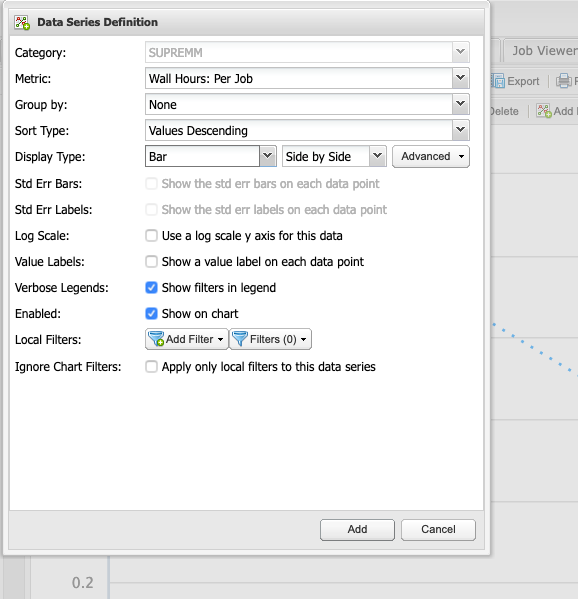
This will open a new window titled Data Series Definition, to change some parameters before showing the new data. In order to easily distinguish between elapsed and requested time, change the Display Type to Bar, then click add to view the new data.
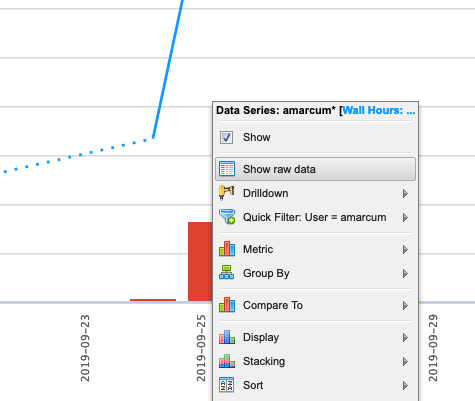
Now there is a line showing the average time requested by submitted jobs, and bars depicting the average time that elapsed to complete those jobs. Essentialy, the closer the bar is to the line, without intersecting the line, the more accurate the time predicition. If the bar intersects the line, then it may indicate the there was not enough time requested for a job to complete, but remember that these values are averages.

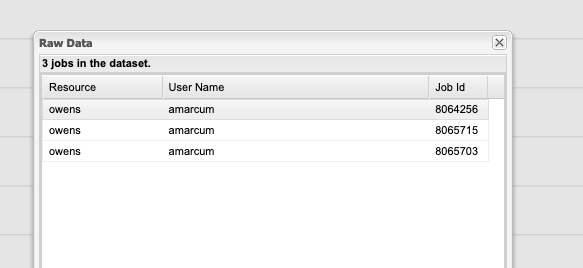
One can also view more detailed information about these jobs by clicking a data point and using the Show raw data option.
HOWTO: Add and Use DUO MFA
Options:
- Duo Mobile: You can install Duo Mobile on your smartphone or tablet. It will give you two ways to authenticate either through DUO push notification or DUO mobile passcode
- Text Message Passcode: You can register your phone and request a passcode via text message. It will send you a single use passcode via text message
- Phone Call: You can register your phone and request a phone call. It will call you and provide a single use passcode
- Security keys: You can purchase security keys such as a YubiKey to access web applications.
- If you need for SSH connection, please purchase YubiKeys that support "OATH - HOTP" and email OSC Help to schedule a meeting and get your security key enrolled in OSC's Duo instance. See this Use YubiKeys with Duo page for additional information.
HOWTO: Collect performance data for your program
This page outlines ways to generate and view performance data for your program using tools available at OSC.
Intel Tools
This section describes how to use performance tools from Intel. Make sure that you have an Intel module loaded to use these tools.
Intel VTune
Intel VTune is a tool to generate profile data for your application. Generating profile data with Intel VTune typically involves three steps:
1. Prepare the executable for profiling.
You need executables with debugging information to view source code line detail: re-compile your code with a -g option added among the other appropriate compiler options. For example:
mpicc wave.c -o wave -g -O3
2. Run your code to produce the profile data.
Profiles are normally generated in a batch job. To generate a VTune profile for an MPI program:
mpiexec <mpi args> amplxe-cl <vtune args> <program> <program args>
where <mpi args> represents arguments to be passed to mpiexec, <program> is the executable to be run, <vtune args> represents arguments to be passed to the VTune executable amplxe-cl, and <program args> represents arguments passed to your program.
For example, if you normally run your program with mpiexec -n 12 wave_c, you would use
mpiexec -n 12 amplxe-cl -collect hotspots -result-dir r001hs wave_c
To profile a non-MPI program:
amplxe-cl <vtune args> <program> <program args>
The profile data is saved in a .map file in your current directory.
As a result of this step, a subdirectory that contains the profile data files is created in your current directory. The subdirectory name is based on the -result-dir argument and the node id, for example, r001hs.o0674.ten.osc.edu.
3. Analyze your profile data.
You can open the profile data using the VTune GUI in interactive mode. For example:
amplxe-gui r001hs.o0674.ten.osc.edu
One should use an OnDemand VDI (Virtual Desktop Interface) or have X11 forwarding enabled (see Setting up X Windows). Note that X11 forwarding can be distractingly slow for interactive applications.
Intel APS
Intel's Application Performance Snapshot (APS) is a tool that provides a summary of your application's performance . Profiling HPC software with Intel APS typically involves four steps:
1. Prepare the executable for profiling.
Regular executables can be profiled with Intel APS. but source code line detail will not be available. You need executables with debugging information to view source code line detail: re-compile your code with a -g option added among the other approriate compiler options. For example:
mpicc wave.c -o wave -tcollect -O3
2. Run your code to produce the profile data directory.
Profiles are normally generated in a batch job. To generate profile data for an MPI program:
mpiexec -trace <mpi args> <program> <program args>
where <mpi args> represents arguments to be passed to mpiexec, <program> is the executable to be run and <program args> represents arguments passed to your program.
For example, if you normally run your program with mpiexec -n 12 wave_c, you would use
mpiexec -n 12 wave_c
To profile a non-MPI program:
aps <program> <program args>
The profile data is saved in a subdirectory in your current directory. The directory name is based on the date and time, for example, aps_result_YYYYMMDD/.
3. Generate the profile file from the directory.
To generate the html profile file from the result subdirectory:
aps --report=./aps_result_YYYYMMDD
to create the file aps_report_YYYYMMDD_HHMMSS.html.
4. Analyze the profile data file.
You can open the profile data file using a web browswer on your local desktop computer. This option typically offers the best performance.
Linaro Tools
This section describes how to use performance tools from ARM.
Linaro MAP
Instructions for how to use MAP is available here.
Linaro DDT
Instructions for how to use DDT is available here.
Linaro Performance Reports
Instructions for how to use Performance Reports is available here.
Other Tools
This section describes how to use other performance tools.
HPC Toolkit
Rice University's HPC Toolkit is a collection of performance tools. Instructions for how to use it at OSC is available here.
TAU Commander
TAU Commander is a user interface for University of Oregon's TAU Performance System. Instructions for how to use it at OSC is available here.
HOWTO: Create and Manage Python Environments
While our Python installations come with many popular packages installed, you may come upon a case in which you need an additional package that is not installed. If the specific package you are looking for is available from anaconda.org (formerly binstar.org), you can easily install it and required dependencies by using the conda package manager.
Procedure
The following steps are an example of how to set up a Python environment and install packages to a local directory using conda. We use the name local for the environment, but you may use any other name.
Load proper Python module
We have python and Miniconda3 modules. python and miniconda3 module is based on Conda package manager. python modules are typically recommended when you use Python in a standard environment that we provide. However, if you want to create your own python environment, we recommend using miniconda3 module, since you can start with minimal configurations.
module load miniconda3/24.1.2-py310
Configure Conda (first time use)
The first time you use conda, it is recommend to configure it to use the desired channels and options. A number of channels exist with different packages and licensing requirements. While academic users are generally unrestricted, commercial users may be subject to terms of service requiring license purchasing. Commercial users are encouraged to check with their organization regarding licensing. Please see Anaconda, Inc. Terms of Service for details.
To avoid using proprietary packages from the defaults channel, users can remove it:
conda config --remove channels defaults
and add the alternative conda-forge channel instead:
conda config --add channels conda-forge
OSC recommends setting strict channel priority:
conda config --set channel_priority strict
If strict channel priority makes required dependencies unavailable, it can be disabled:
conda config --set channel_priority flexible
Create Python installation to local directory
Three alternative create commands are listed. These cover the most common cases.
CREATE NEW ENVIRONMENT
The following will create a minimal Python installation without any extraneous packages:
conda create -n local
CLONE BASE ENVIRONMENT
If you want to clone the full base Python environment from the system, you may use the following create command:
conda create -n local --clone base
CREATE NEW ENVIRONMENT WITH SPECIFIC PACKAGES
You can augment the command above by listing specific packages you would like installed into the environment. For example, the following will create a minimal Python installation with only the specified packages (in this case, numpy and babel):
conda create -n local numpy babel
By default, conda will install the newest versions of the packages it can find. Specific versions can be specified by adding =<version> after the package name. For example, the following will create a Python installation with Python version 2.7 and NumPy version 1.16:
conda create -n local python=2.7 numpy=1.16
CREATE NEW ENVIRONMENT WITH A SPECIFIC location
By default, conda will create the environment in your home location $HOME. To specify a location where the local environment is created, for example, in the project space /fs/ess/ProjectID, you can use the following command:
conda create --prefix /fs/ess/ProjectID/local
To activate the environment, use the command:
source activate /fs/ess/ProjectID/local
To verify that a clone has been created, use the command
conda info -e
For additional conda command documentation see https://docs.conda.io/projects/conda/en/latest/commands.html#conda-general-commands
Activate environment
For the bash shell:
source activate local
At the end of the conda create step, you may saw a message from the installer that you can use conda activate command for activating environment. But, please don't use conda activate command, because it will try to update your shell configuration file and it may cause other issues. So, please use source activate command as we suggest above.
conda init to enable the conda activate command, your shell configuration file such as .bashrc would have been altered with conda-specific lines. Upon activation of your environment using source activate, you may notice that the source activate/deactivate commands cease to function. However, we will be updating miniconda3 modules by May 15th 2024 to ensure that conda activate no longer alters the .bashrc file. Consequently, you can safely remove the conda-related lines between # >>> conda initialize >>> and # <<< conda initialize <<< from your .bashrc file and continue using the conda activate command.On newer versions of Anaconda on the Pitzer cluster you may also need to perform the removal of the following packages before trying to install your specific packages:
conda remove conda-build
conda remove conda-env
Install packages
To install additional packages, use the conda install command. For example, to install the yt package:
conda install yt
By default, conda will install the newest version if the package that it can find. Specific versions can be specified by adding =<version> after the package name. For example, to install version 1.16 of the NumPy package:
conda install numpy=1.16
If you need to install packages with pip, then you can install pip in your virtual environment by
conda install pip
Then, you can install packages with pip as
pip install PACKAGE
Please make sure that you have installed pip in your environment not using one from the miniconda module. The pip from the miniconda module will give access to the packages from the module to your environment which may or may not be desired. Also set export PYTHONNOUSERSITE=True to prevent packages from user's .local path.
Test Python package
Now we will test our installed Python package by loading it in Python and checking its location to ensure we are using the correct version. For example, to test that NumPy is installed correctly, run
python -c "from __future__ import print_function; import numpy; print(numpy.__file__)"
and verify that the output generally matches
$HOME/.conda/envs/local/lib/python3.6/site-packages/numpy/__init__.py
To test installations of other packages, replace all instances of numpy with the name of the package you installed.
Remember, you will need to load the proper version of Python before you go to use your newly installed package. Packages are only installed to one version of Python.
Install your own Python packages
If the method using conda above is not working, or if you prefer, you can consider installing Python packages from the source. Please read HOWTO: install your own Python packages.
But I use virtualenv and/or pip!
See the comparison to these package management tools here:
https://docs.conda.io/projects/conda/en/latest/commands.html#conda-vs-pip-vs-virtualenv-commands
Use pip only without conda package manager
pip installations are supported:
module load python
module list                            # check which python you just loaded
pip install --user --upgrade PACKAGE   # where PACKAGE is a valid package name
Note the default installation prefix is set to the system path where OSC users cannot install the package. With the option --user, the prefix is set to $HOME/.local where lib, bin, and other top-level folders for the installed packages are placed. Finally, the option --upgrade will upgrade the existing packages to the newest available version.
The one issue with this approach is portability with multiple Python modules. If you plan to stick with a single Python module, then this should not be an issue. However, if you commonly switch between different Python versions, then be aware of the potential trouble in using the same installation location for all Python versions.
Use pip in a Python virtual environment (Python 3 only)
Typically, you can install packages with the methods shown in Install packages section above, but in some cases where the conda package installations have no source from conda channels or have dependency issues, you may consider using pip in an isolated Python virtual environment.
To create an isolated virtual environment:
module reset
python3 -m venv --without-pip $HOME/venv/mytest --prompt "local"
source $HOME/venv/mytest/bin/activate
(local) curl https://bootstrap.pypa.io/get-pip.py |python     # get the newest version of pip
(local) deactivate
where we use the path $HOME/venv/mytest and the name local for the environment, but you may use any other path and name.
To activate and deactivate the virtual environment:
source $HOME/venv/mytest/bin/activate
(local) deactivate
To install packages:
source $HOME/venv/mytest/bin/activate
(local) pip install PACKAGE
You don't need the --user option within the virtual environment.
Use uv for virtual environments and package management
uv is a fast Python package and virtual environment manager developed by Astral. It provides functionality provided by both venv and pip, but is significantly faster at dependency resolution. Some users who do not need Conda packages or cross-language support in their project may prefer to use uv for its speed.
To learn more about using uv, see HOWTO: Use uv for Python at OSC.
Further Reading
Conda Test Drive: https://conda.io/docs/test-drive.html
HOWTO: Install Tensorflow locally
This documentation describes how to install tensorflow package locally in your $HOME space. For more details on Tensorflow see the software page.
Load python module
module load miniconda3/24.1.2-py310
If you need to install tensorflow versions not already provided or would like to use tensorflow in a conda environment proceed with the tutorial below.
Create Python Environment
First we will create a conda environment which we will later install tensorflow into. See HOWTO: Create and Manage Python Environments for details on how to create and setup your environemnt.
Make sure you activate your environment before proceeding:
source activate MY_ENV
Install package
Install the latest version of tensorflow.
conda install tensorflow
You can see all available version for download on conda with conda search tensorflow
There is also a gpu compatable version called tensorflow-gpu
If there are errors on this step you will need to resolve them before continuing.
Test python package
Now we will test tensorflow package by loading it in python and checking its location to ensure we are using the correct version.
python -c "import tensorflow;print (tensorflow.__file__)"
Output:
$HOME/.conda/envs/MY_ENV/lib/python3.9/site-packages/tensorflow/__init__.py
Remember, you will need to load the proper version of python before you go to use your newly installed package. Packages are only installed to one version of python.
Please refer HOWTO: Use GPU with Tensorflow and PyTorch if you would like to use tenorflow with Gpus.
HOWTO: Install Python packages from source
While we provide a number of Python packages, you may need a package we do not provide. If it is a commonly used package or one that is particularly difficult to compile, you can contact OSC Help for assistance. We also have provided an example below showing how to build and install your own Python packages and make them available inside of Python. These instructions use "bash" shell syntax, which is our default shell. If you are using something else (csh, tcsh, etc), some of the syntax may be different.
Please consider using conda Python package manager before you try to build Python using the method explained here. We have instructions on conda here.
Gather your materials
First, you need to collect what you need in order to perform the installation. We will do all of our work in $HOME/local/src. You should make this directory now.
mkdir -p $HOME/local/src
Next, we will need to download the source code for the package we want to install. In our example, we will use NumExpr. (NumExpr is already available through conda, so it is recommended you use conda to install it: tutorial here. The following steps are simply an example of the procedure you would follow to perform an installation of software unavailable in conda or pip). You can either download the file to your desktop and then upload it to OSC, or directly download it using the wget utility (if you know the URL for the file).
cd ~/local/src
wget https://github.com/pydata/numexpr/releases/download/v2.8.4/numexpr-2.8.4.tar.gz
Next, extract the downloaded file. In this case, since it's a "tar.gz" format, we can use tar to decompress and extract the contents.
tar xvfz numexpr-2.8.4.tar.gz
You can delete the downloaded archive now or keep it should you want to start the installation from scratch.
Build it!
Environment
To build the package, we will want to first create a temporary environment variable to aid in installation. We'll call INSTALL_DIR.
export INSTALL_DIR=${HOME}/local/numexpr/2.8.4
We are roughly following the convention we use at the system level. This allows us to easily install new versions of software without risking breaking anything that uses older versions. We have specified a folder for the program (numexpr), and for the version (2.8.4). To be consistent with Python installations, we will create a second temporary environment variable that will contain the actual installation location.
export TREE=${INSTALL_DIR}/lib/python3.6/site-packages
Next, make the directory tree.
mkdir -p $TREE
Compile
To compile the package, we should switch to the GNU compilers. The system installation of Python was compiled with the GNU compilers, and this will help avoid any unnecessary complications. We will also load the Python package, if it hasn't already been loaded.
module swap intel gnu
module load python/3.6-conda5.2
Next, build it. This step may vary a bit, depending on the package you are compiling. You can execute python setup.py --help to see what options are available. Since we are overriding the install path to one that we can write to and that fits our management plan, we need to use the --prefix option.
NumExpr build also requires us to set the PYTHONPATH variable before building:
export PYTHONPATH=$PYTHONPATH:~/local/numexpr/2.8.4/lib/python3.6/site-packages
Find the setup.py file:
cd numexpr-2.8.4
Now to build:
python setup.py install --prefix=$INSTALL_DIR
Make it usable
At this point, the package is compiled and installed in ~/local/numexpr/2.8.4/lib/python3.6/site-packages. Occasionally, some files will be installed in ~/local/numexpr/2.8.4/bin as well. To ensure Python can locate these files, we need to modify our environment.
Manual
The most immediate way -- but the one that must be repeated every time you wish to use the package -- is to manually modify your environment. If files are installed in the "bin" directory, you'll need to add it to your path. As before, these examples are for bash, and may have to be modified for other shells. Also, you will have to modify the directories to match your install location.
export PATH=$PATH:~/local/numexpr/2.8.4/bin
And for the Python libraries:
export PYTHONPATH=$PYTHONPATH:~/local/numexpr/2.8.4/lib/python3.6/site-packages
Hardcode it
We don't recommend this option, as it is less flexible and can cause conflicts with system software. But if you want, you can modify your .bashrc (or similar file, depending on your shell) to set these environment variables automatically. Be extra careful; making a mistake in .bashrc (or similar) can destroy your login environment in a way that will require a system administrator to fix. To do this, you can copy the lines above modifying $PATH and $PYTHONPATH into .bashrc. Remember to test them interactively first. If you destroy your shell interactively, the fix is as simple as logging out and then logging back in. If you break your login environment, you'll have to get our help to fix it.
Make a module (recommended!)
This is the most complicated option, but it is also the most flexible, as you can have multiple versions of this particular software installed and specify at run-time which one to use. This is incredibly useful if a major feature changes that would break old code, for example. You can see our tutorial on writing modules here, but the important variables to modify are, again, $PATH and $PYTHONPATH. You should specify the complete path to your home directory here and not rely on any shortcuts like ~ or $HOME. Below is a modulefile written in Lua:
If you are following the tutorial on writing modules, you will want to place this file in $HOME/local/share/lmodfiles/numexpr/2.8.4.lua:
-- This is a Lua modulefile, this file 2.8.4.lua can be located anywhere
-- But if you are following a local modulefile location convention, we place them in
-- $HOME/local/share/lmodfiles/
-- For numexpr we place it in $HOME/local/share/lmodfiles/numexpr/2.8.4.lua
-- This finds your home directory
local homedir = os.getenv("HOME")
prepend_path("PYTHONPATH",
pathJoin(homedir, "/local/numexpr/2.8.4/lib/python3.6/site-packages"))
prepend_path(homedir, "local/numexpr/2.8.4/bin")
Once your module is created (again, see the guide), you can use your Python package simply by loading the software module you created.
module use $HOME/local/share/lmodfiles/
module load numexpr/2.8.4
HOWTO: Use GPU with Tensorflow and PyTorch
GPU Usage on Tensorflow
Environment Setup
To begin, you need to first create and new conda environment or use an already existing one. See HOWTO: Create Python Environment for more details. In this example we are using miniconda3/24.1.2-py310 . You will need to make sure your python version within conda matches supported versions for tensorflow (supported versions listed on TensorFlow installation guide), in this example we will use python 3.9.
Once you have a conda environment created and activated we will now install tensorflow into the environment (In this example we will be using version 2.17.0 of tensorflow:
pip install tensorflow==2.17.0
Verify GPU accessability (Optional):
Now that we have the environment set up we can check if tensorflow can access the gpus.
To test the gpu access we will submit the following job onto a compute node with a gpu:
#!/bin/bash
#SBATCH --account <Project-Id>
#SBATCH --job-name Python_ExampleJob
#SBATCH --nodes=1
#SBATCH --time=00:10:00
#SBATCH --gpus-per-node=1


module load miniconda3/24.1.2-py310 cuda/12.3.0

source activate tensorflow_env


# run either of the following commands

python << EOF
import tensorflow as tf
print(tf.test.is_built_with_cuda())
EOF

python << EOF
from tensorflow.python.client import device_lib
print(device_lib.list_local_devices())
EOF
You will know tensorflow is able to successfully access the gpu if tf.test.is_built_with_cuda() returns True and device_lib.list_local_devices() returns an object with /device:GPU:0 as a listed device.
At this point tensorflow-gpu should be setup to utilize a GPU for its computations.
GPU vs CPU
A GPU can provide signifcant performace imporvements to many machine learnings models. Here is an example python script demonstrating the performace improvements. This is ran on the same environment created in the above section.
from timeit import default_timer as timer
import tensorflow as tf
from tensorflow import keras
import numpy as np


(X_train, y_train), (X_test, y_test) = keras.datasets.cifar10.load_data()


# scaling image values between 0-1
X_train_scaled = X_train/255
X_test_scaled = X_test/255

# one hot encoding labels
y_train_encoded = keras.utils.to_categorical(y_train, num_classes = 10)
y_test_encoded = keras.utils.to_categorical(y_test, num_classes = 10)

def get_model():
    model = keras.Sequential([
        keras.layers.Flatten(input_shape=(32,32,3)),
        keras.layers.Dense(3000, activation='relu'),
        keras.layers.Dense(1000, activation='relu'),
        keras.layers.Dense(10, activation='sigmoid')
    ])

    model.compile(optimizer='SGD',
              loss='categorical_crossentropy',
              metrics=['accuracy'])
    return model

# GPU
with tf.device('/GPU:0'):
    start = timer()
    model_cpu = get_model()
    model_cpu.fit(X_train_scaled, y_train_encoded, epochs = 1)
    end = timer()


print("GPU time: ", end - start)

# CPU
with tf.device('/CPU:0'):
    start = timer()
    model_gpu = get_model()
    model_gpu.fit(X_train_scaled, y_train_encoded, epochs = 1)
    end = timer()

print("CPU time: ", end - start)
Example code sampled from here
The above code was then submitted in a job with the following script:
#!/bin/bash
#SBATCH --account <Project-Id>
#SBATCH --job-name Python_ExampleJob
#SBATCH --nodes=1
#SBATCH --time=00:10:00
#SBATCH --gpus-per-node=1

module load miniconda3/24.1.2-py310 cuda/12.3.0

source activate tensorflow_env

python tensorflow_example.py
As we can see from the output, the GPU provided a signifcant performace improvement.
GPU time:  3.7491355929996644

CPU time:  78.8043485119997
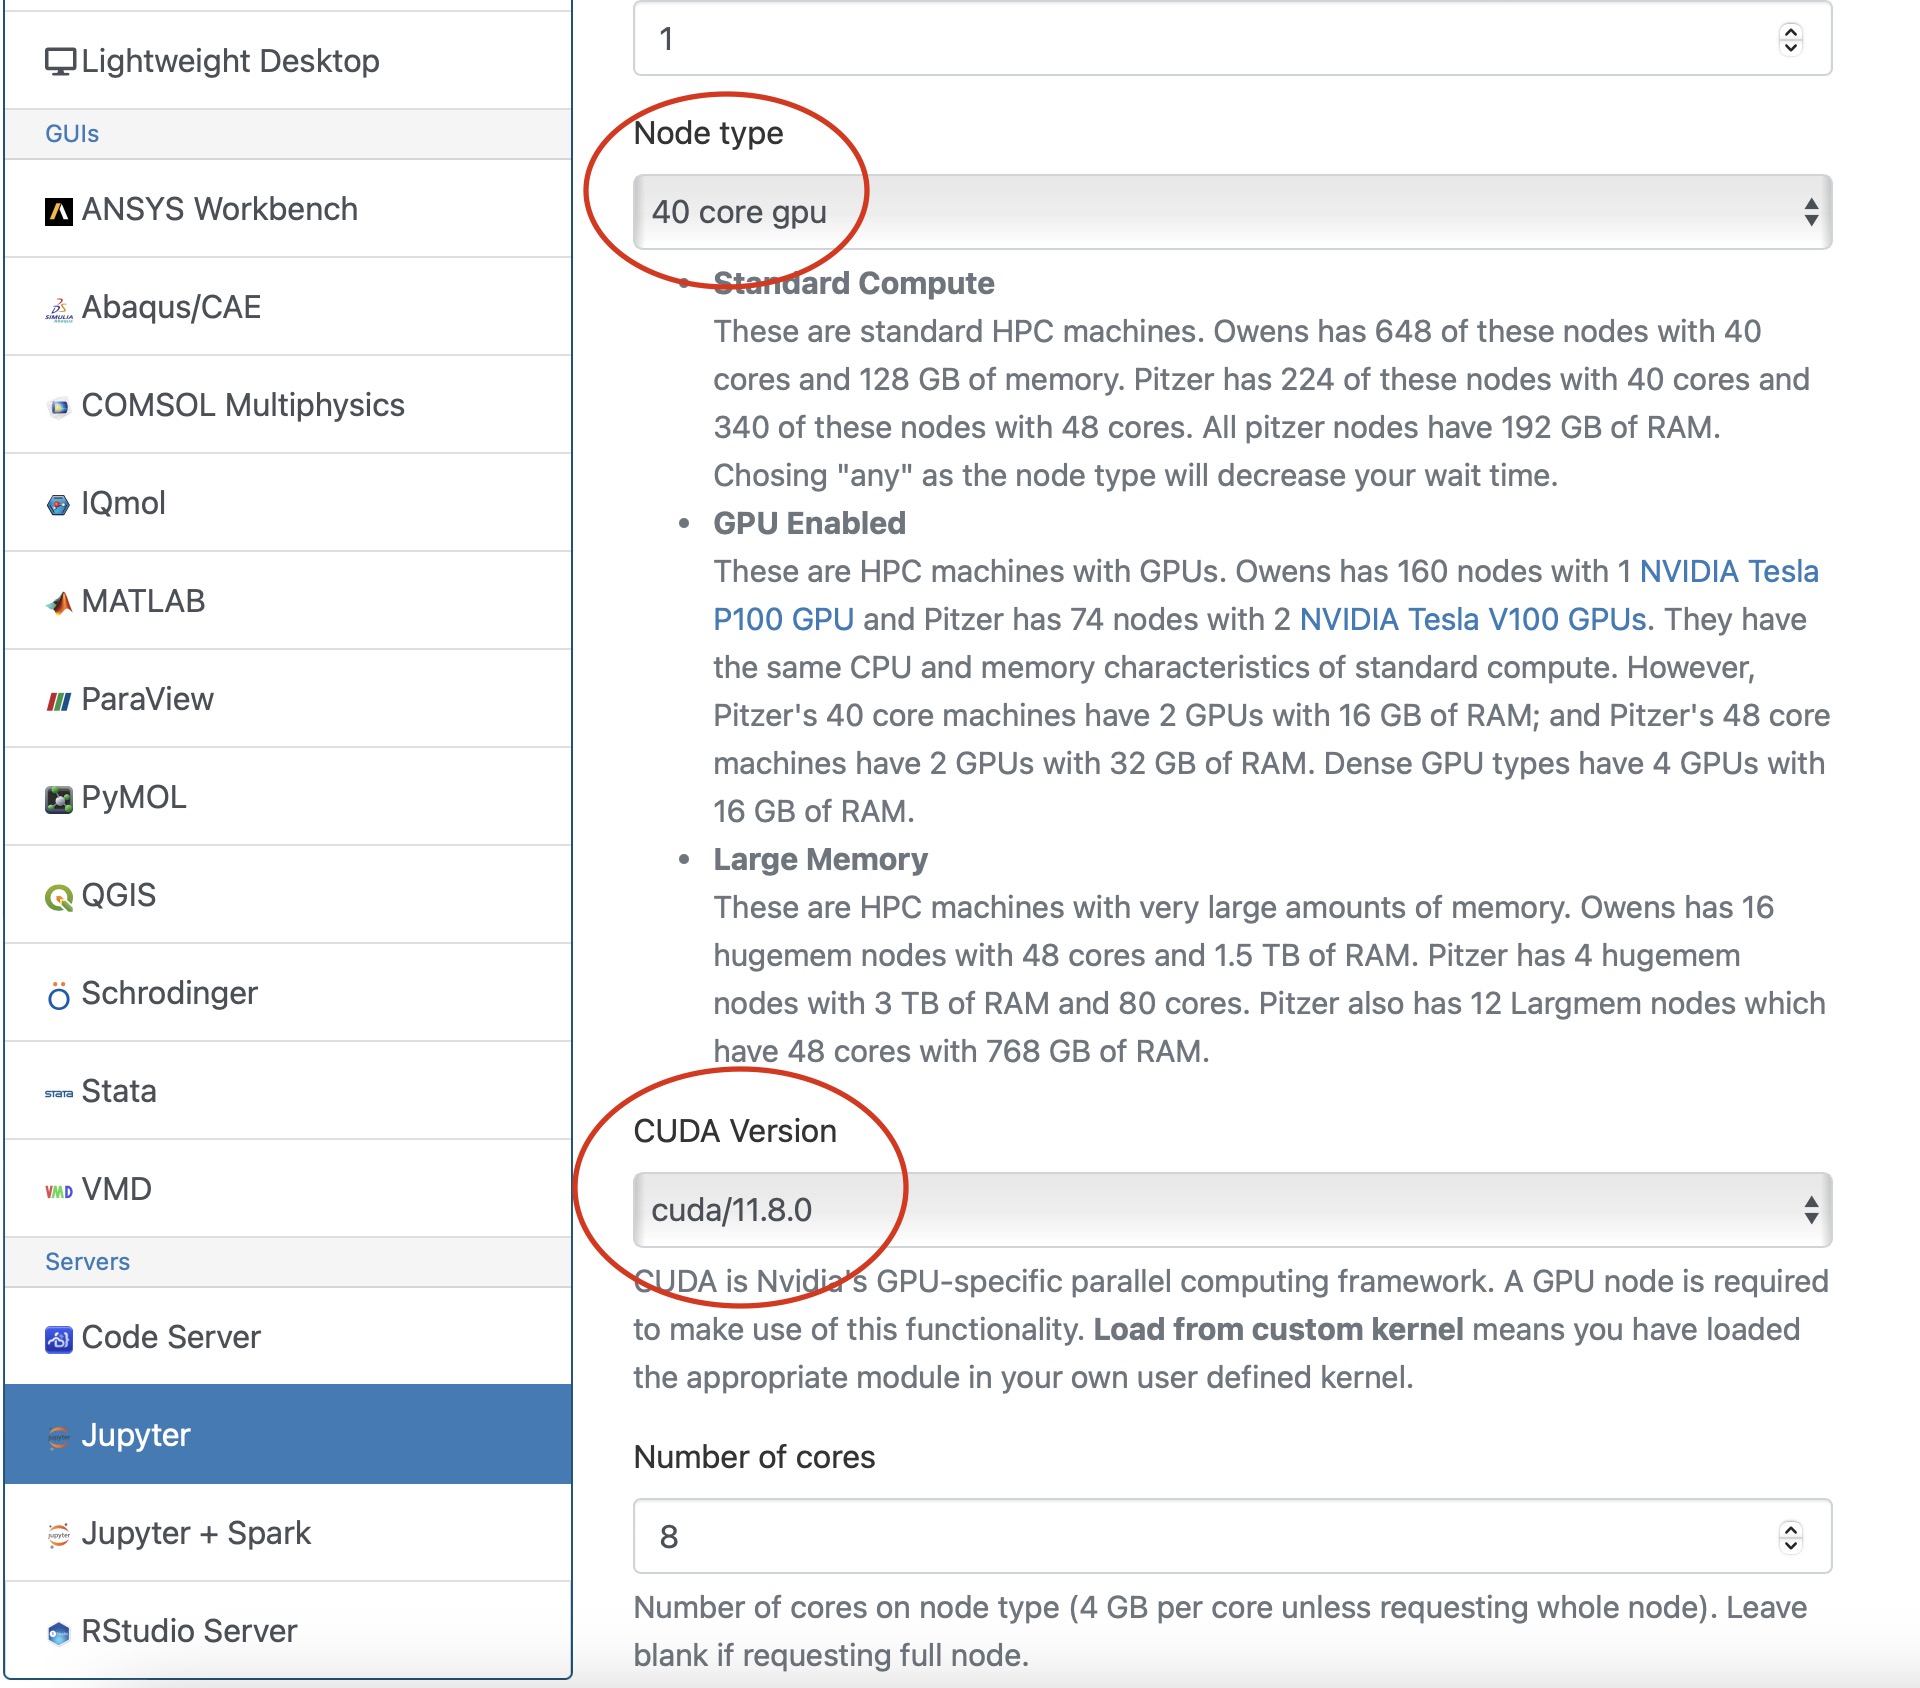
Usage on Jupyter
If you would like to use a gpu for your tensorflow project in a jupyter notebook follow the below commands to set up your environment.
To begin, you need to first create and new conda environment or use an already existing one. See HOWTO: Create Python Environment for more details. In this example we are using python/3.6-conda5.2
Once you have a conda environment created and activated we will now install tensorflow-gpu into the environment (In this example we will be using version 2.4.1 of tensorflow-gpu:
conda install tensorflow-gpu=2.4.1
Now we will setup a jupyter kernel. See HOWTO: Use a Conda/Virtual Environment With Jupyter for details on how to create a jupyter kernel with your conda environment.
Once you have the kernel created see Usage section of Python page for more details on accessing the Jupyter app from OnDemand.
Now you are all setup to use a gpu with tensorflow on a juptyer notebook.
GPU Usage on PyTorch
Environment Setup
To begin, you need to first create and new conda environment or use an already existing one. See HOWTO: Create Python Environment for more details. In this example we are using miniconda3/24.1.2-py310
Once you have a conda environment created and activated we will now install pytorch into the environment (In the example we will be using version 2.3.0 of pytorch:
conda install pytorch=2.3.0
Verify GPU accessability (Optional):
Now that we have the environment set up we can check if pytorch can access the gpus.
To test the gpu access we will submit the following job onto a compute node with a gpu:
#!/bin/bash
#SBATCH --account <Project-Id>
#SBATCH --job-name Python_ExampleJob
#SBATCH --nodes=1
#SBATCH --time=00:10:00
#SBATCH --gpus-per-node=1


module load miniconda3/24.1.2-py310 cuda/12.3.0

source activate pytorch_env


python << EOF
import torch
print(torch.cuda.is_available())
device = torch.device("cuda:0" if torch.cuda.is_available() else "cpu")
print(device)
EOF
You will know pytorch is able to successfully access the gpu if torch.cuda.is_available() returns True and torch.device("cuda:0" if torch.cuda.is_available() else "cpu") returns cuda:0 .
At this point PyTorch should be setup to utilize a GPU for its computations.
GPU vs CPU
Here is an example pytorch script demonstrating the performace improvements from GPUs
import torch
from timeit import default_timer as timer


# check for cuda availability
print("Cuda: ", torch.cuda.is_available())
device = torch.device("cuda:0" if torch.cuda.is_available() else "cpu")
print("Device: ", device)


#GPU
b = torch.ones(4000,4000).cuda() # Create matrix on GPU memory
start_time = timer()
for _ in range(1000):
    b += b
elapsed_time = timer() - start_time

print('GPU time = ',elapsed_time)


#CPU
a = torch.ones(4000,4000) # Create matrix on CPU memory
start_time = timer()
for _ in range(1000):
    a += a
elapsed_time = timer() - start_time

print('CPU time = ',elapsed_time)
The above code was then submitted in a job with the following script:
#!/bin/bash
#SBATCH --account <Project-Id>
#SBATCH --job-name Python_ExampleJob
#SBATCH --nodes=1
#SBATCH --time=00:10:00
#SBATCH --gpus-per-node=1

module load miniconda3/24.1.2-py310 cuda/12.3.0

source activate pytorch_env

python pytorch_example.py
As we can see from the output, the GPU provided a signifcant performace improvement.
GPU time =  0.0053490259997488465

CPU time =  4.232843188998231
Usage on Jupyter
If you would like to use a gpu for your PyTorch project in a jupyter notebook follow the below commands to set up your environment.
To begin, you need to first create and new conda environment or use an already existing one. See HOWTO: Create Python Environment for more details. In this example we are using miniconda3/24.1.2-py310
Once you have a conda environment created and activated we will now install pytorch into the environment (In the example we will be using version 2.3.0 of pytorch:
conda install pytorch=2.3.0
You also may need to install numba for PyTorch to access a gpu from the jupter notebook.
conda install numba=0.60.0
Now we will setup a jupyter kernel. See HOWTO: Use a Conda/Virtual Environment With Jupyter for details on how to create a jupyter kernel with your conda environment.
Once you have the kernel created see Usage section of Python page for more details on accessing the Jupyter app from OnDemand.
Now you are all setup to use a gpu with PyTorch on a juptyer notebook.
Horovod
If you are using Tensorflow or PyTorch you may want to also consider using Horovod. Horovod will take single-GPU training scripts and scale it to train across many GPUs in parallel.
HOWTO: Use uv for Python at OSC
uv is a fast Python package and virtual environment manager developed by Astral. It provides functionality provided by both venv and pip, but is significantly faster at dependency resolution. Some users who do not need Conda packages or cross-language support in their project may prefer to use uv for its speed. Because uv is still under active development and its behavior may change between frequent releases, OSC does not currently provide it as a centrally managed software package. However, users who wish to use uv may install it in their home directory and manage their own installation.
Install uv
To install uv on OSC systems, please manually download the install.sh script for the latest release:
wget https://astral.sh/uv/install.sh
Then, run the following commands to install uv in its own folder in your home directory:
chmod +x install.sh

mkdir -p $HOME/osc_apps/uv

UV_INSTALL_DIR="$HOME/osc_apps/uv" INSTALLER_NO_MODIFY_PATH=1 ./install.sh
The default uv installation procedure modifies a user's .bashrc and installs binaries into location that may not be appropriate for OSC systems. Installing uv into a dedicated location in your home directory as described above avoids creating conflicts with other modules.
Create a Local Module
After installation, OSC recommends you create a local module so that uv can be loaded into your PATH with module load uv/<version> when you want to use it. Modules allow you to dynamically alter your environment to define environment variables and bring executables, libraries, and other features into your shell's search paths. These instructions are for uv version 0.11.29.
We will be using the filename 0.11.29.lua ("version".lua). A simple Lua module for our uv installation would be:
-- Local Variables local name = "uv" local version = "0.11.29" -- Locate Home Directory local homedir = os.getenv("HOME") # This is for the path $HOME/osc_apps/uv local root = pathJoin(homedir, "osc_apps", name)-- Set Basic Paths prepend_path("PATH", pathJoin(root, "bin"))prepend_path("LD_LIBRARY_PATH", root .. "/lib") prepend_path("LIBRARY_PATH", root .. "/lib") prepend_path("INCLUDE", root .. "/include") prepend_path("CPATH", root .. "/include") prepend_path("PKG_CONFIG_PATH", root .. "/lib/pkgconfig")prepend_path("MANPATH", root .. "/share/man")
Copy this to a file and save it to your local module directory at $HOME/local/share/lmodfiles/uv.
Initializing Modules
To make this module usable, you need to tell lmod where to look for it. You can do this by issuing the command module use $HOME/osc_apps/lmodfiles in our example. You can see this change by performing module avail. This will allow you to load your software using module load uv/0.11.29.
More information about locally installing software and creating local modules can be found at HOWTO: Locally Installing Software.
Create a virtual environment
Before creating a virtual environment with uv, load your local uv module and an OSC Python module. If you do not load a Python module, uv will install and manage its own version of Python, which may be less optimized for OSC's systems.
To load these modules:
module load python/<version> uv/<version>
You can use module spider python to see which versions of python are available on a given system.
Then, to create a uv virtual environment, run:
uv venv --no-managed-python local
This creates an environment in the current directory called local. Using --no-managed-python means that uv will use the current Python module that you have loaded.
Activate and deactivate the virtual environment
First, load the Python module you used when you created the enviroment:
module load python/<version>
To activate your uv virtual environment (named local here), run:
source local/bin/activate
To deactivate your uv virtual environment, run:
deactivate
Install packages
uv can install packages from PyPi. To install a package with uv, run:
uv pip install package
Where package is the name of the package you want to install.
Further Reading
HOWTO: Debugging Tips
This article focuses on debugging strategies for C/C++ codes, but many are applicable to other languages as well.
Rubber Duck Debugging
This approach is a great starting point. Say you have written some code, and it does not do what you expect it to do. You have stared at it for a few minutes, but you cannot seem to spot the problem.
Try explaining what the problem is to a rubber duck. Then, walk the rubber duck through your code, line by line, telling it what it does. Don’t have a rubber duck? Any inanimate object will do (or even an animate one if you can grab a friend).
It sounds silly, but rubber duck debugging helps you to get out of your head, and hopefully look at your code from a new perspective. Saying what your code does (or is supposed to do) out loud has a good chance of revealing where your understanding might not be as good as you think it is.
Printf() Debugging
You’ve written a whole bunch of new code. It takes some inputs, chugs along for a while, and then creates some outputs. Somewhere along this process, something goes wrong. You know this because the output is not at all what you expected. Unfortunately, you have no idea where things are going wrong in the code.
This might be a good time to try out printf() debugging. It’s as simple as its name implies: simply add (more) printf() statements to your code. You’ve likely seen this being used. It’s the name given to the infamous ‘printf(“here”);’ calls used to verify that a particular codepath is indeed taken.
Consider printing out arguments and return values to key functions. Or, the results or summary statistics from large calculations. These values can be used as “sanity checks” to ensure that up until that point in the code, everything is going as expected.
Assertion calls, such as "assert(...)", can also be used for a similar purpose. However, often the positive feedback you get from print statements is helpful in when you’re debugging. Seeing a valid result printed in standard out or a log file tells you positively that at least something is working correctly.
Debuggers
Debuggers are tools that can be used to interactively (or with scripts) debug your code. A fairly common debugger for C and C++ codes is gdb. Many guides exist online for using gdb with your code.
OSC systems also provide the ARM DDT debugger. This debugger is designed for use with HPC codes and is arguably easier to use than gdb. It can be used to debug MPI programs as well.
Debuggers allow you to interact with the program while it is running. You can do things like read and write variable values, or check to see if/when certain functions are called.
Testing
Okay, this one isn’t exactly a debugging strategy. It’s a method to catch bugs early, and even prevent the addition of bugs. Writing a test suite for your code that’s easy to run (and ideally fast) lets you test new changes to ensure they don’t break existing functionality.
There are lots of different philosophies on testing software. Too many to cover here. Here’s two concepts that are worth looking into: unit testing and system testing.
The idea behind unit testing is writing tests for small “units” of code. These are often functions or classes. If you know that the small pieces that make up your code work, then you’ll have more confidence in the overall assembled program. There’s an added architecture benefit here too. Writing code that is testable in the first place often results in code that’s broken up into separate logical pieces (google “separation of concerns”). This makes your code more modular and less “spaghetti-like”. Your code will be easier to modify and understand.
The second concept – system testing – involves writing tests that run your entire program. These often take longer than unit tests, but have the added benefit that they’ll let you know whether or not your entire program still works after introducing a new change.
When writing tests (both system and unit tests), it’s often helpful to include a couple different inputs. Occasionally a program may work just fine for one input, but fail horribly with another input.
Minimal, Reproducible Example
Maybe your code takes a couple hours (or longer…) to run. There’s a bug in it, but every time you try to fix it, you have to wait a few hours to see if the fix worked. This is driving you crazy.
A possible approach to make your life easier is to try to make a Minimal, Reproducible Example (see this stackoverflow page for information).
Try to extract just the code that fails, from your program, and also its inputs. Wrap this up into a separate program. This allows you to run just the code that failed, hopefully greatly reducing the time it takes to test out fixes to the problem.
Once you have this example, can you make it smaller? Maybe take out some code that’s not needed to reproduce the bug, or shrink the input even further? Doing this might help you solve the problem.
Tools and other resources
- Compilers – compilers are your friends. Investigate the warning messages because these are likely candidates for unclear and buggy code. Chances are your compiler has a flag that can be used to enable more warnings than are on by default. GNU tools have “-Wall” and “-Wextra”. Modern compilers have extensive debugging options from memory analyzers to floating point arithmetic checkers. See the man page of your compiler.
- Valgrind is a tool that can be used for many types of debugging including looking for memory corruptions and leaks. However, it slows down your code a very sizeable amount. This might not be feasible for HPC codes
- ASAN (address sanitizer) is another tool that can be used for memory debugging. It is less featureful than Valgrind, but runs much quicker, and so will likely work with your HPC code.
- The Practice of Programming by Brian Kernighan and Rob Pike contains a very good chapter on debugging C and C++ programs.
- The Programming Pearls books by Jon Bentley contain good advice and examples of debugging. This includes a chapter where profiling identified a bug. See man gprof.
HOWTO: Establish durable SSH connections
In December 2021 OSC updated its firewall to enhance security. As a result, SSH sessions are being closed more quickly than they used to be. It is very easy to modify your SSH options in the client you use to connect to OSC to keep your connection open.
In ~/.ssh/config (use the command touch ~/.ssh/config to create it if there is no exisitng one), you can set 3 options:
TCPKeepAlive=no
ServerAliveInterval=60
ServerAliveCountMax=5
Please refer to your SSH client documentation for how to set these options in your client.
HOWTO: Estimating and Profiling GPU Memory Usage for Generative AI
Overview
Estimating GPU memory (VRAM) usage for training or running inference with large deep learning models is critical to both 1. requesting the appropriate resources for running your computation and 2. optimizing your job once it is setup. Out-of-memory (OOM) errors can be avoided by requesting appropriate resources and by better understanding memory usage during the job using memory profiling tools described here.
Estimating GPU Memory Usage for Inference
Estimated GPU VRAM in GB = 2x model parameters (in billions) + 1x context length (in thousands)
For example, for StableCode with 3 billion parameters and 16k context length, we estimate 6GB for model weights + 16GB for overhead, totaling 22 GB estimated to run inference. A model like this should fit on an A100 or H100 for inference.
This estimate assumes fp16 (half-precision). Quantization to lower precisions (8-bit, 4-bit, etc) will reduce memory requirements.
Estimating GPU Memory Usage for Training
Estimated GPU VRAM in GB = 40x model parameters (in billions)
For example, for LLaMA-3 with 7 billion parameters, we estimate minimum 280GB to train it. This exceeds the VRAM of even a single H100 accelerator, requiring distributed training. See HOWTO: PyTorch Fully Sharded Data Parallel (FSDP) for more details.
Of note, the training estimate assumes transformer-based architecture with Adam optimizer using mixed-precision (32bit and 16bit weights used) and is extrapolated from results here: Microsoft Deepspeed.
Activation checkpointing can reduce the memory demands, at the cost of increasing runtime.
Example GPU Memory Usage for Selected Models
| Model Name | Parameter count (billions) | Training / Inference | Batch Size | Context Length | min GPUs required | GPU Memory Usage (GB) |
|---|---|---|---|---|---|---|
| minGPT (GPT-2) | 0.12 | training | 216 | 1 V100 (16GB) | 9 | |
| T5 (small) | 3 | training | 4 | 1 H100 (94GB) | 81 | |
| T5 (medium) | 11 |
training |
4 | 8 H100s (94GB) | 760 | |
| Stable-Code-3b | 3 | inference (vllm) | 256 | 16k | 1 A100 (40GB) |
Model weights: 6GB Total usage: 7 (eager mode with 1k context length, 0.18 gpu), 10 (eager mode with 10k context length, 0.25 gpu), 14 (using 0.37 gpu), 20 (using 0.5 gpu), 36 (using 0.9 default gpu) |
| Falcon-7b-Instruct | 7 | inference (vllm) | 256 | 2k | 1 A100 (40GB) |
Model weights: 13GB Total usage: 15 (using 0.37 gpu), 20 (using 0.5 gpu), 36 (using 0.9 default) |
| CodeLlama-13b-Instruct-hf | 13 | inference (vllm) | 256 | 10k | 1 A100 (40GB) |
Model weights: 25GB |
| Gemma3:12b | 12 | inference (Ollama) | 512 | 2k | 1 V100 (16GB) | 11 |
Training memory usage was obtained from Prometheus data. Inference usage was measured with nvidia-smi and vllm or Ollama. Training usage generally follows the estimates above. Inference usage varies considerably depending on parameter size, context length and dtype precision. Vllm also uses a pre-allocation strategy which can increase estimated usage if left at its default 0.9. Eager mode vs CUDA graph mode trades memory footprint for speed.
Profiling GPU Memory Usage During Computation
There are a number of tools that can be used to gather more information about your job's GPU memory usage. Detailed memory usage can be helpful in debugging and optimizing your application to reduce memory footprint and increase performance.
GPU Usage script
The get_gpu_usage script is available on all OSC clusters. Start with this usage script to determine the maximum memory requirements of your job. Once your job has completed, provide the SLURM job ID (and optionally cluster name) to get the maximum memory usage on each GPU used on your job. For example,
$ get_gpu_usage -M cardinal 477503
Host c0813 GPU #0: 19834 MB
Host c0813 GPU #1: 33392 MB
Host c0813 GPU #2: 28260 MB
Host c0813 GPU #3: 28244 MB
Host c0823 GPU #0: 19808 MB
Host c0823 GPU #1: 33340 MB
Host c0823 GPU #2: 28260 MB
Host c0823 GPU #3: 28244 MB
Nvidia-smi Usage
nvidia-smi is a command-line tool available on all GPU-enabled compute nodes that lists processes and their GPU memory usage. Without any arguments, the output looks like the following:
[username@p0254 ~]$ nvidia-smi
Wed Nov 13 20:58:25 2024
+-----------------------------------------------------------------------------------------+
| NVIDIA-SMI 550.90.12              Driver Version: 550.90.12      CUDA Version: 12.4     |
|-----------------------------------------+------------------------+----------------------+
| GPU  Name                 Persistence-M | Bus-Id          Disp.A | Volatile Uncorr. ECC |
| Fan  Temp   Perf          Pwr:Usage/Cap |           Memory-Usage | GPU-Util  Compute M. |
|                                         |                        |               MIG M. |
|=========================================+========================+======================|
|   0  Tesla V100-PCIE-16GB           On  |   00000000:3B:00.0 Off |                  Off |
| N/A   27C    P0             37W /  250W |   13830MiB /  16384MiB |      0%      Default |
|                                         |                        |                  N/A |
+-----------------------------------------+------------------------+----------------------+

+-----------------------------------------------------------------------------------------+
| Processes:                                                                              |
|  GPU   GI   CI        PID   Type   Process name                              GPU Memory |
|        ID   ID                                                               Usage      |
|=========================================================================================|
|    0   N/A  N/A     27515      C   .../vllm_env/bin/python                     13818MiB |
+-----------------------------------------------------------------------------------------+
The example output above shows a V100 on a Pitzer compute node running a vllm inference server running a 3 billion parameter model and using about 14GB of GPU memory.
Summary statistics are available at the top, showing the GPUs available and their current and max memory available. Below, all running processes are shown, with the relevant GPU, PID, Process name, and GPU Memory Usage for that process.
The tool will show multiple GPU devices on the same node if more than one is available, but is limited to one node.
Additional arguments are available, as described in the official documentation.
To run nvidia-smi on the correct node, you will need to ssh to the node where your job is running. You can find the node hostname using the squeue command:
[username@pitzer-login02 ~]$ squeue -u username
             JOBID PARTITION     NAME     USER   ST       TIME  NODES NODELIST(REASON)
          32521417 gpudebug- interact   username  R       0:38      1 p0254
where "username" is your username. In the example above, "p0254" is the compute node you need to run the tool on. The jobid is also useful for other monitoring tools. See HOWTO: Monitoring and Managing Your Job for more details.
Grafana Dashboard Metrics
Grafana provides a dashboard that shows a timeline of GPU memory and usage over time during your job. The script job-dashboard-link.py
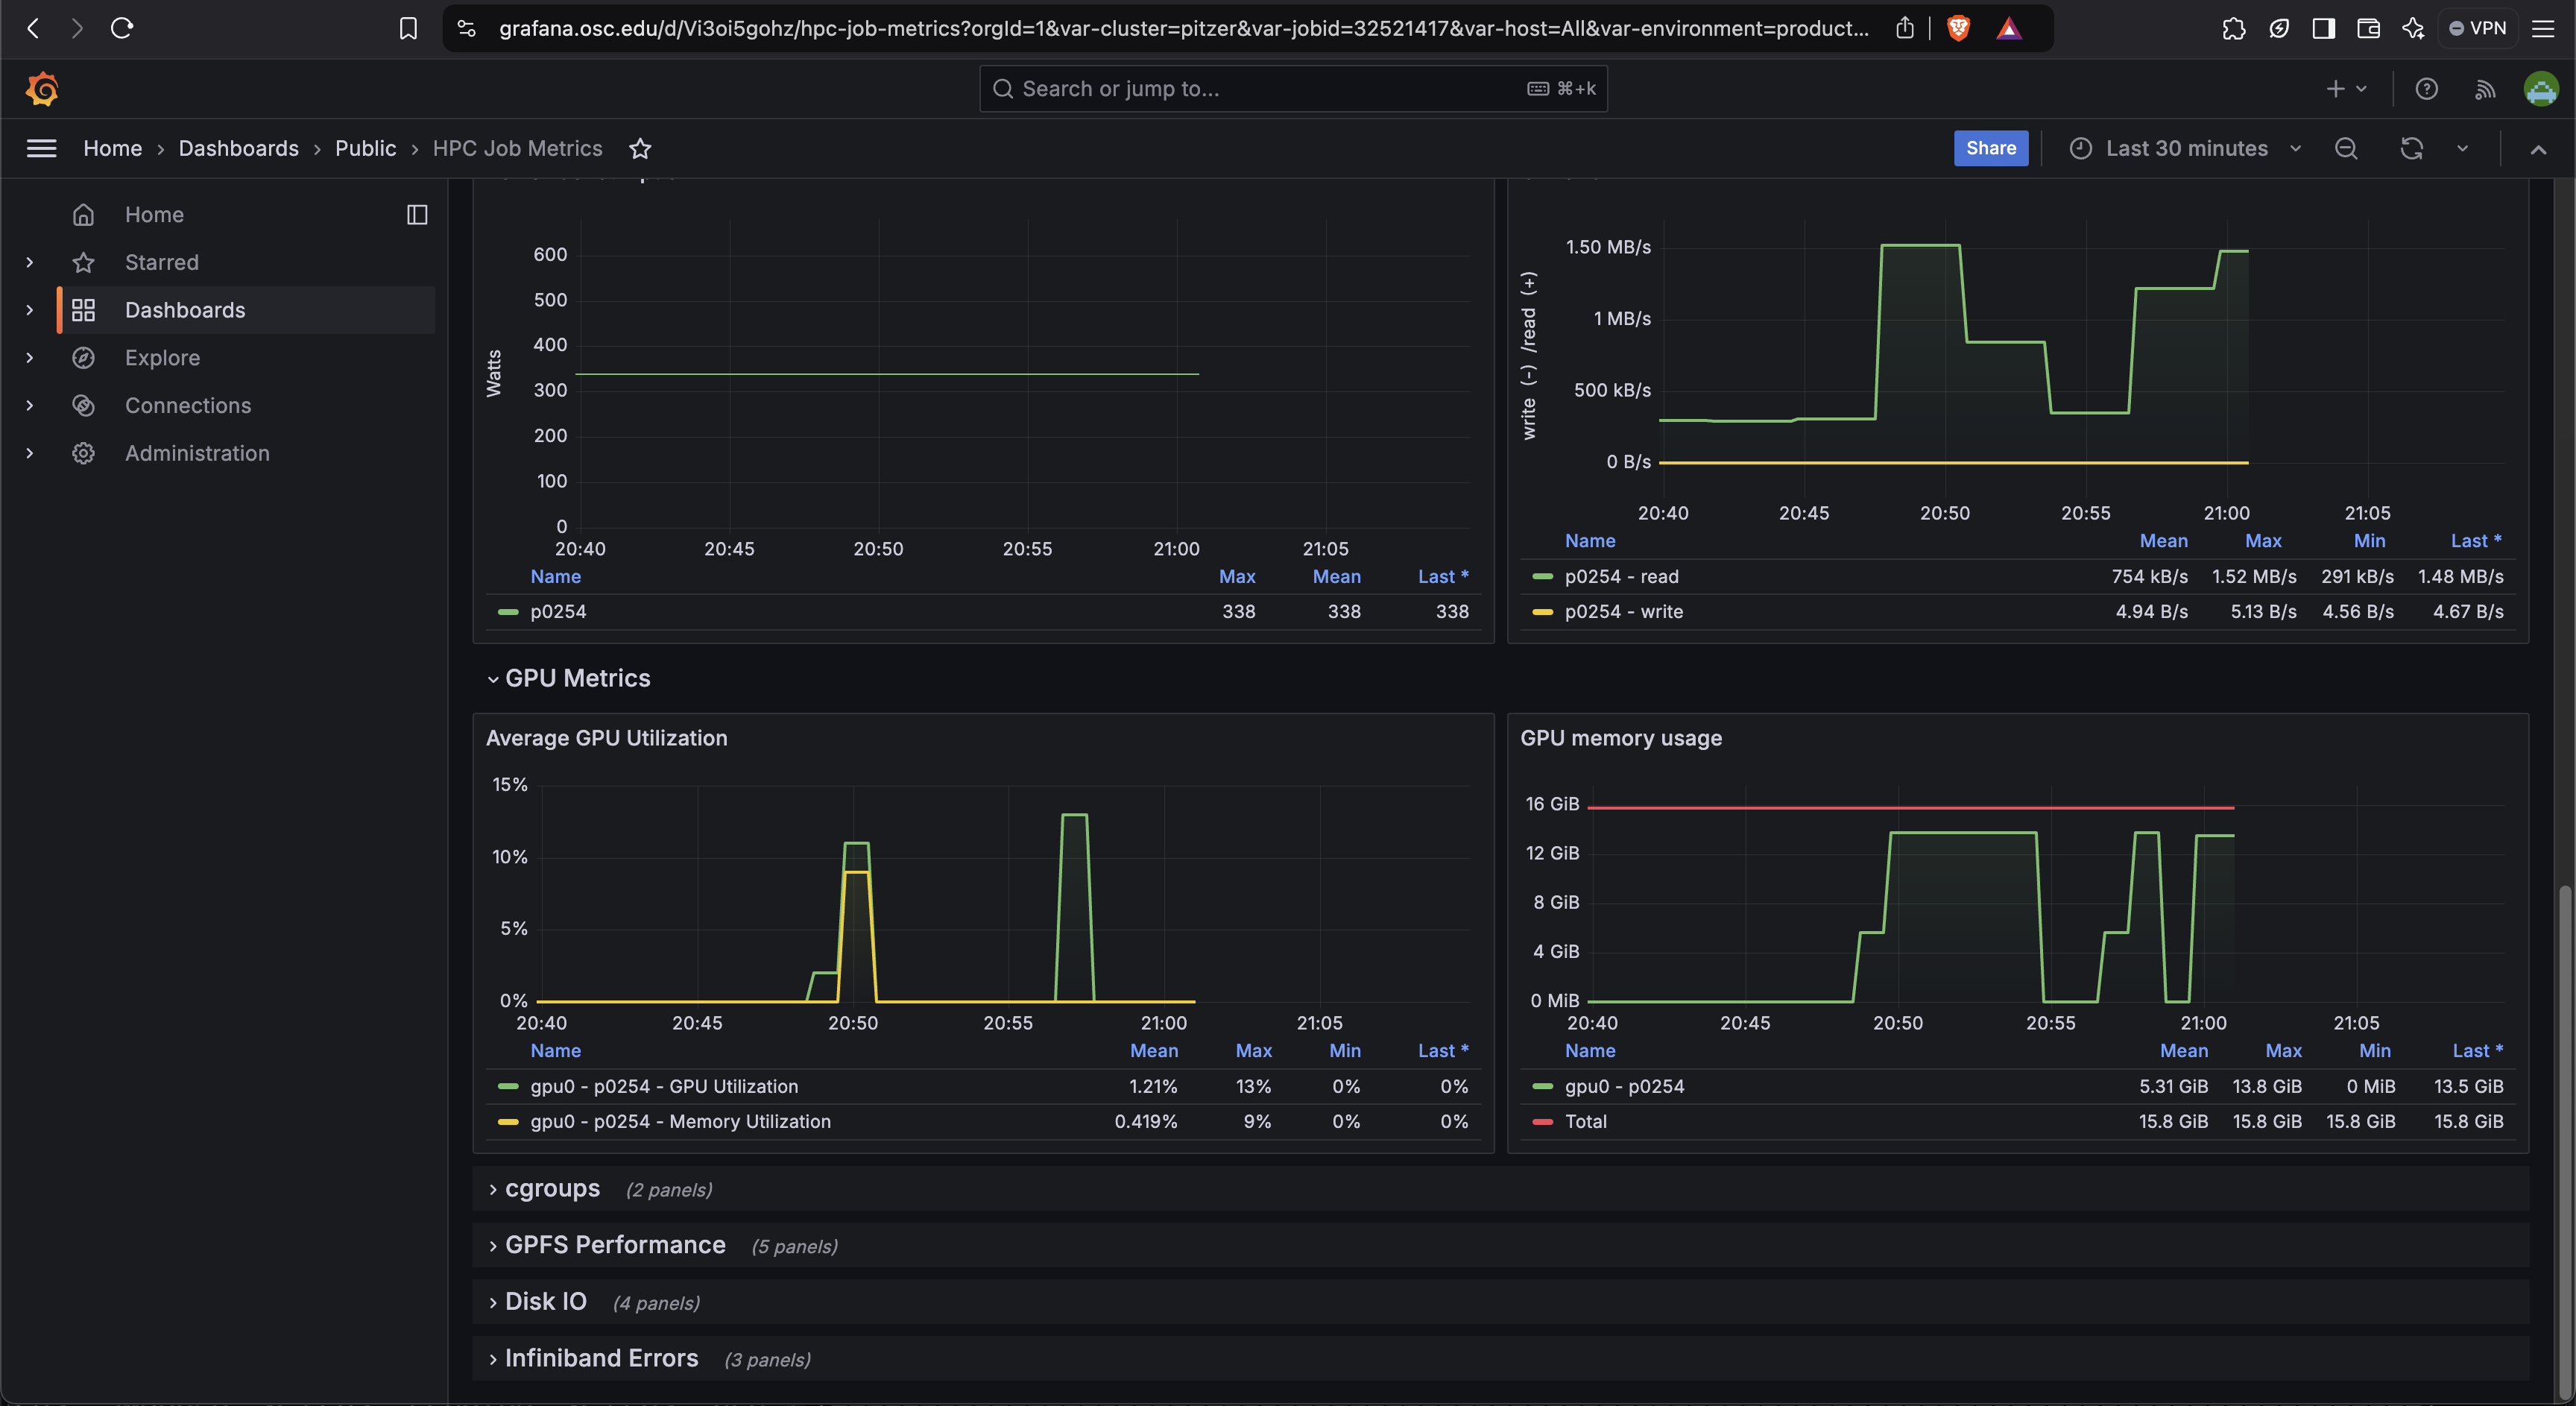
This can give you an idea of when in your job the memory usage peaked and how long it stayed there.
PyTorch memory snapshotting
This tool requires the following minor modifications to your code
- Start:
torch.cuda.memory._record_memory_history(max_entries=100000) - Save:
torch.cuda.memory._dump_snapshot(file_name) - Stop:
torch.cuda.memory._record_memory_history(enabled=None)
This creates a trace file that can viewed by using the javascript code available here. This trace contains information about which called memory allocations and deallocations. This information is sufficient in most cases to understand the memory behavior of your applications. The following two tools can be used to provide additional information, but are only recommended for advanced users.
See documentation here for more information on how to snapshot GPU memory usage while running PyTorch code.
PyTorch Profiler
"PyTorch Profiler is a tool that allows the collection of performance metrics during training and inference. Profiler’s context manager API can be used to better understand what model operators are the most expensive, examine their input shapes and stack traces, study device kernel activity and visualize the execution trace."
The PyTorch profiler also requires code modifications. It provides a suite of configuration options for what information to track and how to export it. The overhead (both in terms of slowing down your job and the size of the profile files) can get very large. There are multiple ways to view the profile data (tensorboard, HTA, chrome browser, etc). At time of writing (2/18/25), tensorboard support has been officially deprecated while HTA is still experimental.
See PyTorch Profiler documentation here.
Here is an example walkthrough using both tools.
NVIDIA Nsight Systems
This profiler provides detailed hardware-level information about what the GPU did during your job. It can be challenging to map hardware events to user-level functions when using Nsight, particularly for Python-based codes. This is only recommended for advanced users. Documention from NVIDIA on how to use Nsight Systems is available here. To learn how to use NVIDIA Nsight Systems at OSC, see the NVHPC page.
Solving GPU Out-of-Memory Errors
While there is no one-size-fits-all solution to solving OOM errors, here are a few guidelines on how to reduce GPU memory usage. If you require assistance, please contact OSC Support.
HOWTO: Identify users on a project account and check status
An eligible principal investigator (PI) heads a project account and can authorize/remove user accounts under the project account (please check our Allocations and Accounts documentation for more details). This document shows you how to identify users on a project account and check the status of each user.
Identify Users on a Project Account
If you know the project acccount
If the project account (projectID) is known, the OSCgetent command will list all users on the project:
$ OSCgetent group projectID
The returned information is in the format of:
projectID:*:gid: list of user IDs
gid is the group identifier number unique for the project account projectID.
For example, the command OSCgetent group PZS0712 lists all users on the project account PZS0712 as below:
$ OSCgetent group PZS0712
PZS0712:*:5513:amarcum,guilfoos,hhamblin,kcahill,xwang
Multiple groups can also be queried at once.
For Example, the command OSCgetent group PZS0712 PZS0726 lists all users on both PZS0712 and PZS0726:
PZS0712:*:5513:amarcum,guilfoos,hhamblin,kcahill,xwang
PZS0726:*:6129:amarcum,kkappel
Details on a project can also be obtained along with the user list using the OSCfinger command.
$ OSCfinger -g projectID
This returns:
Group: projectID                                  GID: XXXX
Status: 'active/restricted/etc'                   Type: XX
Principal Investigator: 'PI email'                Admins: NA
Members: 'list of users'
Category: NA
Institution: 'affliated institution'
Description: 'short description'
---
If you don't know the project acccount, but know the username
If the project account is not known, but the username is known, use the OSCfinger command to list all of the groups the user belongs to:
OSCfinger username
The returned information is in the format of:
Login: username                                   Name: First Last
Directory: home directory path                    Shell: /bin/bash
E-mail: user's email address
Primary Group: user's primary project
Groups: list of projects and other groups user is in
Password Changed: date password was last changed  Password Expires: date password expires
Login Disabled: TRUE/FALSE                             Password Expired: TRUE/FALSE
Current Logins:
Displays if user is currently logged in and from where/when
For example, with the username as amarcum, the command OSCfinger amarcum returns the information as below:
$ OSCfinger amarcum
Login: amarcum                                    Name: Antonio Marcum
Directory: /users/PZS0712/amarcum                 Shell: /bin/bash
E-mail: amarcum@osc.edu
Primary Group: PZS0712
Groups: sts,ruby,l2supprt,oscall,clntstf,oscstaff,clntall,PZS0712,PZS0726
Password Changed: May 12 2019 15:47 (calculated)  Password Expires: Aug 11 2019 12:05 AM
Login Disabled: FALSE                             Password Expired: FALSE
Current Logins:
On since Mar 07 2019 12:12 on pts/14 from pitzer-login01.hpc.osc.edu
----
If you don't know either the project account or user account
If the project account or username is not known, use the OSCfinger -e command with the '-e' flag to get the user account based on the user's name.
Use the following command to list all of the user accounts associated with a First and Last name:
$ OSCfinger -e 'First Last'
For example, with user's first name as Summer and last name as Wang, the command
OSCfinger -e 'Summer Wang' returns the information as below:
$ OSCfinger -e 'Summer Wang'
Login: xwang                                      Name: Summer Wang
Directory: /users/oscgen/xwang                    Shell: /bin/bash
E-mail: xwang@osc.edu
Primary Group: PZS0712
Groups: amber,abaqus,GaussC,comsol,foampro,sts,awsmdev,awesim,ruby,matlab,aasheats,mars,ansysflu,wrigley,lgfuel,l2supprt,fsl,oscall,clntstf,oscstaff,singadm,clntall,dhgremot,fsurfer,PZS0530,PCON0003,PZS0680,PMIU0149,PZS0712,PAS1448
Password Changed: Jan 08 2019 11:41               Password Expires: Jul 08 2019 12:05 AM
Login Disabled: FALSE                             Password Expired: FALSE
---
Once you know the user account username, follow the discussions in the previous section identify users on a project to get all user accounts on the project. Please contact OSC Help if you have any questions.
Check the Status of a User
Use the OSCfinger command to check the status of a user account as below:
OSCfinger username
For example, if the username is xwang, the command OSCfinger xwang will return:
$ OSCfinger xwang
Login: xwang                                      Name: Summer Wang
Directory: /users/oscgen/xwang                    Shell: /bin/bash
E-mail: xwang@osc.edu
Primary Group: PZS0712
Groups: amber,abaqus,GaussC,comsol,foampro,sts,awsmdev,awesim,ruby,matlab,aasheats,mars,ansysflu,wrigley,lgfuel,l2supprt,fsl,oscall,clntstf,oscstaff,singadm,clntall,dhgremot,fsurfer,PZS0530,PCON0003,PZS0680,PMIU0149,PZS0712,PAS1448
Password Changed: Jan 08 2019 11:41               Password Expires: Jul 08 2019 12:05 AM
Login Disabled: FALSE                             Password Expired: FALSE
---
- The home directory of xwang is
Directory: /users/oscgen/xwang - The shell of xwang is bash (
Shell: /bin/bash). If the information isShell:/access/denied, it means this user account has been either archived or restricted. Please contact OSC Help if you'd like to reactivate this user account. - xwang@osc.edu is the associated email with the user account xwang; that is, all OSC emails related to the account xwang will be sent to xwang@osc.edu (
Mail forwarded to xwang@osc.edu). Please contact OSC Help if the email address associated with this user account has been changed to ensure important notifications/messages/reminders from OSC may be received in a timely manner.
Check the Usage and Quota of a User's Home Directory/Project Space
All users see their file system usage statistics when logging in, like so:
As of 2018-01-25T04:02:23.749853 userid userID on /users/projectID used XGB of quota 500GB and Y files of quota 1000000 files
The information is from the file /users/reporting/storage/quota/*_quota.txt , which is updated twice a day. Some users may see multiple lines associated with a username, as well as information on project space usage and quota of their Primary project, if there is one. The usage and quota of the home directory of a username is provided by the line including the file server your home directory is on (for more information, please visit Home Directories), while others (generated due to file copy) can be safely ignored.
You can check any user's home directory or a project's project space usage and quota by running:
grep -h 'userID' OR 'projectID' /users/reporting/storage/quota/*_quota.txt
Here is an example of project PZS0712:
$ grep -h PZS0712 /users/reporting/storage/quota/*_quota.txt
As of 2019-03-07T13:55:01.000000 project/group PZS0712 on /fs/project used 262 GiB of quota 2048 GiB and 166987 files of quota 200000 files
As of 2019-03-07T13:55:01.000000 userid xwang on /fs/project/PZS0712 used 0 GiB of quota 0 GiB and 21 files of quota 0 files
As of 2019-03-07T13:55:01.000000 userid dheisterberg on /fs/project/PZS0712 used 262 GiB of quota 0 GiB and 166961 files of quota 0 files
As of 2019-03-07T13:55:01.000000 userid amarcum on /fs/project/PZS0712 used 0 GiB of quota 0 GiB and 2 files of quota 0 files
As of 2019-03-07T13:55:01.000000 userid root on /fs/project/PZS0712 used 0 GiB of quota 0 GiB and 2 files of quota 0 files
As of 2019-03-07T13:55:01.000000 userid guilfoos on /fs/project/PZS0712 used 0 GiB of quota 0 GiB and 1 files of quota 0 files
As of 2019-03-07T13:51:23.000000 userid amarcum on /users/PZS0712 used 399.86 MiB of quota 500 GiB and 8710 files of quota 1000000 files
Here is an example for username amarcum:
$ grep -h amarcum /users/reporting/storage/quota/*_quota.txt
As of 2019-03-07T13:55:01.000000 userid amarcum on /fs/project/PZS0712 used 0 GiB of quota 0 GiB and 2 files of quota 0 files
As of 2019-03-07T13:56:39.000000 userid amarcum on /users/PZS0645 used 4.00 KiB of quota 500 GiB and 1 files of quota 1000000 files
As of 2019-03-07T13:56:39.000000 userid amarcum on /users/PZS0712 used 399.86 MiB of quota 500 GiB and 8710 files of quota 1000000 files
Check the Usage for Projects and Users
The OSCusage command can provide detailed information about computational usage for a given project and user.
See the OSCusage command page for details.
HOWTO: Install a MATLAB toolbox
If you need to use a MATLAB toolbox that is not provided through our installations. You can follow these instructions, and if you have any difficulties you can contact OSC Help for assistance.
Gather your materials
First, we recommend making a new directory within your home directory in order to keep everything organized. You can use the unix command to make a new directory: "mkdir"
Now you can download the toolbox either to your desktop, and then upload it to OSC, or directly download it using the "wget" utility (if you know the URL for the file).
Now you can extract the downloaded file.
Adding the path
There are two methods on how to add the MATLAB toolbox path.
Method 1: Load up the Matlab GUI and click on "Set Path" and "Add folder"
Method 2: Use the "addpath" fuction in your script. More information on the function can be found here: https://www.mathworks.com/help/matlab/ref/addpath.html
Running the toolbox
Please refer to the instructions given alongside the toolbox. They should contain instructions on how to run the toolbox.
HOWTO: Install your own Perl modules
While we provide a number of Perl modules, you may need a module we do not provide. If it is a commonly used module, or one that is particularly difficult to compile, you can contact OSC Help for assistance, but we have provided an example below showing how to build and install your own Perl modules. Note, these instructions use "bash" shell syntax; this is our default shell, but if you are using something else (csh, tcsh, etc), some of the syntax may be different.
CPAN Minus
CPAN, the Comprehensive Perl Achive Network, is the primary source for publishing and fetching the latest modules and libraries for the Perl programming language. The default method for installing Perl modules using the "CPAN Shell", provides users with a great deal of power and flexibility but at the cost of a complex configuration and inelegant default setup.
Setting Up CPAN Minus
To use CPAN Minus with the system Perl (version 5.16.3), we need to ensure that the "cpanminus" module is loaded, if it hasn't been loaded already.
module load cpanminus
Please note that this step is not required if you have already loaded a version of Perl using the module load command.
Next, in order to use cpanminus, you will need to run the following command only ONCE:
perl -I $CPANMINUS_INC -Mlocal::lib
Using CPAN Minus
In most cases, using CPAN Minus to install modules is as simple as issuing a command in the following form:
cpanm [Module::Name]
For example, below are three examples of installing perl modules:
cpanm Math::CDF
cpanm SET::IntervalTree
cpanm DB_File
Testing Perl Modules
To test a perl module import, here are some examples below:
perl -e "require Math::CDF"
perl -e "require Set::IntervallTree"
perl -e "require DB_File"
The modules are installed correctly if no output is printed.
What Local Modules are Installed in my Account?
To show the local modules you have installed in your user account:
perldoc perllocal
Reseting Module Collection
If you should ever want to start over with your perl module collection, delete the following folders:
rm -r ~/perl5
rm -r ~/.cpanm
HOWTO: Locally Installing Software
Sometimes the best way to get access to a piece of software on the HPC systems is to install it yourself as a "local install". This document will walk you through the OSC-recommended procedure for maintaining local installs in your home directory or project space. The majority of this document describes the process of "manually" building and installing your software. We also show a partially automated approach through the use of a bash script in the Install Script section near the end.
Getting Started
Before installing your software, you should first prepare a place for it to live. We recommend the following directory structure, which you should create in the top-level of your home directory:
    local
    |-- src
    |-- share
        `-- lmodfiles
This structure is analogous to how OSC organizes the software we provide. Each directory serves a specific purpose:
local- Gathers all the files related to your local installs into one directory, rather than cluttering your home directory. Applications will be installed into this directory with the format "appname/version". This allows you to easily store multiple versions of a particular software install if necessary.local/src- Stores the installers -- generally source directories -- for your software. Also, stores the compressed archives ("tarballs") of your installers; useful if you want to reinstall later using different build options.local/share/lmodfiles- The standard place to store module files, which will allow you to dynamically add or remove locally installed applications from your environment.
You can create this structure with one command:
mkdir -p $HOME/local/src $HOME/local/share/lmodfiles
(NOTE: $HOME is defined by the shell as the full path of your home directory. You can view it from the command line with the command echo $HOME.)
Installing Software
Now that you have your directory structure created, you can install your software. For demonstration purposes, we will install a local copy of Git.
First, we need to get the source code onto the HPC filesystem. The easiest thing to do is find a download link, copy it, and use the wget tool to download it on the HPC. We'll download this into $HOME/local/src:
cd $HOME/local/srcwget https://github.com/git/git/archive/v2.9.0.tar.gz
Now extract the tar file:
tar zxvfv2.9.0.tar.gz
Next, we'll go into the source directory and build the program. Consult your application's documentation to determine how to install into $HOME/local/"software_name"/"version". Replace "software_name" with the software's name and "version" with the version you are installing, as demonstrated below. In this case, we'll use the configure tool's --prefix option to specify the install location.
You'll also want to specify a few variables to help make your application more compatible with our systems. We recommend specifying that you wish to use the Intel compilers and that you want to link the Intel libraries statically. This will prevent you from having to have the Intel module loaded in order to use your program. To accomplish this, add CC=icc CFLAGS=-static-intel to the end of your invocation of configure. If your application does not use configure, you can generally still set these variables somewhere in its Makefile or build script.
Then, we can build Git using the following commands:
    cd git-2.9.0
    autoconf # this creates the configure file
    ./configure --prefix=$HOME/local/git/2.9.0 CC=icc CFLAGS=-static-intel
    make && make install
Your application should now be fully installed. However, before you can use it you will need to add the installation's directories to your path. To do this, you will need to create a module.
Creating a Module
Modules allow you to dynamically alter your environment to define environment variables and bring executables, libraries, and other features into your shell's search paths.
Automatically create a module
We can use the mkmod script to create a simple Lua module for the Git installation:
module load mkmod
create_module.sh git 2.9.0 $HOME/local/git/2.9.0
It will create the module $HOME/local/share/lmodfiles/git/2.9.0.lua. Please note that by default our mkmod script only creates module files that define some basic environment variables PATH, LD_LIBRARY_PATH, MANPATH, and GIT_HOME. These default variables may not cover all paths desired. We can overwrite these defaults in this way:
module load mkmod
TOPDIR_LDPATH_LIST="lib:lib64" \
TOPDIR_PATH_LIST="bin:exe" \
create_module.sh git 2.9.0 $HOME/local/git/2.9.0
This adds $GIT_HOME/bin, $GIT_HOME/exe to PATH and $GIT_HOME/lib , $GIT_HOME/lib64 to LD_LIBRARY_PATH.
We can also add other variables by using ENV1, ENV2, and more. For example, suppose we want to change the default editor to vim for Git:
module load mkmod
ENV1="GIT_EDITOR=vim" \
create_module.sh git 2.9.0 $HOME/local/git/2.9.0
Manually create a module
We will be using the filename 2.9.0.lua ("version".lua). A simple Lua module for our Git installation would be:
-- Local Variables local name = "git" local version = "2.9.0" -- Locate Home Directory local homedir = os.getenv("HOME") local root = pathJoin(homedir, "local", name, version)-- Set Basic Paths prepend_path("PATH", pathJoin(root, "bin"))prepend_path("LD_LIBRARY_PATH", root .. "/lib") prepend_path("LIBRARY_PATH", root .. "/lib") prepend_path("INCLUDE", root .. "/include") prepend_path("CPATH", root .. "/include") prepend_path("PKG_CONFIG_PATH", root .. "/lib/pkgconfig")prepend_path("MANPATH", root .. "/share/man")
NOTE: For future module files, copy our sample modulefile from ~support/doc/modules/sample_module.lua. This module file follows the recommended design patterns laid out above and includes samples of many common module operations
NOTE: TCL is cross-compatible and is converted to Lua when loaded. More documentation is available at https://www.tacc.utexas.edu/research-development/tacc-projects/lmod/ or by executing module help.
Initializing Modules
Any module file you create should be saved into your local lmodfiles directory ($HOME/local/share/lmodfiles). To prepare for future software installations, create a subdirectory within lmodfiles named after your software and add one module file to that directory for each version of the software installed.
In the case of our Git example, you should create the directory $HOME/local/share/lmodfiles/git and create a module file within that directory named 2.9.0.lua.
To make this module usable, you need to tell lmod where to look for it. You can do this by issuing the command module use $HOME/local/share/lmodfiles in our example. You can see this change by performing module avail. This will allow you to load your software using either module load git or module load git/2.9.0.
module use$HOME/local/share/lmodfiles and module load "software_name" need to be entered into the command line every time you enter a new session on the system.If you install another version later on (lets say version 2.9.1) and want to create a module file for it, you need to make sure you call it 2.9.1.lua. When loading Git, lmod will automatically load the newer version. If you need to go back to an older version, you can do so by specifying the version you want: module load git/2.9.0.
To make sure you have the correct module file loaded, type which git which should emit "~/local/git/2.9.0/bin/git" (NOTE: ~ is equivalent to $HOME).
To make sure the software was installed correctly and that the module is working, type git --version which should emit "git version 2.9.0".
Automating With Install Script
Simplified versions of the scripts used to manage the central OSC software installations are provided at ~support/share/install-script. The idea is that you provide the minimal commands needed to obtain, compile, and install the software (usually some variation on wget, tar, ./configure, make, and make install) in a script, which then sources an OSC-maintained template that provides all of the "boilerplate" commands to create and manage a directory structure similar to that outlined in the Getting Started section above. You can copy an example install script from ~support/share/install-script/install-osc_sample.sh and follow the notes in that script, as well as in ~support/share/install-script/README.md, to modify it to install software of your choosing.
$HOME/osc_apps/lmodfiles, so you will need to run module use $HOME/osc_apps/lmodfiles and module load [software-name] every time you enter a new session on the system and want to use the software that you have installed.Further Reading
For more information about modules, be sure to read the webpage indicated at the end of module help. If you have any questions about modules or local installations, feel free to contact the OSC Help Desk and oschelp@osc.edu.
HOWTO: Manage Access Control List (ACLs)
An ACL (access control list) is a list of permissions associated with a file or directory. These permissions allow you to restrict access to a certain file or directory by user or group.
OSC supports NFSv4 ACL on our home directory and POSIX ACL on our project and scratch file systems. Please see the how to use NFSv4 ACL for home directory ACL management and how to use POSIX ACL for managing ACLs in project and scratch file systems.
HOWTO: Use NFSv4 ACL
This document shows you how to use the NFSv4 ACL permissions system. An ACL (access control list) is a list of permissions associated with a file or directory. These permissions allow you to restrict access to a certian file or directory by user or group. NFSv4 ACLs provide more specific options than typical POSIX read/write/execute permissions used in most systems.
These commands are useful for managing ACLs in the dir locations of /users/<project-code>.
Understanding NFSv4 ACL
This is an example of an NFSv4 ACL
A::user@nfsdomain.org:rxtncy
A::alice@nfsdomain.org:rxtncy
A::alice@nfsdomain.org:rxtncy
A::alice@nfsdomain.org:rxtncy
The following sections will break down this example from left to right and provide more usage options
ACE Type
The 'A' in the example is known as the ACE (access control entry) type. The 'A' denotes "Allow" meaning this ACL is allowing the user or group to perform actions requiring permissions. Anything that is not explicitly allowed is denied by default.
ACE Flags
The above example could have a distinction known as a flag shown below
A:d:user@osc.edu:rxtncy
The 'd' used above is called an inheritence flag. This makes it so the ACL set on this directory will be automatically established on any new subdirectories. Inheritence flags only work on directories and not files. Multiple inheritence flags can be used in combonation or omitted entirely. Examples of inheritence flags are listed below:
| Flag | Name | Function |
|---|---|---|
| d | directory-inherit | New subdirectories will have the same ACE |
| f | file-inherit | New files will have the same ACE minus the inheritence flags |
| n | no-propogate inherit | New subdirectories will inherit the ACE minus the inheritence flags |
| i | inherit-only | New files and subdirectories will have this ACE but the ACE for the directory with the flag is null |
ACE Principal
The 'user@nfsdomain.org' is a principal. The principle denotes the people the ACL is allowing access to. Principals can be the following:
- A named user
- Example: user@nfsdomain.org
- Special principals
- OWNER@
- GROUP@
- EVERYONE@
- A group
- Note: When the principal is a group, you need to add a group flag, 'g', as shown in the below example
-
A:g:group@osc.edu:rxtncy
ACE Permissions
The 'rxtncy' are the permissions the ACE is allowing. Permissions can be used in combonation with each other. A list of permissions and what they do can be found below:
| Permission | Function |
|---|---|
| r | read-data (files) / list-directory (directories) |
| w | write-data (files) / create-file (directories) |
| a | append-data (files) / create-subdirectory (directories) |
| x | execute (files) / change-directory (directories) |
| d | delete the file/directory |
| D | delete-child : remove a file or subdirectory from the given directory (directories only) |
| t | read the attributes of the file/directory |
| T | write the attribute of the file/directory |
| n | read the named attributes of the file/directory |
| N | write the named attributes of the file/directory |
| c | read the file/directory ACL |
| C | write the file/directory ACL |
| o | change ownership of the file/directory |
Note: Aliases such as 'R', 'W', and 'X' can be used as permissions. These work simlarly to POSIX Read/Write/Execute. More detail can be found below.
| Alias | Name | Expansion |
|---|---|---|
| R | Read | rntcy |
| W | Write | watTNcCy (with D added to directory ACE's) |
| X | Execute | xtcy |
Using NFSv4 ACL
This section will show you how to set, modify, and view ACLs
Set and Modify ACLs
To set an ACE use this command:
nfs4_setfacl [OPTIONS] COMMAND file
To modify an ACE, use this command:
nfs4_editfacl [OPTIONS] file
Where file is the name of your file or directory. More information on Options and Commands can be found below.
Commands
Commands are only used when first setting an ACE. Commands and their uses are listed below.
| COMMAND | FUNCTION |
|---|---|
| -a acl_spec [index] | add ACL entries in acl_spec at index (DEFAULT: 1) |
| -x acl_spec | index | remove ACL entries or entry-at-index from ACL |
| -A file [index] | read ACL entries to add from file |
| -X file | read ACL entries to remove from file |
| -s acl_spec | set ACL to acl_spec (replaces existing ACL) |
| -S file | read ACL entries to set from file |
| -m from_ace to_ace | modify in-place: replace 'from_ace' with 'to_ace' |
Options
Options can be used in combination or ommitted entirely. A list of options is shown below:
| OPTION | NAME | FUNCTION |
|---|---|---|
| -R | recursive | Applies ACE to a directory's files and subdirectories |
| -L | logical | Used with -R, follows symbolic links |
| -P | physical | Used with -R, skips symbolic links |
View ACLs
To view ACLs, use the following command:
nfs4_getfacl file
Where file is your file or directory
Use cases
Create a share folder for a specific group
First, make the top-level of home dir group executable.
nfs4_setfacl -a A:g:<group>@osc.edu:X $HOME
Next create a new folder to store shared data
mkdir share_group
Move all data to be shared that already exists to this folder
mv <src> ~/share_group
Apply the acl for all current files and dirs under ~/share_group, and set acl so that new files created there will automatically have proper group permissions
nfs4_setfacl -R -a A:dfg:<group>@osc.edu:RX ~/share_group
using an acl file
One can also specify the acl to be used in a single file, then apply that acl to avoid duplicate entries and keep the acl entries consistent.
$ cat << EOF > ~/group_acl.txt

A:fdg:clntstf@osc.edu:rxtncy
A::OWNER@:rwaDxtTnNcCy
A:g:GROUP@:tcy
A::EVERYONE@:rxtncy
EOF
$ nfs4_setfacl -R -S ~/group_acl.txt ~/share_group
That data will need to be set with a new acl manually to allow group read permissions.
Share data in your home directory with other users
Assume that you want to share a directory (e.g data) and its files and subdirectories, but it is not readable by other users,
> ls -ld /users/PAA1234/john/data
drwxr-x--- 3 john PAA1234 4096 Nov 21 11:59 /users/PAA1234/john/data
Like before, allow the user execute permissions to $HOME.
> nfs4_setfacl -a A::userid@osc.edu:X $HOME
set an ACL to the directory 'data' to allow specific user access:
> cd /users/PAA1234/john
> nfs4_setfacl -R -a A:df:userid@osc.edu:RX data
or to to allow a specific group access:
> cd /users/PAA1234/john
> nfs4_setfacl -R -a A:dfg:groupname@osc.edu:RX data
You can repeat the above commands to add more users or groups.
Share entire home dir with a group
Sometimes one wishes to share their entire home dir with a particular group. Care should be taken to only share folders with data and not any hidden dirs.
~/.ssh dir, which should always have read permissions only for the user that owns it.Use the below command to only assign group read permissions only non-hidden dirs.
After sharing an entire home dir with a group, you can still create a single share folder with the previous instructions to share different data with a different group only. So, all non-hidden dirs in your home dir would be readable by group_a, but a new folder named 'group_b_share' can be created and its acl altered to only share its contents with group_b.
Please contact oschelp@osc.edu if there are any questions.
HOWTO: Use POSIX ACL
This document shows you how to use the POSIX ACL permissions system. An ACL (access control list) is a list of permissions associated with a file or directory. These permissions allow you to restrict access to a certian file or directory by user or group.
These commands are useful for project and scratch dirs located in /fs/ess.
Understanding POSIX ACL
An example of a basic POSIX ACL would look like this:
# file: foo.txt
# owner: tellison
# group: PZSXXXX
user::rw-
group::r--
other::r--
The first three lines list basic information about the file/directory in question: the file name, the primary owner/creator of the file, and the primary group that has permissions on the file. The following three lines show the file access permissions for the primary user, the primary group, and any other users. POSIX ACLs use the basic rwx permissions, explaned in the following table:
| Permission | Explanation |
|---|---|
| r | Read-Only Permissions |
| w | Write-Only Permissions |
| x |
Execute-Only Permissions |
Using POSIX ACL
This section will show you how to set and view ACLs, using the setfacl and getfacl commands
Viewing ACLs with getfacl
The getfacl command displays a file or directory's ACL. This command is used as the following
$ getfacl [OPTION] file
Where file is the file or directory you are trying to view. Common options include:
| Flag | Description |
|---|---|
| -a/--access | Display file access control list only |
| -d/--default | Display default access control list only (only primary access), which determines the default permissions of any files/directories created in this directory |
| -R/--recursive | Display ACLs for subdirectories |
| -p/--absolute-names | Don't strip leading '/' in pathnames |
Examples:
A simple getfacl call would look like the following:
$ getfacl foo.txt
# file: foo.txt
# owner: user
# group: PZSXXXX
user::rw-
group::r--
other::r--
A recursive getfacl call through subdirectories will list each subdirectories ACL separately
$ getfacl -R foo/
# file: foo/
# owner: user
# group: PZSXXXX
user::rwx
group::r-x
other::r-x

# file: foo//foo.txt
# owner: user
# group: PZSXXXX
user::rwx
group::---
other::---

# file: foo//bar
# owner: user
# group: PZSXXXX
user::rwx
group::---
other::---

# file: foo//bar/foobar.py
# owner: user
# group: PZSXXXX
user::rwx
group::---
other::---
Setting ACLs with setfacl
The setfacl command allows you to set a file or directory's ACL. This command is used as the following
$ setfacl [OPTION] COMMAND file
Where file is the file or directory you are trying to modify.
Commands and Options
setfacl takes several commands to modify a file or directory's ACL
| Command | Function |
|---|---|
| -m/--modify=acl |
modify the current ACL(s) of files. Use as the following setfacl -m u/g:user/group:r/w/x file |
| -M/--modify-file=file |
read ACL entries to modify from a file. Use as the following setfaclt -M file_with_acl_permissions file_to_modify |
| -x/--remove=acl |
remove entries from ACL(s) from files. Use as the following setfaclt -x u/g:user/group:r/w/x file |
| -X/--remove-file=file |
read ACL entries to remove from a file. Use as the following setfaclt -X file_with_acl_permissions file_to_modify |
| -b/--remove-all | Remove all extended ACL permissions |
Common option flags for setfacl are as follows:
| Option | Function |
|---|---|
| -R/--recursive | Recurse through subdirectories |
| -d/--default | Apply modifications to default ACLs |
| --test | test ACL modifications (ACLs are not modified |
Examples
You can set a specific user's access priviledges using the following
setfacl -m u:username:-wx foo.txt
Similarly, a group's access priviledges can be set using the following
setfacl -m g:PZSXXXX:rw- foo.txt
You can remove a specific user's access using the following
setfacl -x user:username foo.txt
Grant a user recursive read access to a dir and all files/dirs under it (notice that the capital 'X' is used to provide execute permissions only to dirs and not files):
setfacl -R -m u:username:r-X shared-dir
Set a dir so that any newly created files or dirs under will inherit the parent dirs facl:
setfacl -d -m u:username:r-X shared-dir
HOWTO: PyTorch Distributed Data Parallel (DDP)
PyTorch Distributed Data Parallel (DDP) is used to speed-up model training time by parallelizing training data across multiple identical model instances.
If your model fits on a single GPU and you have a large training set that is taking a long time to train, you can use DDP and request more GPUs to increase training speed. The entire model is duplicated on each GPU and each training process receives a different subset of training data. Model updates from each device are broadcast across devices, resulting in the same model on all devices.
For a complete overview with video tutorial and examples, see https://pytorch.org/tutorials/beginner/ddp_series_intro.html
Environment Setup
For running DDP at OSC, we recommend using a base PyTorch environment or cloning a base PyTorch environment and adding your project’s specific packages to it.
There are 6 main differences between DDP and single machine runs. The following code examples are taken from https://github.com/pytorch/examples/tree/main/distributed/minGPT-ddp:
DDP Setup Function
DDP setup creates a process group and sets the local device. This function is called toward the start of main.
def ddp_setup():
    init_process_group(backend="nccl")
    torch.cuda.set_device(int(os.environ["LOCAL_RANK"]))
Trainer wraps model in DDP
from torch.nn.parallel import DistributedDataParallel as DDP

class Trainer:
    def __init__(self, trainer_config: TrainerConfig, model, optimizer,         train_dataset, test_dataset=None):
        ...
        self.model = DDP(self.model, device_ids=[self.local_rank])
Use DistributedSampler to load data (and set shuffle=False)
from torch.utils.data.distributed import DistributedSampler

class Trainer:
    ...
    def _prepare_dataloader(self, dataset: Dataset):
        return DataLoader(
            dataset,
            batch_size=self.config.batch_size,
            pin_memory=True,
            shuffle=False,
            num_workers=self.config.data_loader_workers,
            sampler=DistributedSampler(dataset)
        )
Destroy process group when done
def main():
    ...
    trainer.train()
    destroy_process_group()
Only save checkpoints where local_rank=0
class Trainer:
    ...
    def train(self):
        for epoch in range(self.epochs_run, self.config.max_epochs):
            epoch += 1
            self._run_epoch(epoch, self.train_loader, train=True)
            if self.local_rank == 0 and epoch % self.save_every == 0:
                self._save_snapshot(epoch)
Global vs local rank tracked separately
class Trainer:
    def __init__(self, trainer_config: TrainerConfig, model, optimizer,         train_dataset, test_dataset=None):
        self.config = trainer_config
        # set torchrun variables
        self.local_rank = int(os.environ["LOCAL_RANK"])
        self.global_rank = int(os.environ["RANK"])
        ...
Example Slurm Job Script using Srun Torchrun
#!/bin/bash
#SBATCH --job-name=multinode-example-minGPT
#SBATCH --nodes=2
#SBATCH --ntasks=2
#SBATCH --gpus-per-task=1
#SBATCH --cpus-per-task=4

nodes=( $( scontrol show hostnames $SLURM_JOB_NODELIST ) )
nodes_array=($nodes)
head_node=${nodes_array[0]}
head_node_ip=$(srun --nodes=1 --ntasks=1 -w "$head_node" hostname --ip-address)

echo Node IP: $head_node_ip
export LOGLEVEL=INFO

ml miniconda3/24.1.2-py310
conda activate minGPT-ddp

srun torchrun \
--nnodes 2 \
--nproc_per_node 1 \
--rdzv_id $RANDOM \
--rdzv_backend c10d \
--rdzv_endpoint $head_node_ip:29500 \
/path/to/examples/distributed/minGPT-ddp/mingpt/main.py
HOWTO: PyTorch Fully Sharded Data Parallel (FSDP2)
PyTorch Fully Sharded Data Parallel (FSDP) is used to speed-up model training time by parallelizing training data as well as sharding model parameters, optimizer states, and gradients across multiple pytorch instances. The current version is FSDP2, which is not backwards-compatible with the original FSDP, which is deprecated as of PyTorch 2.11.0+.
If your model does not fit on a single GPU, you can use FSDP and request more GPUs to reduce the memory footprint for each GPU. The model parameters are split between the GPUs and each training process receives a different subset of training data. Model updates from each device are broadcast across devices, resulting in the same model on all devices.
For a complete overview with examples, see https://pytorch.org/tutorials/intermediate/FSDP_tutorial.html
Environment Setup
For running FSDP at OSC, we recommend using a base PyTorch environment or cloning a base PyTorch environment and adding your project’s specific packages to it.
There are 5 main differences between FSDP and single GPU runs. See https://github.com/pytorch/examples/tree/main/distributed/FSDP2 for a detailed code example. Note however that the example supports multigpu but not multinode. For changes required to support multinode training, scroll down.
1. FSDP Imports
from torch.distributed.fsdp import fully_shard
2. Model Initialization
Apply fully_shard on each layer first, and then on the full model.
model = Transformer()
for layer in model.layers:
    fully_shard(layer)
fully_shard(model)
3. FSDP Process Group Initialization
This is called toward the start of main.
#set device
rank = int(os.environ["LOCAL_RANK"])
if torch.accelerator.is_available():
    device_type = torch.accelerator.current_accelerator()
    device = torch.device(f"{device_type}:{rank}")
    torch.accelerator.device_index(rank)

#initialize process group
backend = torch.distributed.get_default_backend_for_device(device)
torch.distributed.init_process_group(backend=backend, device_id=device)
4. Define and set prefetching
def set_modules_to_forward_prefetch(model, num_to_forward_prefetch):
    for i, layer in enumerate(model.layers):
        if i >= len(model.layers) - num_to_forward_prefetch:
            break
        layers_to_prefetch = [
            model.layers[i + j] for j in range(1, num_to_forward_prefetch + 1)
        ]
        layer.set_modules_to_forward_prefetch(layers_to_prefetch)

def set_modules_to_backward_prefetch(model, num_to_backward_prefetch):
    for i, layer in enumerate(model.layers):
        if i < num_to_backward_prefetch:
            continue
        layers_to_prefetch = [
            model.layers[i - j] for j in range(1, num_to_backward_prefetch + 1)
        ]
        layer.set_modules_to_backward_prefetch(layers_to_prefetch)

#<model setup>
...
if args.explicit_prefetching:
    set_modules_to_forward_prefetch(model, num_to_forward_prefetch=2)
    set_modules_to_backward_prefetch(model, num_to_backward_prefetch=2)
5. Destroy process group after training/validation and any post-processing has completed. I.e., outside of training loop.
torch.distributed.destroy_process_group()
Multinode Changes
There are also 3 changes for using multinode, rather than just multigpu. See https://github.com/pytorch/examples/blob/main/distributed/ddp-tutorial-series/multinode.py
1. Use DistributedSampler to load data (required)
from torch.utils.data.distributed import DistributedSampler

sampler1 = DistributedSampler(dataset1, rank=rank, num_replicas=world_size, shuffle=True)
train_kwargs = {'batch_size': train_config.batch_size_training, 'sampler': sampler1}
cuda_kwargs = {'num_workers': train_config.num_workers_dataloader, 'pin_memory': True, 'shuffle': False} train_kwargs.update(cuda_kwargs)
train_loader = torch.utils.data.DataLoader(dataset1,**train_kwargs)
2. Global vs local rank tracked separately (optional, but recommended)
class Trainer:
    def __init__(self, trainer_config: TrainerConfig, model, optimizer, train_dataset, test_dataset=None):
        self.config = trainer_config # set torchrun variables
        self.local_rank = int(os.environ["LOCAL_RANK"]) #use local rank to load model to device
        self.global_rank = int(os.environ["RANK"])
        ...
3. Only save checkpoints where global_rank=0 (optional, but recommended)
if self.global_rank == 0:

    ...

    torch.save(model_state_dict, new_model_checkpoint)

    torch.save(optim_state_dict, new_optim_checkpoint)
Example Slurm Job Script using Srun Torchrun
#!/bin/bash
#SBATCH --job-name=fsdp-t5-multinode
#SBATCH --nodes=2
#SBATCH --ntasks-per-node=1
#SBATCH --gpus-per-task=4
#SBATCH --cpus-per-task=96

nodes=( $( scontrol show hostnames $SLURM_JOB_NODELIST ) )
nodes_array=($nodes)
head_node=${nodes_array[0]}
head_node_ip=$(srun --nodes=1 --ntasks=1 -w "$head_node" hostname --ip-address)

echo Node IP: $head_node_ip
export LOGLEVEL=INFO

ml miniconda3/24.1.2-py310
conda activate fsdp

srun torchrun \
--nnodes 2 \
--nproc_per_node 1 \
--rdzv_id $RANDOM \
--rdzv_backend c10d \
--rdzv_endpoint $head_node_ip:29500 \
/path/to/examples/distributed/T5-fsdp/fsdp_t5.py
HOWTO: Reduce Disk Space Usage
This HOWTO will demonstrate how to lower ones' disk space usage. The following procedures can be applied to all of OSC's file systems.
We recommend users regularly check their data usage and clean out old data that is no longer needed.
Users who need assistance lowering their data usage can contact OSC Help.
Preventing Excessive Data Usage Before It Starts
Users should ensure that their jobs are written in such a way that temporary data is not saved to permanent file systems, such as the project space file system or in their home directory.
If your job copies data from the scratch file system or its node's local disk ($TMPDIR) back to a permanent file system, such as the project space file system or a home directory ( /users/PXX####/xxx####/), you should ensure you are only copying the files you will need later.
Identifying Old and Large Data
The following commands will help you identify old data using the find command.
find commands may produce an excessive amount of output. To terminate the command while it is running, click CTRL + C.Find all files in a directory that have not been accessed in the past 100 days:
This command will recursively search the users home directory and give a detailed listing of all files not accessed in the past 100 days.
The last access time atime is updated when a file is opened by any operation, including grep, cat, head, sort, etc.
find ~ -atime +100 -exec ls -l {} \;
- To search a different directory replace
~with the path you wish to search. A period.can be used to search the current directory. - To view files not accessed over a different time span, replace
100with your desired number of days. - To view the total size in bytes of all the files found by
find, you can add| awk '{s+=$5} END {print "Total SIZE (bytes): " s}'to the end of the command:
find ~ -atime +100 -exec ls -l {} \;| awk '{s+=$5} END {print "Total SIZE (bytes): " s}'
Find all files in a directory that have not been modified in the past 100 days:
This command will recursively search the users home directory and give a detailed listing of all files not modified in the past 100 days.
The last modified time mtime is updated when a file's contents are updated or saved. Viewing a file will not update the last modified time.
find ~ -mtime +100 -exec ls -l {} \;
- To search a different directory replace
~with the path you wish to search. A period.can be used to search the current directory. - To view files not modified over a different time span, replace
100with your desired number of days. - To view the total size in bytes of all the files found by
find, you can add| awk '{s+=$5} END {print "Total SIZE (bytes): " s}'to the end of the command:
find ~ -mtime +100 -exec ls -l {} \;| awk '{s+=$5} END {print "Total SIZE (bytes): " s}'
List files larger than a specified size:
Adding the -size <size> option and argument to the find command allows you to only view files larger than a certain size. This option and argument can be added to any other find command.
For example, to view all files in a users home directory that are larger than 1GB:
find ~ -size +1G -exec ls -l {} \;
List number of files in directories
Use the following command to view list dirs under <target-dir> and number of files contained in the dirs.
du --inodes -d 1 <target-dir>
Deleting Identified Data
If you no longer need the old data, you can delete it using the rm command.
If you need to delete a whole directory tree (a directory and all of its subcontents, including other directories), you can use the rm -R command.
For example, the following command will delete the data directory in a users home directory:
rm -R ~/data
If you would like to be prompted for confirmation before deleting every file, use the -i option.
rm -Ri ~/data
Enter y or n when prompted. Simply pressing the enter button will default to n.
Deleting files found by find
The rm command can be combined with any find command to delete the files found. The syntax for doing so is:
find <location> <other find options> -exec rm -i {} \;
Where <other find options> can include one or more of the options -atime <time>, -mtime <time>, and -size <size>.
The following command would find all files in the ~/data directory 1G or larger that have not been accessed in the past 100 days, and then prompt for confirmation to delete each file:
find ~/data -atime +100 -size 1G -exec rm -i {} \;
If you are absolutely sure the files identified by find are okay to delete you can remove the -i option to rm and you will not be prompted. Extreme caution should be used when doing so!
Archiving Data
If you still need the data but do not plan on needing the data in the immediate future, contact OSC Help to discuss moving the data to an archive file system. Requests for data to be moved to the archive file system should be larger than 1TB.
Compressing
If you need the data but do not access the data frequently, you should compress the data using tar or gzip.
Reducing number of files using tar
If you want to keep a number of files, you can choose to combine them into a single archive file. You might do this if the data that you do not access frequently is in a number of files. These files can be different file types. The following command shows you how to add 2 files (named file1 and file2) into a single, tar, archive file (named files.tar). It is good practice to keep the extension .tar to differentiate the file as an archive, though it is not necessary.
tar -cvf files.tar file1 file2
To extract the data, you can use the following command.
tar -xvf files.tar
Reducing disk size using gzip
If you want to keep the need to reduce the total space being used by a file, you can compress the file using gzip (GNU zip). You might do this if the data that you do not access frequently is in a large file. The following command shows you how to compress a file (named file.txt). The resulting file of using gzip will have the same file name as before (extensions included) but will add the extension .gz to differentiate the file as compressed.
gzip file.txt
You can also compress multiple files into a single gzip file using the following command. This command also gives you more flexibility in naming the zipped files.
cat file1.txt file2.txt |gzip > files.txt.gz
To extract the data, you can use the following command.
gunzip file.txt.gz
Combing tar and gzip
If you have multiple, large files or a single large directory, it may be helpful to compress an entire directory. In order to do this you will need to tar the directory into a single file and then use the gzip command to compress the file. You can shorten the command into a single line as follows.
tar -cvfz folder.tar.gz folder
Moving Data to a Local File System
If you have the space available locally you can transfer your data there using sftp or Globus.
Globus is recommended for large transfers.
The OnDemand File application should not be used for transfers larger than 1GB.
HOWTO: Reduce GPU memory usage during ANN training and inference
Overview
Out-of-Memory (OOM) errors during artificial neural network (ANN) training are common and can slow down the process of obtaining desired experimental results. A number of strategies exist to overcome this challenge, including requesting more resources and distributed training, using smaller models and data precision, setting hyperparameters, and other techniques. While this is not an exhaustive guide, the following recommendations are meant to reduce GPU memory usage and reduce time to get results. If you require assistance, please contact OSC Support.
Also, consider profiling your GPU memory usage to identify which portions of your training code are using the most memory, allowing you to target your strategies accordingly.
Requesting and Using More Resources
- Request more GPU resources
- Use Fully Sharded Data Parallel (FSDP) in PyTorch to distribute large models across multiple GPU devices
Using Smaller Models and Datatypes
Model choice has the single largest impact on GPU memory usage, so it's important to choose a model that suits your needs but is not unnecessarily large if there's no advantage for your use case. See how to estimate GPU memory usage based on model size in billions of parameters. Each parameter's datatype also strongly affects total model size - consider using lower precision datatypes if feasible to reduce memory footprint. Lower precision calculations can also be faster and use less energy. Using a smaller model or lower precision datatype may negatively impact model fit and overall performance however, and individual needs vary in terms of flexibility with model choice.
- Use smaller models to reduce overall parameter count
- Use lower precision datatypes to reduce bytes per parameter
- Enable mixed precision training - Mixed precision trainings uses both 32-bit and 16-bit representations at different times during training and can reduce memory usage and training time.
- Enable bfloat16 training - Pure 16-bit training does not use fp32 floating point integers during training for increased speed and reduced memory usage, at the cost of potential model fit.
- Quantization - Even lower precision datatypes such as int8 can be used in quantized training, where the datatype is actually cast to a lower bit width.
- Some quantization-related techniques are unlikely to reduce memory usage during training:
- Quantization-Aware Training (QAT) is an alternative to true quantized training, and it simulates lower-precision datatypes alongside the higher precision representations. Therefore, the memory usage during training with QAT can actually increase; its benefits are more oriented toward reduced cost during inference.
- Post training static and dynamic quantization involves converting model weights after the training is completed - again the main benefit is inference cost.
- Some quantization-related techniques are unlikely to reduce memory usage during training:
Setting Hyperparameters
Setting hyperparameters can have a large impact on reducing memory usage during ANN training. Reducing batch size and context length in particular can result in a sizable reduction in memory usage. Another benefit of adjusting hyperparameters is that little to no code changes are required, making it easy to experiment with different values.
- Reduce batch size - training and validation batches can have their own batch size hyperparameters. Batch size reduction will have increased memory reduction as the size of each training instance increases. For example, text encoding with long contexts or large images, audio or video clips see the largest memory reductions as batch size decreases.
- Reduce context length - this may be called max_seq_len, context_len, or other name if you're using a pre-built model.
- Set Dataloaders to Number of GPUs -To avoid I/O bottleneck, aim to set your number of dataloaders at least equal to your number of GPUs.
Other GPU Memory-Reduction Techniques
- Use flash-attention (not available on V100s)
- Gradient Accumulation - increases effective batch size without increasing memory, minimal code changes
- Activation Checkpointing - recompute activations, trading off extra computation for lower memory usage
- For validation runs during training, ensure gradient computations are disabled
torch.no_grad()model.eval()
GPU Memory-Reduction During Inference (this section in progress)
Disable gradient computations - eliminate memory for unncessary calculations
Enable Paged Attention - kv cache memory reduction
Enable Eager Mode (vllm)
Reduce GPU utilization (vllm)
Reduce context length - may be called different things with different services
Reduce batch size - may be called different things with different services
HOWTO: Run Claude Code with local inference
Claude Code is a CLI tool for code assistance.
Because Claude can run system commands on your behalf, users are encouraged to take proper security precautions including, but not limited to:
1. Only giving Claude access to files you are willing to lose. Consider backing up anything before allowing Claude access.
2. Enabling manual confirmation for commands run: Default Mode = Ask
3. Disabling additional directories access
4. Restricting risky commands by adding them to the Denylist (permissions.deny) - e.g. WebFetch, Bash(curl:*), Bash(wget:*), etc.
5. Disable all hooks and MCP servers by default, whitelisting only those you trust.
Run Claude Code by taking the following steps:
1. Install Claude Code (only required first time)
a. curl -fsSL https://claude.ai/install.sh | bash
b. echo 'export PATH="$HOME/.local/bin:$PATH"' >> ~/.bashrc && source ~/.bashrc
2. Get a GPU session (multiple options)
a. sinteractive -g 1 -c 16 -t 1:00:00 -A <PROJECT_CODE>
b. Open Ondemand desktop session with GPU
3. Run vLLM with your target model, setting an alias like "qwen" (Claude can't handle HuggingFace-style slashes in model names)
a. module load vllm/0.23.0
b. vllm_start Qwen/Qwen3-8B --served-model-name qwen --enable-auto-tool-choice --tool-call-parser hermes > vllm.log 2>&1
c. (optional) test vLLM - curl http://localhost:${VLLM_API_PORT}/v1/models | jq
4. Configure Claude to use Local LLM (we'll use vLLM)
a. Create a claude_envvars.env file with values something like the following:
export ANTHROPIC_BASE_URL="http://localhost:${VLLM_API_PORT}"
export ANTHROPIC_API_KEY="empty"                   # Placeholder value
export ANTHROPIC_AUTH_TOKEN="empty"                # Placeholder value

# Map Anthropic's internal model tiers to your local Qwen alias
# Use the exact alias defined in your local server (e.g., 'qwen3.5', 'qwen3-coder', or the full HF ID)
export ANTHROPIC_MODEL="qwen"
export ANTHROPIC_DEFAULT_OPUS_MODEL="qwen"
export ANTHROPIC_DEFAULT_SONNET_MODEL="qwen"
export ANTHROPIC_DEFAULT_HAIKU_MODEL="qwen"
export CLAUDE_CODE_SUBAGENT_MODEL="qwen"

# Optimize for local inference
export CLAUDE_CODE_MAX_OUTPUT_TOKENS="4096"
export DISABLE_PROMPT_CACHING="1"
export DISABLE_AUTOUPDATER="1"
export DISABLE_TELEMETRY="1"
export DISABLE_ERROR_REPORTING="1"
export CLAUDE_CODE_DISABLE_NONESSENTIAL_TRAFFIC="1"
5. Set the Claude environment variables you defined above:
a. source claude_envvars.env
6. Run Claude (in your project's directory)
a. claude
HOWTO: Run Python in Parallel
We can improve performace of python calculation by running python in parallel. In this turtorial we will be making use of the multithreading library to run python code in parallel.
Multiprocessing is part of the standard python library distribution on versions python/2.6 and above so no additonal instalation is required (Pitzer both offers 2.7 and above and Cardinal offers 3.9 and above so this should not be an issue). However, we do recommend you use python environments when using multiple libraries to avoid version conflicts with different projects you may have. See here for more information.
Please note that this parallelization is limited to a single node. If you need to run your job across multiple nodes, you should consider other options like mpi4py.
Pool
One way to parallelizing is by created a parallel pool. This can be done by using the Pool method:
p = Pool(10)
This will create a pool of 10 worker processes.
Once you have a pool of worker processes created you can then use the map method to assign tasks to each worker.
p.map(my_function, something_iterable)
Here is an example python code:
from multiprocessing import Pool
from timeit import default_timer as timer
import time


def sleep_func(x):
        time.sleep(x)


if __name__ == '__main__':

        arr = [1,1,1,1,1]

        # create a pool of 5 worker processes
        p = Pool(5)

        start = timer()

        # assign sleep_func to a worker for each entry in arr.
        # each array entry is passed as an argument to sleep_func
        p.map(sleep_func, arr)

        print("parallel time: ", timer() - start)


        start = timer()
        # run the functions again but in serial
        for a in arr:
            sleep_func(a)
        print("serial time: ", timer() - start)
The above code was then submitted using the below job script:
#!/bin/bash

#SBATCH --account <your-project-id>
#SBATCH --job-name Python_ExampleJob
#SBATCH --nodes=1
#SBATCH --time=00:10:00

module load python

python example_pool.py
After submitting the above job, the following was the output:
parallel time:  1.003282466903329
serial time:  5.005984931252897
See the documenation for more details and examples on using Pool.
Process
The mutiprocessing library also provides the Process method to run functions asynchronously.
To create a Process object you can simply make a call to:
proc = Process(target=my_function, args=[my_function, arguments, go, here])
The target is set equal to the name of your function which you want to run asynchronously and args is a list of arguement for your function.
Start running a process asynchronously by:
proc.start()
Doing so will begin running the function in another process and the main parent process will continue in its execution.
You can make the parent process wait for a child process to finish with:
proc.join()
If you use proc.run() it will run your process and wait for it to finish before continuing on in executing the parent process.
Note: The below code will start proc2 only after proc1 has finshed. If you want to start multiple processes and wait for them use start() and join() instead of run.
proc1.run()
proc2.run()
Examples
Here some example code:
from multiprocessing import Process
from timeit import default_timer as timer
import time

def sleep_func(x):
        print(f'Sleeping for {x} sec')
        time.sleep(x)

if __name__ == '__main__':

        # initialize process objects
        proc1 = Process(target=sleep_func, args=[1])
        proc2 = Process(target=sleep_func, args=[1])

        # begin timer
        start = timer()

        # start processes
        proc1.start()
        proc2.start()

        # wait for both process to finish
        proc1.join()
        proc2.join()

        print('Time: ', timer() - start)
Running this code give the following output:
Sleeping for 1 sec
Sleeping for 1 sec
Time:  1.0275288447737694
You can create a many process easily in loop aswell:
from multiprocessing import Process
from timeit import default_timer as timer
import time

def sleep_func(x):
        print(f'Sleeping for {x} sec')
        time.sleep(x)

if __name__ == '__main__':

        # empty list to later store processes
        processes = []

        # start timer
        start = timer()


        for i in range(10):
            # initialize and start processes
            p = Process(target=sleep_func, args=[5])
            p.start()

            # add the processes to list for later reference
            processes.append(p)

        # wait for processes to finish.
        # we cannot join() them within the same loop above because it would
        # wait for the process to finish before looping and creating the next one.
        # So it would be the same as running them sequentially.
        for p in processes:
            p.join()

        print('Time: ', timer() - start)
Output:
Sleeping for 5 sec
Sleeping for 5 sec
Sleeping for 5 sec
Sleeping for 5 sec
Sleeping for 5 sec
Sleeping for 5 sec
Sleeping for 5 sec
Sleeping for 5 sec
Sleeping for 5 sec
Sleeping for 5 sec
Time:  5.069192241877317
See documentation for more information and example on using Process.
Shared States
When running process in parallel it is generally best to avoid sharing states between processes. However, if data must be shared see documentation for more information and examples on how to safely share data.
Other Resources
- Spark:You can also drastically improve preformance of your python code by using Apache Spark. See Spark for more details.
- Horovod: If you are using Tensorflow, PyTorch or other python machine learning packages you may want to also consider using Horovod. Horovod will take single-GPU training scripts and scale it to train across many GPUs in parallel.
HOWTO: Submit Homework to Repository at OSC
This page outlines a way a professor can set up a file submission system at OSC for his/her classroom project.
Usage for Professor
After connecting to OSC system, professor runs submit_prepare as
$ /users/PZS0645/support/bin/submit_prepare
Follow the instruction and provided the needed information (name of the assignment, TA username if appropriate, a size limit if not the default 1000MB per student, and whether or not you want the email notification of a submit). It will create a designated directory where students submit their assignments, as well as generate submit for students used to submit homework to OSC, both of which are located in the directory specified by the professor.
If you want to create multiple directories for different assignments, simply run the following command again with specifying the different assignment number:
$ /users/PZS0645/support/bin/submit_prepare
Note:
The PI can also enforce the deadline by simply changing the permission of the submission directory or renaming the submission directory at the deadline.
(Only works on Owens): One way is to use at command following the steps below:
- Use
atcommand to specify the deadline:
at [TIME]
where TIME is formatted HH:MM AM/PM MM/DD/YY. For example:
at 2:30 PM 08/21/2017
- After running this command, run:
$ chmod 700 [DIRECTORY]
where DIRECTORY is the assignment folder to be closed off.
- Enter [ctrl+D] to submit this command.
The permission of DIRECTORY will be changed to 700 at 2:30PM, August 21, 2018. After that, the student will get an error message when he/she tries to submit an assignment to this directory.
Usage for Students
A student should create one directory which includes all the files he/she wants to submit before running this script to submit his/her assignment. Also, the previous submission of the same assignment from the student will be replaced by the new submission.
To submit the assignment, the student runs submit after connecting to OSC system as
$ /path/to/directory/from/professor/submit
Follow the instructions. It will allow students to submit an assignment to the designated directory specified by the professor and send a confirmation email, or return an error message.
HOWTO: Submit multiple jobs using parameters
Often users want to submit a large number of jobs all at once, with each using different parameters for each job. These parameters could be anything, including the path of a data file or different input values for a program. This how-to will show you how you can do this using a simple python script, a CSV file, and a template script. You will need to adapt this advice for your own situation.
Consider the following batch script:
#!/bin/bash
#SBATCH --ntasks-per-node=2
#SBATCH --time=1:00:00
#SBATCH --job-name=week42_data8

# Copy input data to the nodes fast local disk
cp ~/week42/data/source1/data8.in $TMPDIR

cd $TMPDIR

# Run the analysis
full_analysis data8.in data8.out

# Copy results to proper folder
cp  data8.out ~/week42/results
Let's say you need to submit 100 of these jobs on a weekly basis. Each job uses a different data file as input. You recieve data from two different sources, and so your data is located within two different folders. All of the jobs from one week need to store their results in a single weekly results folder. The output file name is based upon the input file name.
Creating a Template Script
As you can see, this job follows a general template. There are three main parameters that change in each job:
- The week
- Used as part of the job name
- Used to find the proper data file to copy to the nodes local disk
- Used to copy the results to the correct folder
- The data source
- Used to find the proper data file to copy to the nodes local disk
- The data file's name
- Used as part of the job name
- Used to find the proper data file to copy to the nodes local disk
- Used to specify both the input and output file to the program
full_analysis - Used to copy the results to the correct folder
If we replace these parameters with variables, prefixed by the dollar sign $and surrounded by curly braces { }, we get the following template script:
#!/bin/bash
#SBATCH --ntasks-per-node=2
#SBATCH --time=1:00:00

# Copy input data to the nodes fast local disk
cp ~/${WEEK}/data/${SOURCE}/${DATA}.in $TMPDIR
cd $TMPDIR

# Run the analysis
full_analysis ${DATA}.in ${DATA}.out

# Copy results to proper folder
cp  ${DATA}.out ~/${WEEK}/results
Automating Job Submission
We can now use the sbatch --exportoption to pass parameters to our template script. The format for passing parameters is:
sbatch --job-name=name --export=var_name=value[,var_name=value...]
Submitting 100 jobs using the sbatch --export option manually does not make our task much easier than modifying and submitting each job one by one. To complete our task we need to automate the submission of our jobs. We will do this by using a python script that submits our jobs using parameters it reads from a CSV file.
Note that python was chosen for this task for its general ease of use and understandability -- if you feel more comfortable using another scripting language feel free to interpret/translate this python code for your own use.
The script for submitting multiple jobs using parameters can be found at ~support/share/misc/submit_jobs.py
Use the following command to run a test with the examples already created:
<your-proj-code> with a project you are a member of to charge jobs to.~support/share/misc/submit_jobs.py -t ~support/share/misc/submit_jobs_examples/job_template2.sh WEEK,SOURCE,DATA ~support/share/misc/submit_jobs_examples/parameters_example2.csv <your-proj-code>
This script will open the CSV file and step through the file line by line, submitting a job for each line using the line's values. If the submit command returns a non-zero exit code, usually indicating it was not submitted, we will print this out to the display. The jobs will be submitted using the general format (using the example WEEK,SOURCE,DATA environment variables):
sbatch -A <project-account> -o ~/x/job_logs/x_y_z.job_log --job-name=x_y_z --export=WEEK=x,SOURCE=y,DATA=z job.sh
Where x, y and z are determined by the values in the CSV parameter file. Below we relate x to week, y to source and z to data.
Creating a CSV File
We now need to create a CSV file with parameters for each job. This can be done with a regular text editor or using a spreadsheet editor such as Excel. By default you should use commas as your delimiter.
Here is our CSV file with parameters:
week42,source1,data1
week42,source1,data2
week42,source1,data3
...
week42,source2,data98
week42,source2,data99
week42,source2,data100
The submit script would read in the first row of this CSV file and form and execute the command:
sbatch -A <project-account> -o week42/job_logs/week42_source1_data1.job_log --job-name=week42_source1_data1 --export=WEEK=week42,SOURCE=source1,DATA=data1 job.sh
Submitting Jobs
Once all the above is done, all you need to do to submit your jobs is to make sure the CSV file is populated with the proper parameters and run the automatic submission script with the right flags.
Try using submit_jobs.py --help for an explanation:
$ ~support/share/misc/submit_jobs.py --help
usage: submit_jobs.py [-h] [-t]
                      jobscript parameter_names job_parameters_file account

Automatically submit jobs using a csv file; examples in
~support/share/misc/submit_jobs_examples/

positional arguments:
  jobscript            job script to use
  parameter_names      comma separated list of names for each parameter
  job_parameters_file  csv parameter file to use
  account              project account to charge jobs to

optional arguments:
  -h, --help           show this help message and exit
  -t, --test           test script without submitting jobs
-t flag as well to check the submit commands.Modifying for unique uses
It is a good idea to copy the ~support/share/misc/submit_jobs.py file and modify for unique use cases.
Contact oschelp@osc.edu and OSC staff can assist if there are questions using the default script or adjusting the script for unique use cases.
HOWTO: Tune Performance
Table of Contents
Introduction
This tutorial presents techniques to tune the performance of an application. Keep in mind that correctness of results, code readability/maintainability, and portability to future systems are more important than performance. For a big picture view, you can check the status of a node while a job is running by visiting the OSC grafana page and using the "cluster metrics" report, and you can use the online interactive tool XDMoD to look at resource usage information for a job.
Some application software specific factors that can affect performance are
- Effective use of processor features for a high degree of internal concurrency in a single core
- Memory access patterns (memory access is slow compared to computation)
- Use of an appropriate file system for file I/O
- Scalability of algorithms
- Compiler optimizations
- Explicit parallelism
We will be using this code based on the HPCCD miniapp from Mantevo. It performs the Conjugate Gradient (CG) on a 3D chimney domain. CG is an iterative algorithm to numerically approximate the solution to a system of linear equations.
Run code with:
srun -n <numprocs> ./test_HPCCG nx ny nz
where nx, ny, nz are the number of nodes in the x, y, and z dimension on each processor.
Setup
First start an interactive Pitzer Desktop session with OnDemand.
You need to load intel 19.0.5 and mvapich2 2.3.3:
module load intel/19.0.5 mvapich2/2.3.3
Then clone the repository:
git clone https://code.osu.edu/khuvis.1/performance_handson.git
Debugging
Debuggers let you execute your program one line at a time, inspect variable values, stop your programming at a particular line, and open a core file after the program crashes.
For debugging, use the -g flag and remove optimzation or set to -O0. For example:
icc -g -o mycode.c
gcc -g -O0 -o mycode mycode.c
To see compiler warnings and diagnostic options:
icc -help diag
man gcc
ARM DDT
ARM DDT is a commercial debugger produced by ARM. It can be loaded on all OSC clusters:
module load arm-ddt
To run a non-MPI program from the command line:
ddt --offline --no-mpi ./mycode [args]
To run an MPI program from the command line:
ddt --offline -np num.procs ./mycode [args]
Hands On
Compile and run the code:
make
srun -n 2 ./test_HPCCG 150 150 150
You should have received the following error message at the end of the program output:
===================================================================================
=   BAD TERMINATION OF ONE OF YOUR APPLICATION PROCESSES
=   PID 308893 RUNNING AT p0200
=   EXIT CODE: 11
=   CLEANING UP REMAINING PROCESSES
=   YOU CAN IGNORE THE BELOW CLEANUP MESSAGES
===================================================================================
YOUR APPPLICATIN TERMINATED WITH EXIT STRING: Segmentation fault (signal 11)
This typically referes to a problem with your application.
Please see tthe FAQ page for debugging suggestions
Set compiler flags -O0 -g to CPP_OPT_FLAGS in Makefile. Then recompile and run with ARM DDT:
make clean; make
module load arm-ddt
ddt -np 2 ./test_HPCCG 150 150 150
Solution
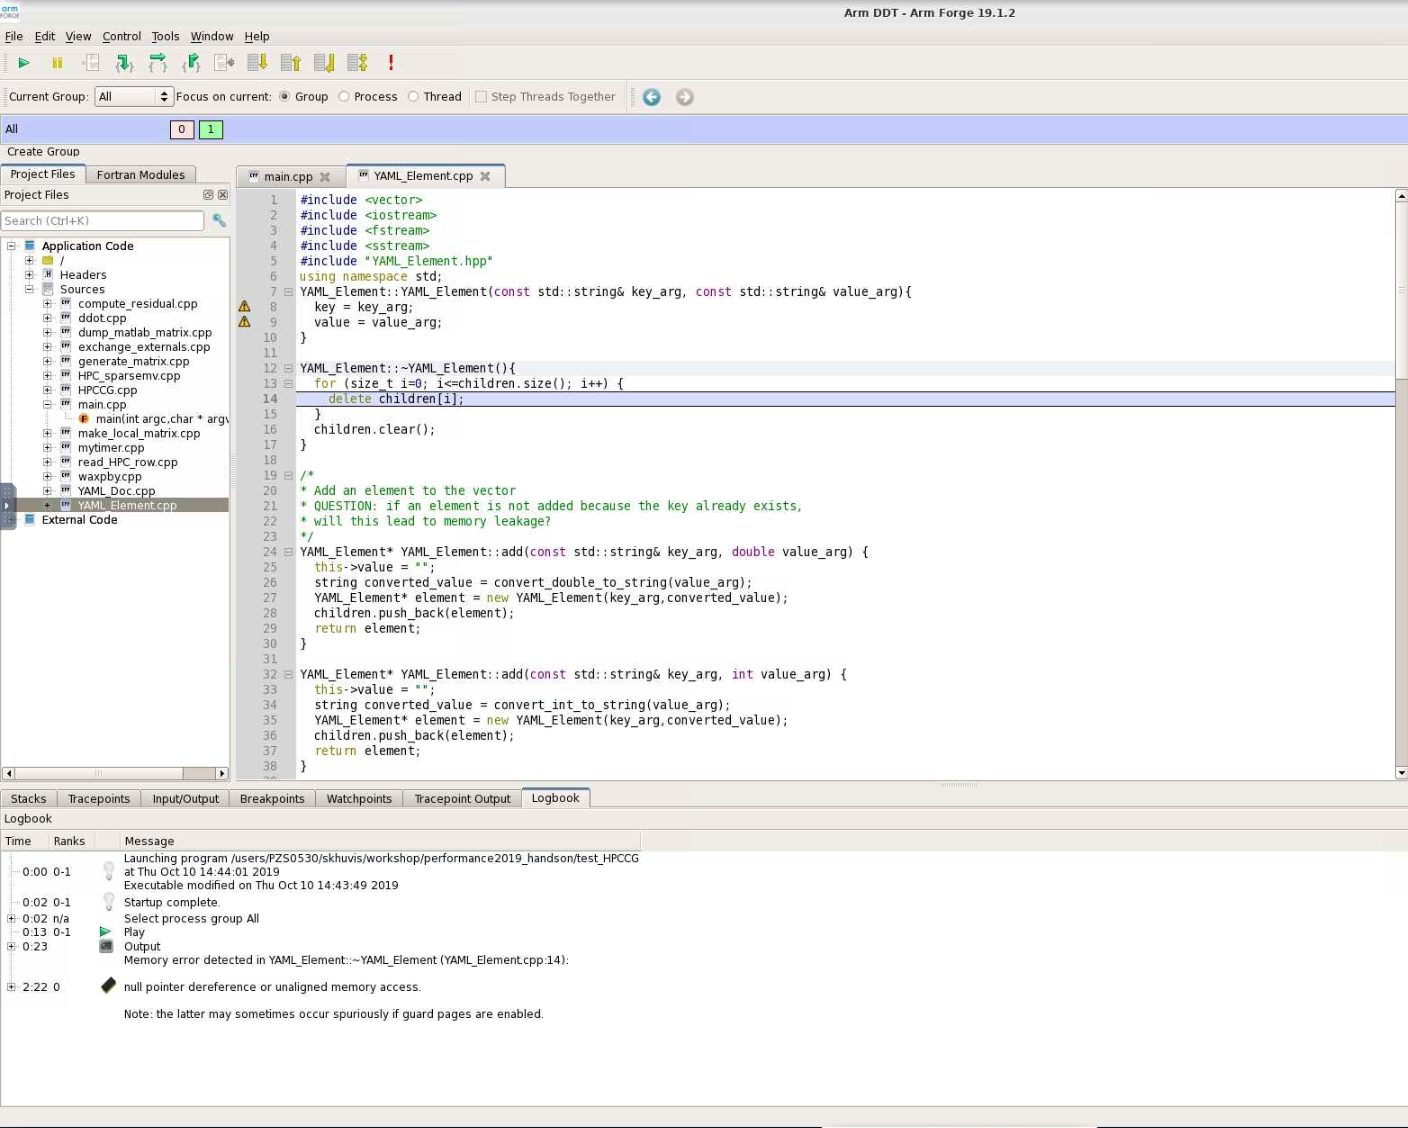
When DDT stops on the segmentation fault, the stack is in the YAML_Element::~YAML_Element function of YAML_Element.cpp. Looking at this function, we see that the loop stops at children.size() instead of children.size()-1. So, line 13 should be changed from
for(size_t i=0; i<=children.size(); i++) {
to
for(size_t i=0; i<children.size(); i++) {
Hardware
On Pitzer, there are 40 cores per node (20 cores per socket and 2 sockets per node). There is support for AVX512, vector length 8 double or 16 single precision values and fused multiply-add. (There is hardware support for 4 thread per core, but it is currently not enabled on OSC systems.)
There are three cache levels on Pitzer, and the statistics are shown in the table below:
| Cache level | Size (KB) | Latency (cycles) | Max BW (bytes/cycle) | Sustained BW (bytes/cycle) |
|---|---|---|---|---|
| L1 DCU | 32 | 4-6 | 192 | 133 |
| L2 MLC | 1024 | 14 | 64 | 52 |
| L3 LLC | 28160 | 50-70 | 16 | 15 |
Never do heavy I/O in your home directory. Home directories are for long-term storage, not scratch files.
One option for I/O intensive jobs is to use the local disk on a compute node. Stage files to and from your home directory into $TMPDIR using the pbsdcp command (e.g. pbsdcp file1 file2 $TMPDIR), and execute the program in $TMPDIR.
Another option is to use the scratch file system ($PFSDIR). This is faster than other file systems, good for parallel jobs, and may be faster than local disk.
For more information about OSC's file system, click here.
For example batch scripts showing the use of $TMPDIR and $PFSDIR, click here.
For more information about Pitzer, click here.
Performance Measurement
FLOPS stands for "floating point operations per second." Pitzer has a theoretical maximum of 720 teraflops. With the LINPACK benchmark of solving a dense system of linear equations, 543 teraflops. With the STREAM benchmark, which measures sustainable memory bandwidth and the corresponding computation rate for vector kernels, copy: 299095.01 MB/s, scale: 298741.01 MB/s, add: 331719.18 MB/s, and traid: 331712.19 MB/s. Application performance is typically much less than peak/sustained performance since applications usually do not take full advantage of all hardware features.
Timing
You can time a program using the /usr/bin/time command. It gives results for user time (CPU time spent running your program), system time (CPU time spent by your program in system calls), and elapsed time (wallclock). It also shows % CPU, which is (user + system) / elapsed, as well as memory, pagefault, swap, and I/O statistics.
/usr/bin/time j3
5415.03user 13.75system 1:30:29elapsed 99%CPU \
(0avgtext+0avgdata 0maxresident)k \
0inputs+0outputs (255major+509333minor)pagefaults 0 swaps
You can also time portions of your code:
| C/C++ | Fortran 77/90 | MPI (C/C++/Fortran) | |
|---|---|---|---|
| Wallclock |
time(2), difftime(3), getrusage(2) |
SYSTEM_CLOCK(2) | MPI_Wtime(3) |
| CPU | times(2) | DTIME(3), ETIME(3) | X |
Profiling
A profiler can show you whether code is compute-bound, memory-bound, or communication bound. Also, it shows how well the code uses available resources and how much time is spent in different parts of your code. OSC has the following profiling tools: ARM Performance Reports, ARM MAP, Intel VTune, Intel Trace Analyzer and Collector (ITAC), Intel Advisor, TAU Commander, and HPCToolkit.
For profiling, use the -g flag and specify the same optimization level that you normally would normally use with -On. For example:
icc -g -O3 -o mycode mycode.c
Look for
- Hot spots (where most of the time is spent)
- Excessive number of calls to short functions (use inlining!)
- Memory usage (swapping and thrashing are not allowed at OSC)
- % CPU (low CPU utilization may mean excessive I/O delays).
ARM Performance Reports
ARM PR works on precompiled binaries, so the -g flag is not needed. It gives a summary of your code's performance that you can view with a browser.
For a non-MPI program:
module load arm-pr
perf-report --no-mpi ./mycode [args]
For an MPI program:
module load arm-pr
perf-report --np num_procs ./mycode [args]
ARM MAP
Interpreting this profile requires some expertise. It gives details about your code's performance. You can view and explore the resulting profile using an ARM client.
For a non-MPI program:
module load arm-map
map --no-mpi ./mycode [args]
For an MPI program:
module load arm-pr
map --np num_procs ./mycode [args]
For more information about ARM Tools, view OSC resources or visit ARM's website.
Intel Trace Analyzer and Collector (ITAC)
ITAC is a graphical tool for profiling MPI code (Intel MPI).
To use:
module load intelmpi # then compile (-g) code
mpiexec -trace ./mycode
View and explore the results using a GUI with traceanalyzer:
traceanalyzer <mycode>.stf
Help From the Compiler
HPC software is traditionally written in Fortran or C/C++. OSC supports several compiler families. Intel (icc, icpc, ifort) usually gives fastest code on Intel architecture). Portland Group (PGI - pgcc, pgc++, pgf90) is good for GPU programming, OpenACC. GNU (gcc, g++, gfortran) is open source and universally available.
Compiler options are easy to use and let you control aspects of the optimization. Keep in mind that different compilers have different values for options. For all compilers, any highly optimized builds, such as those employing the options herein, should be thoroughly validated for correctness.
Some examples of optimization include:
- Function inlining (eliminating function calls)
- Interprocedural optimization/analysis (ipo/ipa)
- Loop transformations (unrolling, interchange, splitting, tiling)
- Vectorization (operate on arrays of operands)
- Automatic parallization of loops (very conservative multithreading)
Compiler flags to try first are:
- General optimization flags (-O2, -O3, -fast)
- Fast math
- Interprocedural optimization/analysis
Faster operations are sometimes less accurate. For Intel compilers, fast math is default with -O2 and -O3. If you have a problem, use -fp-model precise. For GNU compilers, precise math is default with -O2 and -O3. If you want faster performance, use -ffast-math.
Inlining is replacing a subroutine or function call with the actual body of the subprogram. It eliminates overhead of calling the subprogram and allows for more loop optimizations. Inlining for one source file is typically automatic with -O2 and -O3.
Optimization Compiler Options
Options for Intel compilers are shown below. Don't use -fast for MPI programs with Intel compilers. Use the same compiler command to link for -ipo with separate compilation. Many other optimization options can be found in the man pages. The recommended options are -O3 -xHost. An example is ifort -O3 program.f90.
| -fast | Common optimizations |
| -On |
Set optimization level (0, 1, 2, 3) |
| -ipo | Interprocedural optimization, multiple files |
| -O3 | Loop transforms |
| -xHost | Use highest instruction set available |
| -parallel | Loop auto-parallelization |
Options for PGI compilers are shown below. Use the same compiler command to link for -Mipa with separate compilation. Many other optimization options can be found in the man pages. The recommended option is -fast. An example is pgf90 -fast program.f90.
| -fast | Common optimizations |
| -On |
Set optimization level (0, 1, 2, 3, 4) |
| -Mipa | Interprocedural optimization |
| -Mconcur | Loop auto-parallelization |
Options for GNU compilers are shown below. Use the same compiler command to link for -Mipa with separate compilation. Many other optimization options can be found in the man pages. The recommended options are -O3 -ffast-math. An example is gfortran -O3 program.f90.
| -On | Set optimization level (0, 1, 2, 3) |
| N/A for separate compilation | Interprocedural optimization |
| -O3 | Loop transforms |
| -ffast-math | Possibly unsafe floating point optimizations |
| -march=native | Use highest instruction set available |
Hands On
Compile and run with different compiler options:
time srun -n 2 ./test_HPCCG 150 150 150
Using the optimal compiler flags, get an overview of the bottlenecks in the code with the ARM performance report:
module load arm-pr
perf-report -np 2 ./test_HPCCG 150 150 150
Solution
On Pitzer, sample times were:
| Compiler Option | Runtime (seconds) |
|---|---|
| -g | 129 |
| -O0 -g | 129 |
| -O1 -g | 74 |
| -O2 -g | 74 |
| -O3 -g |
74 |
The performance report shows that the code is compute-bound.

Compiler Optimization Reports
Compiler optimization reports let you understand how well the compiler is doing at optimizing your code and what parts of your code need work. They are generated at compile time and describe what optimizations were applied at various points in the source code. The report may tell you why optimizations could not be performed.
For Intel compilers, -qopt-report and outputs to a file.
For Portland Group compilers, -Minfo and outputs to stderr.
For GNU compilers, -fopt-info and ouputs to stderr by default.
A sample output is:
LOOP BEGIN at laplace-good.f(10,7)
   remark #15542: loop was not vectorized: inner loop was already vectorized

   LOOP BEGIN at laplace-good.f(11,10)
   <Peeled loop for vectorization>
   LOOP END

   LOOP BEGIN at laplace-good.f(11,10)
      remark #15300: LOOP WAS VECTORIZED
   LOOP END

   LOOP BEGIN at laplace-good.f(11,10)
   <Remainder loop for vectorization>
      remark #15301: REMAINDER LOOP WAS VECTORIZED
   LOOP END

   LOOP BEGIN at laplace-good.f(11,10)
   <Remainder loop for vectorization>
   LOOP END
LOOP END
Hands On
Add the compiler flag -qopt-report=5 and recompile to view an optimization report.
Vectorization/Streaming
Code is structured to operate on arrays of operands. Vector instructions are built into the processor. On Pitzer, the vector length is 16 single or 8 double precision. The following is a vectorizable loop:
do i = 1,N
  a(i) = b(i) + x(1) * c(i)
end do
Some things that can inhibit vectorization are:
- Loops being in the wrong order (usually fixed by compiler)
- Loops over derived types
- Function calls (can sometimes be fixed by inlining)
- Too many conditionals
- Indexed array accesses
Hands On
Use ARM MAP to identify the most expensive parts of the code.
module load arm-map
map -np 2 ./test_HPCCG 150 150 150
Check the optimization report previously generated by the compiler (with -qopt-report=5) to see if any of the loops in the regions of the code are not being vectorized. Modify the code to enable vectorization and rerun the code.
Solution
 Map shows that the most expensive segment of the code is lines 83-84 of HPC_sparsemv.cpp:
for (int j=0; j< cur_nnz; j++)
  y[i] += cur_vals[j]*x[cur_inds[j]];
The optimization report confirms that the loop was not vectorized due to a dependence on y.
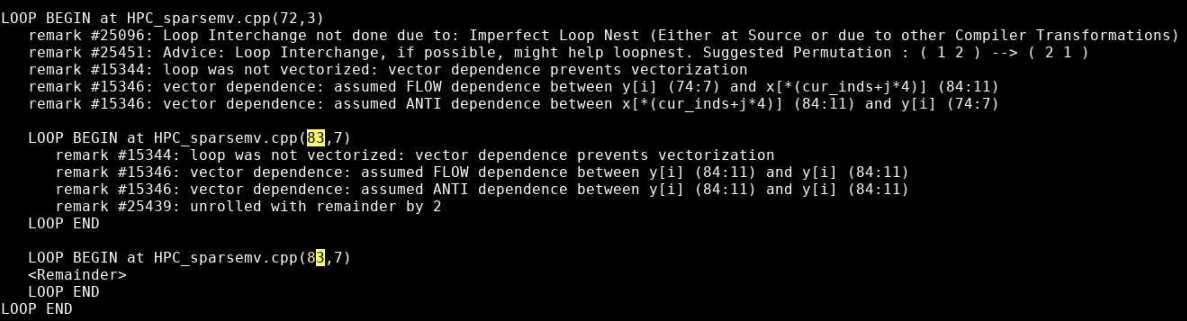
Incrementing a temporary variable instead of y[i], should enable vectorization:
for (int j=0; j< cur_nnz; j++)
  sum += cur_vals[j]*x[cur_inds[j]];
y[i] = sum;
Recompiling and rerunning with change reduces runtime from 74 seconds to 63 seconds.
Memory access is often the most important factor in your code's performance. Loops that work with arrays should use a stride of one whenever possible. C and C++ are row-major (store elements consecutively by row in 2D arrays), so the first array index should be the outermost loop and the last array index should be the innermost loop. Fortran is column-major, so the reverse is true. You can get factor of 3 or 4 speedup just by using unit stride. Avoid using arrays of derived data types, structs, or classes. For example, use structs of arrays instead of arrays of structures.
Efficient cache usage is important. Cache lines are 8 words (64 bytes) of consecutive memory. The entire cache line is loaded when a piece of data is fetched.
The code below is a good example. 2 cache lines are used for every 8 loop iterations, and it is unit stride:
real*8 a(N), b(N)
do i = 1,N
  a(i) = a(i) + b(i)
end do

! 2 cache lines:
! a(1), a(2), a(3) ... a(8)
! b(1), b(2), b(3) ... b(8)
The code below is a bad example. 1 cache line is loaded for each loop iteration, and it is not unit stride:
TYPE :: node
  real*8 a, b, c, d, w, x, y, z
END TYPE node
TYPE(node) :: s(N)
do i = 1, N
  s(i)%a = s(i)%a + s(i)%b
end do

! cache line:
! a(1), b(1), c(1), d(1), w(1), x(1), y(1), z(1)
Hands On
Look again at the most expensive parts of the code using ARM MAP:
module load arm-map
map -np 2 ./test_HPCCG 150 150 150
Look for any inefficient memory access patterns. Modify the code to improve memory access patterns and rerun the code. Do these changes improve performance?
Solution
Lines 110-148 of generate_matrix.cpp are nested loops:
for (int ix=0; ix<nx; ix++) {
  for (int iy=0; iy<ny; iy++) {
    for (int iz=0; iz<nz; iz++) {
      int curlocalrow = iz*nx*ny+iy*nx+ix;
      int currow = start_row+iz*nx*ny+iy*nx+ix;
      int nnzrow = 0;
      (*A)->ptr_to_vals_in_row[curlocalrow] = curvalptr;
      (*A)->ptr_to_inds_in_row[curlocalrow] = curindptr;
      .
      .
      .
    }
  }
}
The arrays are accessed in a manner so that consecutive values of ix are accesssed in order. However, our loops are ordered so that the ix is the outer loop. We can reorder the loops so that ix is iterated in the inner loop:
for (int iz=0; iz<nz; iz++) {
  for (int iy=0; iy<ny; iy++) {
    for (int ix=0; ix<nx; ix++) {
      .
      .
      .
    }
  }
}
This reduces the runtime from 63 seconds to 22 seconds.
OpenMP
OpenMP is a shared-memory, threaded parallel programming model. It is a portable standard with a set of compiler directives and a library of support functions. It is supported in compilers by Intel, Portland Group, GNU, and Cray.
The following are parallel loop execution examples in Fortran and C. The inner loop vectorizes while the outer loop executes on multiple threads:
PROGRAM omploop
INTEGER, PARAMETER :: N = 1000
INTEGER i, j
REAL, DIMENSION(N, N) :: a, b, c, x
... ! Initialize arrays
!$OMP PARALLEL DO
do j = 1, N
  do i = 1, N
    a(i, j) = b(i, j) + x(i, j) * c(i, j)
  end do
end do
!$OMP END PARALLEL DO
END PROGRAM omploop
int main() {
  int N = 1000;
  float *a, *b, *c, *x;
... // Allocate and initialize arrays
#pragma omp parallel for
  for (int i = 0; i < N; i++) {
    for (int j = 0; j < N; j++) {
      a[i*N+j] = b[i*N+j] + x[i*N+j] * c[i*N+j]
    }
  }
}
You can add an option to compile a program with OpenMP.
For Intel compilers, add the -qopenmp option. For example, ifort -qopenmp ompex.f90 -o ompex.
For GNU compilers, add the -fopenmp option. For example, gcc -fopenmp ompex.c -o ompex.
For Portland group compilers, add the -mp option. For example, pgf90 -mp ompex.f90 -o ompex.
To run an OpenMP program, requires multiple processors through Slurm (--N 1 -n 40) and set the OMP_NUM_THREADS environment variable (default is use all available cores). For the best performance, run at most one thread per core.
An example script is:
#!/bin/bash
#SBATCH -J omploop
#SBATCH -N 1
#SBATCH -n 40
#SBATCH -t 1:00

export OMP_NUM_THREADS=40
/usr/bin/time ./omploop
For more information, visit http://www.openmp.org, OpenMP Application Program Interface, and self-paced turorials. OSC will host an XSEDE OpenMP workshop on November 5, 2019.
MPI
MPI stands for message passing interface for when multiple processes run on one or more nodes. MPI has functions for point-to-point communication (e.g. MPI_Send, MPI_Recv). It also provides a number of functions for typical collective communication patterns, including MPI_Bcast (broadcasts value from root process to all other processes), MPI_Reduce (reduces values on all processes to a single value on a root process), MPI_Allreduce (reduces value on all processes to a single value and distributes the result back to all processes), MPI_Gather (gathers together values from a group of processes to a root process), and MPI_Alltoall (sends data from all processes to all processes).
A simple MPI program is:
#include <mpi.h>
#include <stdio.h>

int main(int argc, char *argv[]) {
  int rank, size;
  MPI_INIT(&argc, &argv);
  MPI_Comm_rank(MPI_COMM_WORLD, &rank);
  MPI_COMM_size(MPI_COMM_WORLD, &size);
  printf("Hello from node %d of %d\n", rank size);
  MPI_Finalize();
  return(0);
}
MPI implementations available at OSC are mvapich2, Intel MPI (only for Intel compilers), and OpenMPI.
MPI programs can be compiled with MPI compiler wrappers (mpicc, mpicxx, mpif90). They accept the same arguments as the compilers they wrap. For example, mpicc -o hello hello.c.
MPI programs must run in batch only. Debugging runs may be done with interactive batch jobs. srun automatically determines exectuion nodes from PBS:
#!/bin/bash
#SBATCH -J mpi_hello
#SBATCH -N 2
#SBATCH --ntasks-per-node=40
#SBATCH -t 1:00

cd $PBS_O_WORKDIR
srun ./hello
For more information about MPI, visit MPI Forum and MPI: A Message-Passing Interface Standard. OSC will host an XSEDE MPI workshop on September 3-4, 2019. Self-paced tutorials are available here.
Hands On
Use ITAC to get a timeline of the run of the code.
module load intelmpi
LD_PRELOAD=libVT.so \
mpiexec -trace -np 40 ./test_HPCCG 150 150 150
traceanalyzer <stf_file>
Look at the Event Timeline (under Charts). Do you see any communication patterns that could be replaced by a single MPI command?
Solution
Looking at the Event Timeline, we see that a large part of runtime is spent in the following communication pattern: MPI_Barrier, MPI_Send/MPI_Recv, MPI_Barrier. We also see that during this communication rank 0 is sending data to all other rank. We should be able to replace all of these MPI calls with a single call to MPI_Bcast.
The relavent code is in lines 82-89 of ddot.cpp:
  MPI_Barrier(MPI_COMM_WORLD);
  if(rank == 0) {
    for(int dst_rank=1; dst_rank < size; dst_rank++) {
      MPI_Send(&global_result, 1, MPI_DOUBLE, dst_rank, 1, MPI_COMM_WORLD);
    }
  }
  if(rank != 0) MPI_Recv(&global_result, 1, MPI_DOUBLE, 0, 1, MPI_COMM_WORLD, MPI_STATUS_IGNORE);
  MPI_Barrier(MPI_COMM_WORLD);
and can be replaced with:
MPI_Bcast(&global_result, 1, MPI_DOUBLE, 0, MPI_COMM_WORLD);
Interpreted Languages
Although many of the tools we already mentioned can also be used with interpreted languages, most interpreted languages such as Python and R have their own profiling tools.
Since they are still running on th same hardware, the performance considerations are very similar for interpreted languages as they are for compiled languages:
- Vectorization
- Efficient memory utilization
- Use built-in and library functions where possible
- Use appropriate data structures
- Understand and use best practices for the language
One of Python's most common profiling tools is cProfile. The simplest way to use cProfile is to add several arguments to your Python call so that an ordered list of the time spent in all functions called during executation. For instance, if a program is typically run with the command:
python ./mycode.py
replace that with
python -m cProfile -s time ./mycode.py
Here is a sample output from this profiler:
See Python's documentation for more details on how to use cProfile.
One of the most popular profilers for R is profvis. It is not available by default with R so it will need to be installed locally before its first use and loaded into your environment prior to each use. To profile your code, just put how you would usually call your code as the argument into profvis:
$ R
> install.packages('profvis')
> library('profvis')
> profvis({source('mycode.R')}
Here is a sample output from profvis:

For more information on profvis is available here.
Hands On
Python
First, enter the Python/ subdirectory of the code containing the python script ns.py. Profile this code with cProfile to determine the most expensive functions of the code. Next, rerun and profile with the array as an argument to ns.py. Which versions runs faster? Can you determine why it runs faster?
Solution
Execute the following commands:
python -m cProfile -s time ./ns.py
python -m cProfile -s time ./ns.py array
In the original code, 66 seconds out 68 seconds are spent in presPoissPeriodic. When the array argument is passed, the time spent in this function is approximately 1 second and the total runtime goes down to about 2 seconds.
The speedup comes from the vectorization of the main computation in the body of presPoissPeriodic by replacing nester for loops with a single like operation on arrays.
R
Now, enter the R/ subdirectory of the code containing the R script lu.R. Make sure that you have the R module loaded. First, run the code with profvis without any additional arguments and then again with frmt="matrix".
Which version of the code runs faster? Can you tell why it runs faster based on the profile?
Solution
Runtime for the default version is 28 seconds while the runtime when frmt="matrix" is 20 seconds.
Here is the profile with default arguments:
And here is the profile with frmt="matrix":

We can see that most of the time is being spent in lu_decomposition. The difference, however, is that the dataframe version seems to have a much higher overhead associated with accessing elements of the dataframe. On the other hand, the profile of the matrix version seems to be much flatter with fewer functions being called during LU decomposition. This reduction in overhead by using a matrix instead of a dataframe results in the better performance.
HOWTO: Tune VASP Memory Usage
This article discusses memory tuning strategies for VASP.
Data Distribution
Typically the first approach for memory sensitive VASP issues is to tweak the data distribution (via NCORE or NPAR). The information at https://www.vasp.at/wiki/index.php/NPAR covers a variety of machines. OSC has fast communications via Infiniband.
Performance and memory consumption are dependent on the simulation model. So we recommend a series of benchmarks varying the number of nodes and NCORE. The recommended initial value for NCORE is the processor count per node which is the ntasks-per-node value in Slurm (the ppn value in PBS). Of course, if this benchmarking is intractable then one must reexamine the model. For general points see: https://www.vasp.at/wiki/index.php/Memory_requirements and https://www.vasp.at/wiki/index.php/Not_enough_memory And of course one should start small and incrementally improve or scale up one's model.
Rationalization
Using the key parameters with respect to memory scaling listed at the VASP memory requirements page one can rationalize VASP memory usage. The general approach is to study working calculations and then apply that understanding to scaled up or failing calculations. This might help one identify if a calculation is close to a node's memory limit and happens to cross over the limit for reasons that might be out of ones control, in which case one might need to switch to higher memory nodes.
Here is an example of rationalizing memory consumption. Extract from a simulation output the key parameters:
Dimension of arrays:
k-points NKPTS = 18 k-points in BZ NKDIM = 18 number of bands NBANDS= 1344
total plane-waves NPLWV = 752640
...
dimension x,y,z NGXF= 160 NGYF= 168 NGZF= 224
support grid NGXF= 320 NGYF= 336 NGZF= 448
This yields 273 GB of memory, NKDIM*NBANDS*NPLWV*16 + 4*(NGXF/2+1)*NGYF*NGZF*16, according to
https://www.vasp.at/wiki/index.php/Memory_requirements
This estimate should be compared to actual memory reports. See for example XDModD and grafana. Note that most application software has an overhead in the ballpack of ten to twenty percent. In addition, disk caching can consume significant memory. Thus, one must adjust the memory estimate upward. It can then be comapred to the available memory per cluster and per cluster node type.
Miscellaneous
- OSC sets the default resource limits for shells, except for core dump file size, to unlimited; see the limit/ulimit/unlimit commands depending on your shell.
- In the INCAR input file NWRITE=3 is for verbose output and NWRITE=4 is for debugging output.
- OSC does not have a VASP license and our staff has limited experience with it. So investigate alternate forms of help: ask within your research group and post on the VASP mailing list.
- Valgrind is a tool that can be used for many types of debugging including looking for memory corruptions and leaks. However, it slows down your code a very sizeable amount. This might not be feasible for HPC codes
- ASAN (address sanitizer) is another tool that can be used for memory debugging. It is less featureful than Valgrind, but runs much quicker, and so will likely work with your HPC code.
HOWTO: Use 'rclone' to Upload Data
rclone is a tool that can be used to upload and download files to a cloud storage (like Microsoft OneDrive, BuckeyeBox) from the command line. It's shipped as a standalone binary, but requires some user configuration before using. In this page, we will provide instructions on how to use rclone to upload data to OneDrive. For instructions with other cloud storage, check rclone Online documentation.
Setup
Before configuration, please first log into OSC OnDemand and request a Pitzer Lightweight Desktop session. Walltime of 1 hour should be sufficient to finish the configuration.
* xfce: Applications (Top left corner) -> Settings -> Preferred Applications
* mate: System (top bar towards the left) -> Preferences -> Preferred Applications
Once the session is ready, open a terminal. In the terminal, run the command
rclone config
It prompts you with a bunch of questions:
- It shows "No remotes found -- make a new one" or list available remotes you made before
- Answer "n" for "New remote"
- "name>" (the name for the new remote)
- Type "OneDrive" (or whatever else you want to call this remote)
- "Storage>" (the storage type of the new remote)
- This should display a list to choose from. Enter the number corresponding to the "Microsoft OneDrive" storage type, which is "26".
- (It is "6" for BuckeyeBox)
- "client_id>"
- Leave this blank (just press enter).
- "client_secret>"
- Leave this blank (just press enter).
- "Choose national cloud region for OneDrive."
- This should display a list to choose from. Enter the number corresponding to the "Microsoft Cloud Global" region, which is "1".
- "Edit advanced config?"
- Type "n" for no
- "Use auto config?"
- Answer "y" for yes
- A web browser window should pop up allowing you to log into box. It is a good idea at this point to verify that the url is actually OneDrive before entering any credentials
- Enter your OSU email
- This should take you to the OSU login page. Login with your OSU credentials
- Go back to the terminal once "Success" is displayed.
- "Your choice>"
- One of five options to locate the drive you wish to use.
- Type "1" to use your personal or business OneDrive
- "Choose drive to use"
- Type "0"
- "Is this Okay? y/n>"
- Type "y" to confirm the drive you wish to use is correct.
- "y/e/d>"
- Type "y" to confirm you wish to add this remote to rclone.
Testing rclone
Create an empty hello.txt file and upload it to OneDrive using 'rclone copy' as below in a terminal:
touch hello.txt
rclone copy hello.txt OneDrive:/test
This creates a toplevel directory in OneDrive called 'test' if it does not already exist, and uploads the file hello.txt to it.
To verify the uploading is successful, you can either login to OneDrive in a web browser to check the file, or use rclone ls command in the terminal as:
rclone ls OneDrive:/test
ls on a large directory, because it's recursive. You can add a '--max-depth 1' flag to stop the recursion. Downloading from OneDrive to OSC
Copy the contents of a source directory from a configured OneDrive remote, OneDrive:/src/dir/path, into a destination directory in your OSC session, /dest/dir/path, using the code below:
rclone copy OneDrive:/src/dir/path /dest/dir/path
Identical files on the source and destination directories are not transferred. Only the contents of the provided source directory are copied, not the directory name and contents.
copy does not delete files from the destination. To delete files from the destination directory in order to match the source directory, use the sync command instead.
If only one file is being transferred, use the copyto command instead.
--no-traverse option can be used to increase efficiency by stopping rclone from listing the destination. It should be used when copying a small number of files and/or have a large number of files on the destination, but not when a large number of files are being copied.rclone ls OneDrive:/path/to/shared_folder and rclone copy OneDrive:/path/to/shared_folder /dest/dir/path will work normally even though the shared folder does not appear when listing their source directory.Limitations
If rclone remains unused for 90 days, the refresh token will expire, leading to issues with authorization. This can be easily resolved by executing the rclone config reconnect remote: command, which generates a fresh token and refresh token.
Naming
It's important to note OneDrive is case insensitive which prohibits the coexistence files such as "Hello.doc" and "hello.doc". Certain characters are prohibited from being in OneDrive filenames and are commonly encountered on non-Windows platforms. Rclone addresses this by converting these filenames to their visually equivalent Unicode alternatives.
File Sizes
The largest allowed file size is 250 GiB for both OneDrive Personal and OneDrive for Business (Updated 13 Jan 2021).
Path Length
The entire path, including the file name, must contain fewer than 400 characters for OneDrive, OneDrive for Business and SharePoint Online. It is important to know the limitation when encrypting file and folder names with rclone, as the encrypted names are typically longer than the original ones.
Number of Files
OneDrive seems to be OK with at least 50,000 files in a folder, but at 100,000 rclone will get errors listing the directory like couldn’t list files: UnknownError:.
Reference
HOWTO: Use 'rclone' to Upload Data from Google Drive
rclone is a tool that can be used to upload and download files to a cloud storage (like Microsoft OneDrive) from the command line. It's shipped as a standalone binary, but requires some user configuration before using. In this page, we will provide instructions on how to use rclone to upload data from Google Drive. For instructions with other cloud storage, check rclone Online documentation.
Setup
Before configuration, please first log into OSC OnDemand and request a Pitzer Lightweight Desktop session. Walltime of 1 hour should be sufficient to finish the configuration.
Once the session is ready, open a terminal. In the terminal, run the command
rclone config
It prompts you with a bunch of questions:
- It shows "No remotes found -- make a new one" or list available remotes you made before
- Answer "n" for "New remote"
- "name>" (the name for the new remote)
- Type "GDrive" (or whatever else you want to call this remote)
- "Storage>" (the storage type of the new remote)
- This should display a list to choose from. Enter the number corresponding to the "Google Drive" storage type, which is "15".
- "client_id>"
- Leave this blank (just press enter).
- "client_secret>"
- Leave this blank (just press enter).
- Scope that rclone should use when requesting access from drive.
Enter a string value. Press Enter for the default ("").
Choose a number from below, or type in your own value- Select "2" for read-only access.
- ID of the root folder
- Leave this blank (just press enter)
- Service Account Credentials
- Leave this blank (just press enter)
- "Edit advanced config?"
- Type "n" for no
- "Use auto config?"
- Answer "y" for yes
- A web browser window should pop up allowing you to log into Google. It is a good idea at this point to verify that the URL is actually Google before entering any credentials. You may also copy and paste the link from Terminal into a web browser.
- Enter your Google credentials
- "Configure this as a Shared Drive (Team Drive)?"
- Answer "n" for no
Downloading from Google Drive to OSC
Copy the contents of a source directory from a configured OneDrive remote, GDrive:/src/dir/path, into a destination directory in your OSC session, /dest/dir/path, using the code below:
rclone copy GDrive:/src/dir/path /dest/dir/path --progress
Identical files on the source and destination directories are not transferred. Only the contents of the provided source directory are copied, not the directory name and contents.
copy does not delete files from the destination. To delete files from the destination directory in order to match the source directory, use the sync command instead.
If only one file is being transferred, use the copyto command instead.
--no-traverse option can be used to increase efficiency by stopping rclone from listing the destination. It should be used when copying a small number of files and/or have a large number of files on the destination, but not when a large number of files are being copied.rclone ls GDrive:/path/to/shared_folder and rclone copy GDrive:/path/to/shared_folder /dest/dir/path will work normally even though the shared folder does not appear when listing their source directory.Limitations
If rclone remains unused for 90 days, the refresh token will expire, leading to issues with authorization. This can be easily resolved by executing the rclone config reconnect remote: command, which generates a fresh token and refresh token.
Naming
It's important to note Google Drive is case insensitive which prohibits the coexistence files such as "Hello.doc" and "hello.doc". Certain characters are prohibited from being in Google Drive filenames and are commonly encountered on non-Windows platforms. Rclone addresses this by converting these filenames to their visually equivalent Unicode alternatives.
Reference
HOWTO: Use Address Sanitizer
Address Sanitizer is a tool developed by Google detect memory access error such as use-after-free and memory leaks. It is built into GCC versions >= 4.8 and can be used on both C and C++ codes. Address Sanitizer uses runtime instrumentation to track memory allocations, which mean you must build your code with Address Sanitizer to take advantage of it's features.
There is extensive documentation on the AddressSanitizer Github Wiki.
Memory leaks can increase the total memory used by your program. It's important to properly free memory when it's no longer required. For small programs, loosing a few bytes here and there may not seem like a big deal. However, for long running programs that use gigabytes of memory, avoiding memory leaks becomes increasingly vital. If your program fails to free the memory it uses when it no longer needs it, it can run out of memory, resulting in early termination of the application. AddressSanitizer can help detect these memory leaks.
Additionally, AddressSanitizer can detect use-after-free bugs. A use-after-free bug occurs when a program tries to read or write to memory that has already been freed. This is undefined behavior and can lead to corrupted data, incorrect results, and even program crashes.
Building With Address Sanitzer
We need to use gcc to build our code, so we'll load the gcc module:
module load gnu/9.1.0
The "-fsanitize=address" flag is used to tell the compiler to add AddressSanitizer.
Additionally, due to some environmental configuration settings on OSC systems, we must also statically link against Asan. This is done using the "-static-libasan" flag.
It's helpful to compile the code with debug symbols. AddressSanitizer will print line numbers if debug symbols are present. To do this, add the "-g" flag. Additionally, the "-fno-omit-frame-pointer" flag may be helpful if you find that your stack traces do not look quite correct.
In one command, this looks like:
gcc main.c -o main -fsanitize=address -static-libasan -g
Or, splitting into separate compiling and linking stages:
gcc -c main.c -fsanitize=address -g
gcc main.o -o main -fsanitize=address -static-libasan
Notice that both the compilation and linking steps require the "-fsanitize-address" flag, but only the linking step requires "-static-libasan". If your build system is more complex, it might make sense to put these flags in CFLAGS and LDFLAGS environment variables.
And that's it!
Examples
No Leak
First, let's look at a program that has no memory leaks (noleak.c):
#include <stdio.h>
#include <stdlib.h>
#include <string.h>

int main(int argc, const char *argv[]) {
    char *s = malloc(100);
    strcpy(s, "Hello world!");
    printf("string is: %s\n", s);
    free(s);
    return 0;
}
To build this we run:
gcc noleak.c -o noleak -fsanitize=address -static-libasan -g
And, the output we get after running it:
string is: Hello world!
That looks correct! Since there are no memory leaks in this program, AddressSanitizer did not print anything. But, what happens if there are leaks?
Missing free
Let's look at the above program again, but this time, remove the free call (leak.c):
#include <stdio.h>
#include <stdlib.h>
#include <string.h>

int main(int argc, const char *argv[]) {
    char *s = malloc(100);
    strcpy(s, "Hello world!");
    printf("string is: %s\n", s);
    return 0;
}
Then, to build:
gcc leak.c -o leak -fsanitize=address -static-libasan
And the output:
string is: Hello world!

=================================================================
==235624==ERROR: LeakSanitizer: detected memory leaks

Direct leak of 100 byte(s) in 1 object(s) allocated from:
    #0 0x4eaaa8 in __interceptor_malloc ../../.././libsanitizer/asan/asan_malloc_linux.cc:144
    #1 0x5283dd in main /users/PZS0710/edanish/test/asan/leak.c:6
    #2 0x2b0c29909544 in __libc_start_main (/lib64/libc.so.6+0x22544)

SUMMARY: AddressSanitizer: 100 byte(s) leaked in 1 allocation(s).
This is a leak report from AddressSanitizer. It detected that 100 bytes were allocated, but never freed. Looking at the stack trace that it provides, we can see that the memory was allocated on line 6 in leak.c
Use After Free
Say we found the above leak in our code, and we wanted to fix it. We need to add a call to free. But, what if we add it in the wrong spot?
#include <stdio.h>
#include <stdlib.h>
#include <string.h>

int main(int argc, const char *argv[]) {
    char *s = malloc(100);
    free(s);
    strcpy(s, "Hello world!");
    printf("string is: %s\n", s);
    return 0;
}
The above (uaf.c) is clearly wrong. Albiet a contrived example, the allocated memory, pointed to by "s", was written to and read from after it was freed.
To Build:
gcc uaf.c -o uaf -fsanitize=address -static-libasan
Building it and running it, we get the following report from AddressSanitizer:
=================================================================
==244157==ERROR: AddressSanitizer: heap-use-after-free on address 0x60b0000000f0 at pc 0x00000047a560 bp 0x7ffcdf0d59f0 sp 0x7ffcdf0d51a0
WRITE of size 13 at 0x60b0000000f0 thread T0
    #0 0x47a55f in __interceptor_memcpy ../../.././libsanitizer/sanitizer_common/sanitizer_common_interceptors.inc:790
    #1 0x528403 in main /users/PZS0710/edanish/test/asan/uaf.c:8
    #2 0x2b47dd204544 in __libc_start_main (/lib64/libc.so.6+0x22544)
    #3 0x405f5c  (/users/PZS0710/edanish/test/asan/uaf+0x405f5c)

0x60b0000000f0 is located 0 bytes inside of 100-byte region [0x60b0000000f0,0x60b000000154)
freed by thread T0 here:
    #0 0x4ea6f7 in __interceptor_free ../../.././libsanitizer/asan/asan_malloc_linux.cc:122
    #1 0x5283ed in main /users/PZS0710/edanish/test/asan/uaf.c:7
    #2 0x2b47dd204544 in __libc_start_main (/lib64/libc.so.6+0x22544)

previously allocated by thread T0 here:
    #0 0x4eaaa8 in __interceptor_malloc ../../.././libsanitizer/asan/asan_malloc_linux.cc:144
    #1 0x5283dd in main /users/PZS0710/edanish/test/asan/uaf.c:6
    #2 0x2b47dd204544 in __libc_start_main (/lib64/libc.so.6+0x22544)

SUMMARY: AddressSanitizer: heap-use-after-free ../../.././libsanitizer/sanitizer_common/sanitizer_common_interceptors.inc:790 in __interceptor_memcpy
Shadow bytes around the buggy address:
  0x0c167fff7fc0: 00 00 00 00 00 00 00 00 00 00 00 00 00 00 00 00
  0x0c167fff7fd0: 00 00 00 00 00 00 00 00 00 00 00 00 00 00 00 00
  0x0c167fff7fe0: 00 00 00 00 00 00 00 00 00 00 00 00 00 00 00 00
  0x0c167fff7ff0: 00 00 00 00 00 00 00 00 00 00 00 00 00 00 00 00
  0x0c167fff8000: fa fa fa fa fa fa fa fa fd fd fd fd fd fd fd fd
=>0x0c167fff8010: fd fd fd fd fd fa fa fa fa fa fa fa fa fa[fd]fd
  0x0c167fff8020: fd fd fd fd fd fd fd fd fd fd fd fa fa fa fa fa
  0x0c167fff8030: fa fa fa fa fa fa fa fa fa fa fa fa fa fa fa fa
  0x0c167fff8040: fa fa fa fa fa fa fa fa fa fa fa fa fa fa fa fa
  0x0c167fff8050: fa fa fa fa fa fa fa fa fa fa fa fa fa fa fa fa
  0x0c167fff8060: fa fa fa fa fa fa fa fa fa fa fa fa fa fa fa fa
Shadow byte legend (one shadow byte represents 8 application bytes):
  Addressable:           00
  Partially addressable: 01 02 03 04 05 06 07
  Heap left redzone:       fa
  Freed heap region:       fd
  Stack left redzone:      f1
  Stack mid redzone:       f2
  Stack right redzone:     f3
  Stack after return:      f5
  Stack use after scope:   f8
  Global redzone:          f9
  Global init order:       f6
  Poisoned by user:        f7
  Container overflow:      fc
  Array cookie:            ac
  Intra object redzone:    bb
  ASan internal:           fe
  Left alloca redzone:     ca
  Right alloca redzone:    cb
  Shadow gap:              cc
==244157==ABORTING
This is a bit intimidating. It looks like there's alot going on here, but it's not as bad as it looks. Starting at the top, we see what AddressSanitizer detected. In this case, a "WRITE" of 13 bytes (from our strcpy). Immediately below that, we get a stack trace of where the write occured. This tells us that the write occured on line 8 in uaf.c in the function called "main".
Next, AddressSanitizer reports where the memory was located. We can ignore this for now, but depending on your use case, it could be helpful information.
Two key pieces of information follow. AddressSanitizer tells us where the memory was freed (the "freed by thread T0 here" section), giving us another stack trace indicating the memory was freed on line 7. Then, it reports where it was originally allocated ("previously allocated by thread T0 here:"), line 6 in uaf.c.
This is likely enough information to start to debug the issue. The rest of the report provides details about how the memory is laid out, and exactly which addresses were accessed/written to. You probably won't need to pay too much attention to this section. It's a bit "down in the weeds" for most use cases.
Heap Overflow
AddresssSanitizer can also detect heap overflows. Consider the following code (overflow.c):
#include <stdio.h>
#include <stdlib.h>
#include <string.h>
int main(int argc, const char *argv[]) {
    // whoops, forgot c strings are null-terminated
    // and not enough memory was allocated for the copy
    char *s = malloc(12);
    strcpy(s, "Hello world!");
    printf("string is: %s\n", s);
    free(s);
    return 0;
}
The "Hello world!" string is 13 characters long including the null terminator, but we've only allocated 12 bytes, so the strcpy above will overflow the buffer that was allocated. To build this:
gcc overflow.c -o overflow -fsanitize=address -static-libasan -g -Wall
Then, running it, we get the following report from AddressSanitizer:
==168232==ERROR: AddressSanitizer: heap-buffer-overflow on address 0x60200000003c at pc 0x000000423454 bp 0x7ffdd58700e0 sp 0x7ffdd586f890
WRITE of size 13 at 0x60200000003c thread T0
    #0 0x423453 in __interceptor_memcpy /apps_src/gnu/8.4.0/src/libsanitizer/sanitizer_common/sanitizer_common_interceptors.inc:737
    #1 0x5097c9 in main /users/PZS0710/edanish/test/asan/overflow.c:8
    #2 0x2ad93cbd7544 in __libc_start_main (/lib64/libc.so.6+0x22544)
    #3 0x405d7b  (/users/PZS0710/edanish/test/asan/overflow+0x405d7b)

0x60200000003c is located 0 bytes to the right of 12-byte region [0x602000000030,0x60200000003c)
allocated by thread T0 here:
    #0 0x4cd5d0 in __interceptor_malloc /apps_src/gnu/8.4.0/src/libsanitizer/asan/asan_malloc_linux.cc:86
    #1 0x5097af in main /users/PZS0710/edanish/test/asan/overflow.c:7
    #2 0x2ad93cbd7544 in __libc_start_main (/lib64/libc.so.6+0x22544)

SUMMARY: AddressSanitizer: heap-buffer-overflow /apps_src/gnu/8.4.0/src/libsanitizer/sanitizer_common/sanitizer_common_interceptors.inc:737 in __interceptor_memcpy
Shadow bytes around the buggy address:
  0x0c047fff7fb0: 00 00 00 00 00 00 00 00 00 00 00 00 00 00 00 00
  0x0c047fff7fc0: 00 00 00 00 00 00 00 00 00 00 00 00 00 00 00 00
  0x0c047fff7fd0: 00 00 00 00 00 00 00 00 00 00 00 00 00 00 00 00
  0x0c047fff7fe0: 00 00 00 00 00 00 00 00 00 00 00 00 00 00 00 00
  0x0c047fff7ff0: 00 00 00 00 00 00 00 00 00 00 00 00 00 00 00 00
=>0x0c047fff8000: fa fa 00 fa fa fa 00[04]fa fa fa fa fa fa fa fa
  0x0c047fff8010: fa fa fa fa fa fa fa fa fa fa fa fa fa fa fa fa
  0x0c047fff8020: fa fa fa fa fa fa fa fa fa fa fa fa fa fa fa fa
  0x0c047fff8030: fa fa fa fa fa fa fa fa fa fa fa fa fa fa fa fa
  0x0c047fff8040: fa fa fa fa fa fa fa fa fa fa fa fa fa fa fa fa
  0x0c047fff8050: fa fa fa fa fa fa fa fa fa fa fa fa fa fa fa fa
Shadow byte legend (one shadow byte represents 8 application bytes):
  Addressable:           00
  Partially addressable: 01 02 03 04 05 06 07
  Heap left redzone:       fa
  Freed heap region:       fd
  Stack left redzone:      f1
  Stack mid redzone:       f2
  Stack right redzone:     f3
  Stack after return:      f5
  Stack use after scope:   f8
  Global redzone:          f9
  Global init order:       f6
  Poisoned by user:        f7
  Container overflow:      fc
  Array cookie:            ac
  Intra object redzone:    bb
  ASan internal:           fe
  Left alloca redzone:     ca
  Right alloca redzone:    cb
==168232==ABORTING
This is similar to the use-after-free report we looked at above. It tells us that a heap buffer overflow occured, then goes on to report where the write happened and where the memory was originally allocated. Again, the rest of this report describes the layout of the heap, and probably isn't too important for your use case.
C++ Delete Mismatch
AddressSanitizer can be used on C++ codes as well. Consider the following (bad_delete.cxx):
#include <iostream>
#include <cstring>

int main(int argc, const char *argv[]) {
    char *cstr = new char[100];
    strcpy(cstr, "Hello World");
    std::cout << cstr << std::endl;

    delete cstr;
    return 0;
}
What's the problem here? The memory pointed to by "cstr" was allocated with new[]. An array allocation must be deleted with the delete[] operator, not "delete".
To build this code, just use g++ instead of gcc:
g++ bad_delete.cxx -o bad_delete -fsanitize=address -static-libasan -g
And running it, we get the following output:
Hello World
=================================================================
==257438==ERROR: AddressSanitizer: alloc-dealloc-mismatch (operator new [] vs operator delete) on 0x60b000000040
    #0 0x4d0a78 in operator delete(void*, unsigned long) /apps_src/gnu/8.4.0/src/libsanitizer/asan/asan_new_delete.cc:151
    #1 0x509ea8 in main /users/PZS0710/edanish/test/asan/bad_delete.cxx:9
    #2 0x2b8232878544 in __libc_start_main (/lib64/libc.so.6+0x22544)
    #3 0x40642b  (/users/PZS0710/edanish/test/asan/bad_delete+0x40642b)

0x60b000000040 is located 0 bytes inside of 100-byte region [0x60b000000040,0x60b0000000a4)
allocated by thread T0 here:
    #0 0x4cf840 in operator new[](unsigned long) /apps_src/gnu/8.4.0/src/libsanitizer/asan/asan_new_delete.cc:93
    #1 0x509e5f in main /users/PZS0710/edanish/test/asan/bad_delete.cxx:5
    #2 0x2b8232878544 in __libc_start_main (/lib64/libc.so.6+0x22544)

SUMMARY: AddressSanitizer: alloc-dealloc-mismatch /apps_src/gnu/8.4.0/src/libsanitizer/asan/asan_new_delete.cc:151 in operator delete(void*, unsigned long)
==257438==HINT: if you don't care about these errors you may set ASAN_OPTIONS=alloc_dealloc_mismatch=0
==257438==ABORTING
This is similar to the other AddressSanitizer outputs we've looked at. This time, it tells us there's a mismatch between new and delete. It prints a stack trace for where the delete occured (line 9) and also a stack trace for where to allocation occured (line 5).
Performance
The documentation states:
This tool is very fast. The average slowdown of the instrumented program is ~2x
AddressSanitizer is much faster than tools that do similar analysis such as valgrind. This allows for usage on HPC codes.
However, if you find that AddressSanitizer is too slow for your code, there are compiler flags that can be used to disable it for specific functions. This way, you can use address sanitizer on cooler parts of your code, while manually auditing the hot paths.
The compiler directive to skip analyzing functions is:
__attribute__((no_sanitize_address)
HOWTO: Use Cron and OSCusage for Regular Emailed Reports
It is possible to utilize Cron and the OSCusage command to send regular usage reports via email
Cron
It is easy to create Cron jobs on the Cardinal and Pitzer clusters at OSC. Cron is a Linux utility which allows the user to schedule a command or script to run automatically at a specific date and time. A cron job is the task that is scheduled.
Shell scripts run as a cron job are usually used to update and modify files or databases; however, they can perform other tasks, for example a cron job can send an email notification.
Getting Help
In order to use what cron has to offer, here is a list of the command name and options that can be used
Usage: crontab [options] file crontab [options] crontab -n [hostname] Options: -udefine user -e edit user's crontab -l list user's crontab -r delete user's crontab -i prompt before deleting -n set host in cluster to run users' crontabs -c get host in cluster to run users' crontabs -s selinux context -x enable debugging
Running a Cron Job
crontab -l
crontab -e
Linux Crontab Format
MIN HOUR DOM MON DOW CMD

Getting Notified by Email Using a Cron Job
* * * * * {cmd} | mail -s "title of the email notification" {your email}
12 15 * * * /opt/osc/bin/OSCusage | mail -s "OSC usage on $(date)" {your email} 2> /path/to/file/for/stdout/and/stderr 2>&1
Using OSCusage
$ /opt/osc/bin/OSCusage --help
usage: OSCusage.py [-h] [-u USER]
[-s {opt,pitzer,glenn,bale,oak,oakley,owens,ruby,ascend,cardinal}] [-A]
[-P PROJECT] [-q] [-H] [-r] [-n] [-v]
[start_date] [end_date]

positional arguments:
start_date start date (default: 2020-04-23)
end_date end date (default: 2020-04-24)

optional arguments:
-h, --help show this help message and exit
-u USER, --user USER username to run as. Be sure to include -P or -A. (default: kalattar)
-s {opt,pitzer,glenn,bale,oak,oakley,owens,ruby,ascend,cardinal}, --system {opt,pitzer,glenn,bale,oak,oakle
-A Show all
-P PROJECT, --project PROJECT project to query (default: PZS0715)
-q show user data
-H show hours
-r show raw
-n show job ID
-v do not summarize
OSCusage 2018-01-24
OSCusage 2018-01-24 2018-01-25
Terminating a Cron Job
ps aux | grep crontab
kill {PID}
crontab -e
HOWTO: Use Docker and Singularity Containers at OSC
It is now possible to run Docker and Apptainer/Singularity containers on all clusters at OSC. Single-node jobs are currently supported, including GPU jobs; MPI jobs are planned for the future.
From the Docker website: "A container image is a lightweight, stand-alone, executable package of a piece of software that includes everything needed to run it: code, runtime, system tools, system libraries, settings."
As of June 21st, 2022, Singularity is replaced with Apptainer, which is just a renamed open-source project. For more information visit the Apptainer/Singularity page
This document will describe how to run Docker and Apptainer/Singularity containers on OSC clusters. You can use containers from Docker Hub, Sylabs Cloud, or any other source. As examples we will use hello-world and ubuntu from Docker Hub.
If you encounter an error then check the Known Issues on using Apptainer/Singularity or Podman at OSC. If the issue can not be resolved, please contact OSC help.
Contents
- Getting help
- Setting up your environment
- Accessing a container
- Running a container
- File system access
- GPU usage within a container
- Build a container
- Known issues
- References
Getting help
-
For Apptainer/Singularity, use
apptainer help. -
For Podman/Docker, use
podman help. -
User guides and examples are available at Podman documentation and Apptainer documentation.
Setting up your environment for Podman or Apptainer/Singularity usage
No setup is required. You can use Podman or Apptainer/Singularity directly on all clusters.
Accessing a container
A container image is a file (e.g. .sif for Apptainer) or image stored in a registry (for Docker/Podman).
You can pull images from hubs: Docker Hub, Sylabs Cloud, or other registries.
Using Apptainer/Singularity
Examples:
# Pull the gcc:7.2.0 image from Docker Hub → gcc_7.2.0.sif
apptainer pull docker://gcc:7.2.0

# Ubuntu 18.04 → ubuntu_18.04.sif
apptainer pull docker://ubuntu:18.04

# Pull from Singularity Hub
apptainer pull shub://singularityhub/hello-world
Downloading Apptainer/Singularitycontainers from the hubs is not the only way to get one. You can, for example get a copy from your colleague's computer or directory. If you would like to create your own container you can start from the Build a container section below. If you have any questions, please contact OSC Help.
Using Podman/Docker
With Podman/Docker, you pull images to your local image store:
podman pull ubuntu:18.04
podman pull docker.io/library/gcc:7.2.0
Use podman images to list available images in the local registry:
REPOSITORY                TAG         IMAGE ID      CREATED      SIZE
docker.io/library/ubuntu  18.04       f9a80a55f492  2 years ago  65.5 MB
docker.io/library/gcc     7.2.0       81ffb25b1dec  7 years ago  1.73 GB
Running a container
You can run containers on OSC clusters either interactively or in batch jobs.
If unsure about the amount of memory that a singularity process will require, then be sure to request an entire node for the job. It is common for singularity jobs to be killed by the OOM killer because of using too much RAM.
We note that the operating system on OSC cluster is Red Hat by running cat /etc/os-release:
NAME="Red Hat Enterprise Linux Server"
[..more..]
In the examples below we will often check the operating system to show that we are really inside a container.
Using Apptainer/Singularity
Run container like a native command
If you simply run the container image, it will execute the container’s runscript.
apptainer pull docker://hello-wolrd
./hello-world_latest.sif
You should see the following output:
Hello from Docker!
This message shows that your installation appears to be working correctly.
Use the “run” sub-command
The Apptainer “run” sub-command does the same thing as running a container directly as described above. That is, it executes the container’s runscript.
Example: Run a container from a local file
apptainer run hello-world_latest.sif
Example: Run a container from a hub without explicitly downloading it
apptainer run docker://hello-world
Use the “exec” sub-command
The Apptainer “exec” sub-command lets you execute an arbitrary command within your container instead of just the runscript.
Example: Find out what operating system the ubuntu:18.04 container uses
apptainer pull docker://ubuntu:18.04
apptainer exec ./ubuntu_18.04.sif cat /etc/os-release
You should see the following output:
NAME="Ubuntu"
VERSION="18.04.6 LTS (Bionic Beaver)"
Use the “shell” sub-command
The Apptainer “shell” sub-command invokes an interactive shell within a container.
Example: Run an Ubuntu shell.
apptainer shell ubuntu_18.04.sif
You should now see the prompt Apptainer>, indicating that you are logged into the container. You can verify the operating system version by running:
Apptainer> cat /etc/os-release
Output:
NAME="Ubuntu"
VERSION="18.04.6 LTS (Bionic Beaver)"
To exit the container, simply type exit.
Using Podman/Docker
With Podman or Docker:
-
Run: runs the container’s default command
podman run hello-world
-
Exec: execute arbitrary command inside running (or started) container
podman run -t -d --name my_ubuntu ubuntu:18.04
podman exec my_ubuntu cat /etc/os-release
-
Interactive shell:
podman run -it ubuntu:18.04
File system access
Using Apptainer/Singularity
When you use a container you run within the container’s environment. The directories available to you by default from the host environment are
- your home directory
- working directory (directory you were in when you ran the container)
/fs/ess/tmp
You can review our Available File Systems page for more details about our file system access policy.
If you run the container within a job you will have the usual access to the $PFSDIR environment variable with adding node attribute "pfsdir" in the job request (--gres=pfsdir). You can access most of our file systems from a container without any special treatment.
Using Podman/Docker
If using Podman/Docker, you may need to explicitly bind mount host directories into the container. For example:
podman run -it -v $HOME:$HOME -v /fs/ess:/fs/ess $ubuntu:18.04
GPU usage within a container
Using Apptainer/Singularity
If you have a GPU-enabled container you can easily run it on Pitzer just by adding the --nv flag to the apptainer exec or run command. The example below comes from the "exec" command section of Apptainer User Guide. It runs a TensorFlow example using a GPU on Pitzer. (Output has been omitted from the example for brevity.)
[pitzer-login01]$ salloc -N 1 --ntasks-per-node=4 -G 1...[p0756]$git clone https://github.com/tensorflow/models.git[p0756]$apptainer exec --nv docker://tensorflow/tensorflow:latest-gpu \ python ./models/tutorials/image/mnist/convolutional.py
In some cases it may be necessary to bind the CUDA_HOME path and add $CUDA_HOME/lib64 to the shared library search path:
[pitzer-login01]$ salloc -N 1 --ntasks-per-node=4 -G 1...[p0756]$module load cuda [p0756]$ export APPTAINER_BINDPATH=$CUDA_HOME [p0756]$ export APPTAINERENV_LD_LIBRARY_PATH=$LD_LIBRARY_PATH:$CUDA_HOME/lib64[p0756]$napptainer exec --nv my_container mycmd
Using Podman/Docker
To use a GPU in a Docker container, you need to add the GPU device using the --device option.
For example, to request a GPU node with one GPU:
salloc -n 1 -G 1
After obtaining the node, you can test if the GPU device is available in a container by running:
podman run --rm --device nvidia.com/gpu=all nvidia/cuda:11.0.3-base-ubuntu20.04 nvidia-smi
If successful, the nvidia-smi command will display details about the GPU, such as model, memory usage, and driver version.
Build a container
Using Apptainer/Singularity
OSC users can now build an Apptainer/Singularity container image from a definition file using the fakeroot feature:
apptainer build --fakeroot myimage.sif mydef.def
When building an image, it is recommended to change the cache folder (the default location is $HOME/.apptainer/cache) to improve build efficiency and avoid potential file system issues, especially when building a large container image.
Recommended steps
Request a compute node with sufficient memory. The following example requests a compute node with 32 GB of memory:
sinteractive -n 8
Change the cache folder to a temporary file system:
export APPTAINER_CACHEDIR=$TMPDIR
Build an image:
apptainer build --fakeroot myimage.sif mydef.def
These steps help optimize performance and prevent file system issues when building large container images.
Using Podman/Docker
OSC users can now build a Docker container image from a Dockerfile:
buildah build -f Dockerfile --format docker -t tag_my_container .
The option --format docker ensures that the container format is compatible with the Docker schema for the manifest. The -t flag is used to tag the image, typically in the format name:version.
For example, if you set -t my_container:1.0, you should see the following after listing images with podman images:
REPOSITORY                TAG         IMAGE ID      CREATED      SIZE
local/my_container        1.0         f9a80a55f492  30 mins ago  65.5 MB
Note that our local registry is saved on a local disk. This means that if you build an image on a compute node, it will not be accessible from other nodes and will be removed once the job ends.
To ensure that your container image can be reused, you should create an account on Docker Hub (or another supported container registry) and tag your image with the registry URL. For example:
podman login
podman tag my_container:1.0 docker.io/<username>/my_container:1.0
podman push docker.io/<username>/my_container:1.0
Known isues
References
HOWTO: Use Extensions with JupyterLab
JupyterLab stores the main build of JupyterLab with associated data, including extensions in Application Directory. The default Application Directory is the JupyterLab installation directory where is read-only for OSC users. Unlike Jupyter Notebook, JupyterLab cannot accommodate multiple paths for extensions management. Therefore we set the user's home directory for Application Directory so as to allow user to manage extensions.
Manage and install extensions
After launching a JupyterLab session, open a notebook and run
!jupyter lab path
Check if home directory is set for to the Application Directory
Application directory:   /users/PXX1234/user/.jupyter/lab/3.0
User Settings directory: /users/PXX1234/user/.jupyter/lab/user-settings
Workspaces directory: /users/PXX1234/user/ondemand/data/sys/dashboard/batch_connect/dev/bc_osc_jupyter/output/f2a4f918-b18c-4d2a-88bc-4f4e1bdfe03e
If home directory is NOT set, try removing the corresonding directory, e.g. if you are using JupyterLab 2.2, remove the entire directory $HOME/.jupyter/lab/2.2 and re-launch JupyterLab 2.2.
If this is the first time to use extension or use extensions that are installed with different Jupyter version or on different cluster, you will need to run
!jupyter lab build
to initialize the JupyterLab application.
To manage and install extensions, simply click Extension Manager icon at the side bar:
HOWTO: Use GPU in Python
If you plan on using GPUs in tensorflow or pytorch see HOWTO: Use GPU with Tensorflow and PyTorch
This is an exmaple to utilize a GPU to improve performace in our python computations. We will make use of the Numba python library. Numba provides numerious tools to improve perfromace of your python code including GPU support.
This tutorial is only a high level overview of the basics of running python on a gpu. For more detailed documentation and instructions refer to the official numba document: https://numba.pydata.org/numba-doc/latest/cuda/index.html
Environment Setup
To begin, you need to first create and new conda environment or use an already existing one. See HOWTO: Create Python Environment for more details.
Once you have an environment created and activated run the following command to install the latest version of Numba into the environment.
conda install numba
conda install cudatoolkit
You can specify a specific version by replacing numba with number={version}. In this turtorial we will be using numba version 0.60.0 and cudatoolkit version 12.3.52.
Write Code
Now we can use numba to write a kernel function. (a kernel function is a GPU function that is called from CPU code).
To invoke a kernel, you need to include the @cuda.jit decorator above your gpu function as such:
@cuda.jit
def my_funtion(array):
     # function code
Next to invoke a kernel you must first specify the thread heirachy with the number of blocks per grid and threads per block you want on your gpu:
threadsperblock = 32
blockspergrid = (an_array.size + (threadsperblock - 1))
For more details on thread heirachy see: https://numba.pydata.org/numba-doc/latest/cuda/kernels.html
Now you can call you kernel as such:
my_function[blockspergrid, threadsperblock](an_array)
Kernel instantiation is done by taking the compiled kernel function (here my_function) and indexing it with a tuple of integers.
Run the kernel, by passing it the input array (and any separate output arrays if necessary). By default, running a kernel is synchronous: the function returns when the kernel has finished executing and the data is synchronized back.
Note: Kernels cannot explicitly return a value, as a result, all returned results should be written to a reference. For example, you can write your output data to an array which was passed in as an argument (for scalars you can use a one-element array)
Memory Transfer
Before we can use a kernel on an array of data we need to transfer the data from host memory to gpu memory.
This can be done by (assume arr is already created and filled with the data):
d_arr = cuda.to_device(arr)
d_arr is a reference to the data stored in the gpu memory.
Now to get the gpu data back into host memory we can run (assume gpu_arr has already been initialized ot an empty array):
d_arr.copy_to_host(gpu_arr)
Example Code:
from numba import cuda
import numpy as np
from timeit import default_timer as timer

# gpu kernel function
@cuda.jit
def increment_by_one_gpu(an_array):
    #get the absolute position of the current thread in out 1 dimentional grid
    pos = cuda.grid(1)

    #increment the entry in the array based on its thread position
    if pos < an_array.size:
        an_array[pos] += 1


# cpu function
def increment_by_one_nogpu(an_array):
    # increment each position using standard iterative approach
    pos = 0
    while pos < an_array.size:
        an_array[pos] += 1
        pos += 1

if __name__ == "__main__":

    # create numpy array of 10 million 1s
    n = 10_000_000
    arr = np.ones(n)

    # copy the array to gpu memory
    d_arr = cuda.to_device(arr)

    # print inital array values
    print("GPU Array: ", arr)
    print("NON-GPU Array: ", arr)

    #specify threads
    threadsperblock = 32
    blockspergrid = (len(arr) + (threadsperblock - 1)) // threadsperblock

    # start timer
    start = timer()
    # run gpu kernel
    increment_by_one_gpu[blockspergrid, threadsperblock](d_arr)
    # get time elapsed for gpu
    dt = timer() - start

    print("Time With GPU: ", dt)

    # restart timer
    start = timer()
    # run cpu function
    increment_by_one_nogpu(arr)
    # get time elapsed for cpu
    dt = timer() - start

    print("Time Without GPU: ", dt)

    # create empty array
    gpu_arr = np.empty(shape=d_arr.shape, dtype=d_arr.dtype)

    # move data back to host memory
    d_arr.copy_to_host(gpu_arr)

    print("GPU Array: ", gpu_arr)
    print("NON-GPU Array: ", arr)
Now we need to write a job script to submit the python code.
#!/bin/bash

#SBATCH --account <project-id>
#SBATCH --job-name Python_ExampleJob
#SBATCH --nodes=1
#SBATCH --time=00:10:00
#SBATCH --gpus-per-node=1


module load miniconda3/24.1.2-py310
module list

source activate gpu_env

python gpu_test.py

conda deactivate
Running the above job returns the following output:
GPU Array:  [1. 1. 1. ... 1. 1. 1.]
NON-GPU Array:  [1. 1. 1. ... 1. 1. 1.]
Time With GPU:  0.34201269410550594
Time Without GPU:  2.2052815910428762
GPU Array:  [2. 2. 2. ... 2. 2. 2.]
NON-GPU Array:  [2. 2. 2. ... 2. 2. 2.]
As we can see, running the function on a gpu resulted in a signifcant speed increase.
Usage on Jupyter
see HOWTO: Use a Conda/Virtual Environment With Jupyter for more information on how to setup jupyter kernels.
One you have your jupyter kernel created, activate your python environment in the command line (source activate ENV).
Install numba and cudatoolkit the same as was done above:
conda install numba
conda install cudatoolkit
Now you should have numba installed into your jupyter kernel.
See Python page for more information on how to access your jupyter notebook on OnDemand.
Make sure you select a node with a gpu before laucnhing your jupyter app:

Additional Resources
If you are using Tensorflow, PyTorch or other machine learning frameworks you may want to also consider using Horovod. Horovod will take single-GPU training scripts and scale it to train across many GPUs in parallel.
HOWTO: Use Globus (Overview)
![]()
Globus is a cloud-based service designed to let users move, share, and discover research data via a single interface, regardless of its location or number of files or size.
Globus was developed and is maintained at the University of Chicago and is used extensively at supercomputer centers and major research facilities.
Globus is available as a free service that any user can access. More on how Globus works can be found on the Globus "How It Works" page.
Data Transfer
Globus can be used to transfer data between source and destination systems including OSC storage, cloud storage, storage at other HPC centers with Globus support, laptops, desktops.
If you would like to transfer data between OSC storage and your own laptop/desktop which has not installed Globus Connect Personal yet, please go to 'Globus Connect Personal Installation' first
Step 1: Log into Globus
Log into https://www.globus.org/
When prompted to login, select "Ohio Supercomputer Center (OSC)" from the drop-down list of organizations and then click Continue. This will redirect you to the Ohio Supercomputer Center login page where you can log in with your OSC username and password.
Step 2: Locate collections of your data
Click 'File Manager' on the left of the page. Switch to 'two panel' view by clicking the appropriate icon next to 'Panels' in the top right corner. One panel will act as the source while the other is the destination.
In each panel, you can click 'Collection' to search and select the appropriate collection.
To find your local collection (the one created via Globus Connect Personal), you can use the 'Your Collections' tab.
To locate the correct collection from OSC storage, please see 'OSC endpoints'.
Step 3: Transfer the file
Select the file(s) or directory that you would like to transfer between collections.
Click the "Transfer or Sync to..." button in the center control panel (two diagonal arrows).
Click the blue "Start" button above the file selector.
A ribbon should appear that recognizes the transfer request. You can hit View Details to take you to the Activity tab in the command menu.
Step 4: Verify the transfer
Click Activity in the command menu on the left of the page to go to the Activity page.
A green checkmark will appear at the top of the page with a Transfer Complete Message.
The email you have set up with your Globus profile will receive a confirmation receipt of the request.
The files will now be accessible in the transfer location.
Globus Connect Personal Installation
Globus Installation on Windows
-
Launch the application installer.
-
If you have local administrator permissions on your machine, and will be the only user, click on 'Install'.
- If you do not have local administrator permissions or wish to specify a non-default destination directory for installation, or will have multiple GCP users, click on the 'Browse' button and select a directory which you have read/write access to.
- If you do not have local administrator permissions or wish to specify a non-default destination directory for installation, or will have multiple GCP users, click on the 'Browse' button and select a directory which you have read/write access to.
-
After installation has completed GCP will launch. Click on 'Log In' in order to authenticate with Globus and begin the Collection Setup process.
-
Grant the required consents to GCP Setup.
-
Enter the details for your GCP Collection.
-
Exit the Setup process or open the Globus web app to view collection details or move data to or from your collection.
-
At the end of the installation, you will see an icon in the menu bar at the bottom of your screen, indicating that Globus Connect Personal is running and your new collection is ready to be used.
OSC Endpoints
- Enter 'OSC Globus Connect Server' in the endpoint search box to find all the endpointss managed by OSC as below:
| Endpoint | |
|---|---|
| OSC's home directory | OSC $HOME |
| OSC's scratch directory | OSC /fs/scratch |
| OSC's ess storage | OSC /fs/ess |
| AWS S3 storage | OSC S3 |
| OSC high assurance |
OSC /fs/ess/ High Assurance for project storage OSC /fs/scratch/ High Assurance for scratch storage |
Globus Connectors
Globus connectors provide a consistent interface for accessing, transferring, and sharing data across a wide range of storage systems. OSC has acquired all available connectors including AWS S3, dropbox, with the exception of the HPSS connector. For a complete list of connectors, please visit the Globus connectors page.
Data Sharing
With Globus, you can easily share research data with your collaborators. You don’t need to create accounts on the server(s) where your data is stored. You can share data with anyone using their identity or their email address.
To share data, you’ll create a guest collection and grant your collaborators access as described in the instructions below. If you like, you can designate other Globus users as "access managers" for the guest collection, allowing them to grant or revoke access privileges for other Globus users.
-
Log into Globus and navigate to the File Manager.
-
Select the collection that has the files/folders you wish to share and, if necessary, activate the collection.
-
Highlight the folder that you would like to share and Click Share in the right command pane.
Note: Sharing is available for folders. Individual files can only be shared by sharing the folder that contains them. If you are using an ad blocker plugin in your browser, the share button may be unavailable. We recommend users whitelist app.globus.org, docs.globus.org, and globus.org within the plugin to circumvent this issue.If Share is not available, contact the endpoint’s administrator or refer to Globus Connect Server Installation Guide for instructions on enabling sharing. If you’re a using a Globus Connect Personal endpoint and you’re a Globus Plus user, enable sharing by opening the Preferences for Globus Connect Personal, clicking the Access tab, and checking the Sharable box.
-
Provide a name for the guest collection, and click Create Share. If this is the first time you are accessing the collection, you may need to authenticate and consent to allow Globus services to manage your collections on your behalf.
-
When your collection is created, you’ll be taken to the Sharing tab, where you can set permissions. The starting permissions give read and write access (and the Administrator role) to the person who created the collection.
Click the Add Permissions button or icon to share access with others. You can add permissions for an individual user, for a group, or for all logged-in users. In the Identity/E-mail field, type a person’s name or username (if user is selected) or a group name (if group is selected) and press Enter. Globus will display matching identities. Pick from the list. If the user hasn’t used Globus before or you only have an email address, enter the email address and click Add.
Note: Granting write access to a folder allows users to modify and delete files and folders within the folder.You can add permissions to subfolders by entering a path in the Path field.
-
After receiving the email notification, your colleague can click on the link to log into Globus and access the guest collection.
-
You can allow others to manage the permissions for a collection you create. Use the Roles tab to manage roles for other users. You can assign roles to individual users or to groups. The default is for the person who created the collection to have the Administrator role.
The Access Manager role grants the ability to manage permissions for a collection. (Users with this role automatically have read/write access for the collection.)
When a role is assigned to a group, all members of the group have the assigned role.
Data Sharing with Service Account
Sometimes, a group may need to share data uploaded by several OSC users with external entities using Globus. To simplify this process OSC can help set up a service account that owns the data and create a Globus share that makes the data accessible to individuals. Contact OSC Help for this service.
Further Reading
HOWTO: Use AWS S3 in Globus
Beofre creating a new collection, please set up a S3 bucket and configure the IAM access permissions to that bucket. If you need more information on how to do that, see the AWS S3 documentation and Amazon Web Services S3 Connector pages.
Create a New Collection
- Login to Globus. If your institution does not have an organizational login, you may choose to either Sign in with Google or Sign in with ORCiD iD
- Navigate to the 'COLLECTIONS' on the sidebar and search 'OSC S3'. Click 'OSC S3' to go to this gateway
- Click on the “Credentials” tab of the “OSC S3” page. Register your AWS IAM access key ID and AWS IAM Secret Key with Globus. Click the “Continue” button, and you will return to the full “Credentials” tab where you can see your saved AWS access credentials.
- Click on the 'Collections' tab. You will see all of the collections added by you before. To add a new collection, click 'Add Guest Collection'. Click the “Browse” button to get a directory view and select the bucket or subfolder folder you want. Provide the name of the collection in 'Display Name” field
- Click 'Create Collection' to finish the creation
- Click 'COLLECTIONS' on the sidebar. Click the 'Administered by You' and then you can locate the new collection you just created.
HOWTO: Use OneDrive in Globus
Accessing User OneDrive in Globus
Globus is a cloud-based service designed to let users move, share, and discover research data via a single interface, regardless of its location or number of files or size.
This makes Globus incredibly useful for transferring large files for users. This service is also able to work alongside OneDrive, making your this storage even more attainable. The OneDrive connection to Globus is only available for Ohio State clients with a valid OSU email.
Data Transfer with OneDrive
Step 1: Log into Globus
Log into https://www.globus.org/
When prompted to login, select "Ohio Supercomputer Center (OSC)" from the drop-down list of organizations and then click Continue. This will redirect you to the Ohio Supercomputer Center login page where you can log in with your OSC username and password.
Step 2: Choose the Appropriate Collections
Select the File Manager tab on the left hand toolbar. You will be introduced to the file exchange function in the two-panel format.

In the left panel, select the collection that you would like to import the data to. In the right panel, you can simply type "OSU OneDrive" or "OSU OneDrive Student" and the collection will appear. Students will need to use their buckeyemail.osu.edu emails in order to access the student OneDrive.
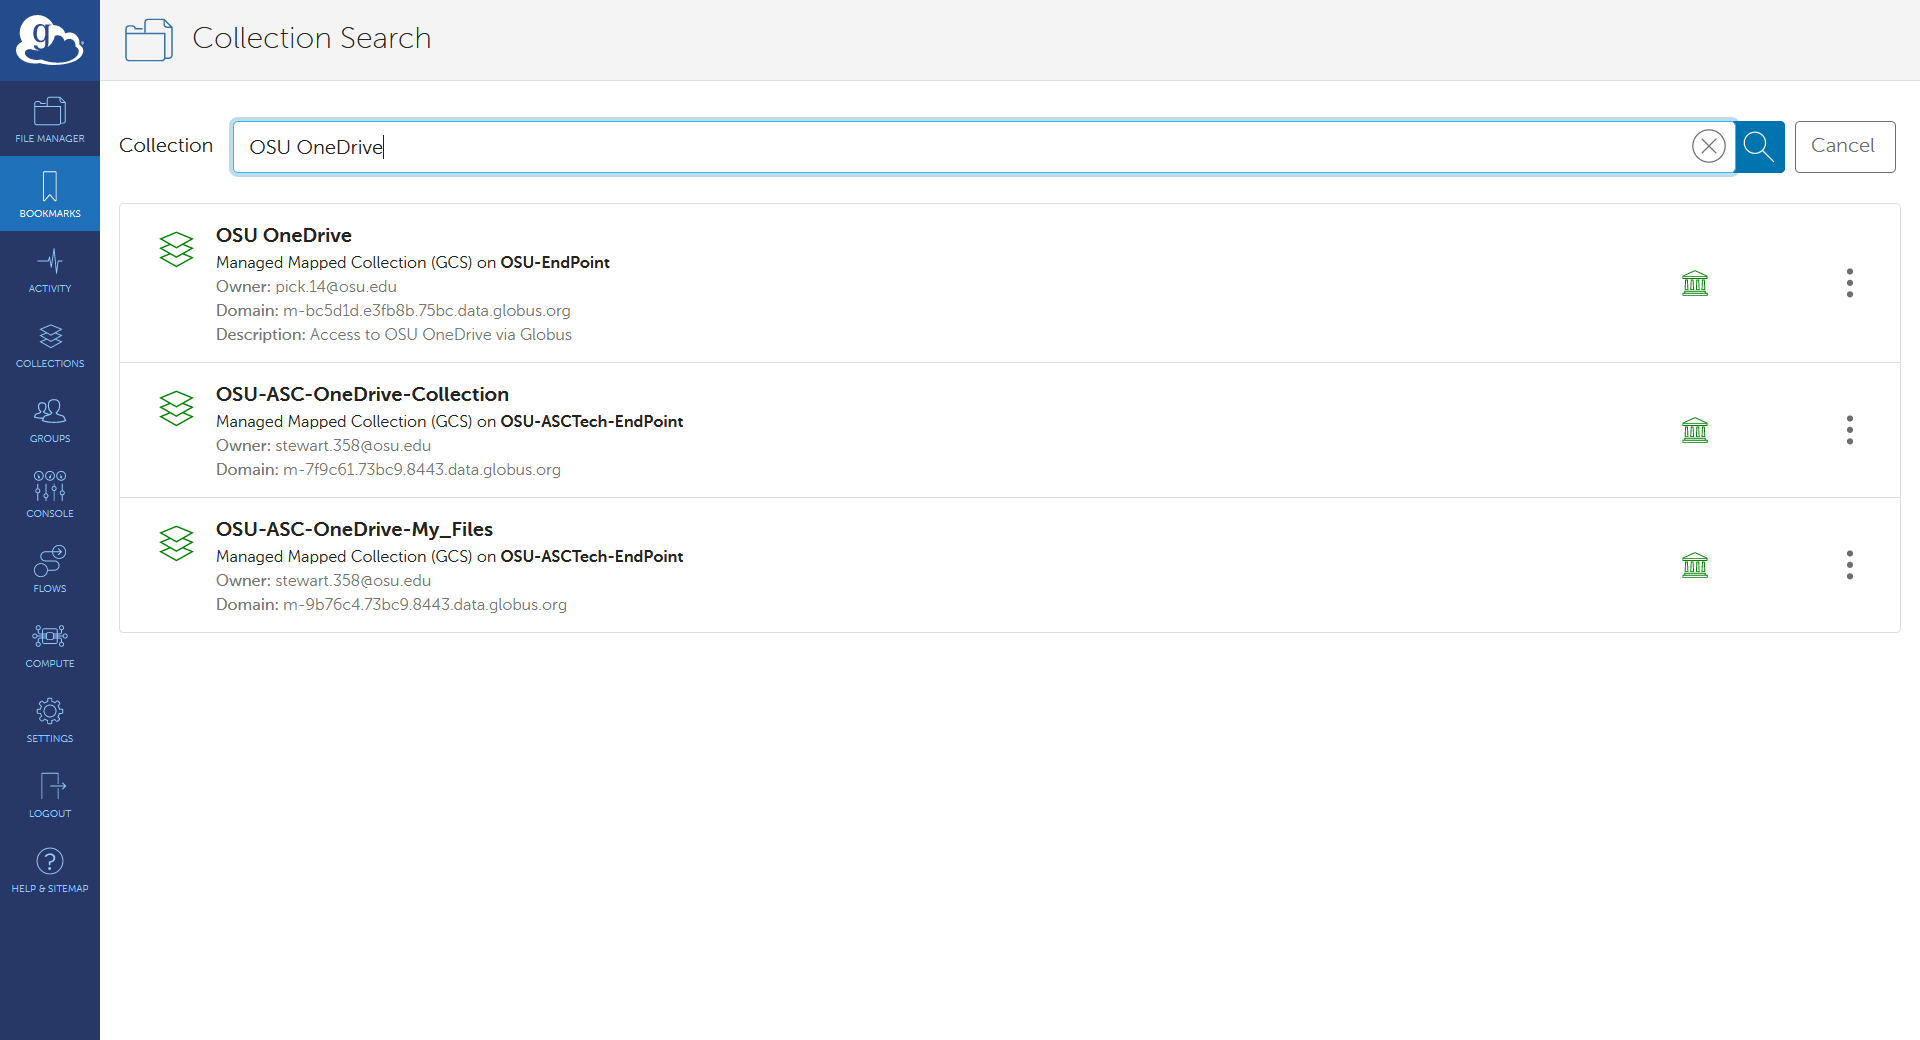
The first time that you access this collection, you will be prompted for some initial account setup.

Complete the Authentication Request and, if prompted, verify that you wish to grant access to the Collection.
Once opened, the default location will be My Files. Click the "up one folder" icon to see the other locations.
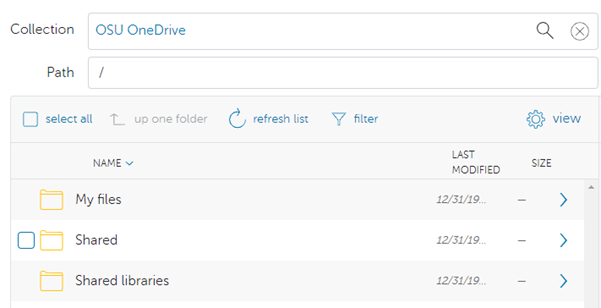
Step 3: Transfer the Files
Select the file(s) or directory that you would like to transfer between collections. You can now select the "Transfer or Sync to..." and hit the blue "Start" icon above the file selector.
Step 4: Verify the transfer
Click Activity in the command menu on the left of the page to go to the Activity page. You will now be able to monitor the processing of the request and the confirmation receipt will appear here.
Following Sites in SharePoint
To follow a SharePoint site, log into the OSU SharePoint service with your OSC name.# credentials. Next, navigate to the site you would like to connect to via Globus and click the star icon on the site to follow:
Finally, return to Globus and click the "up one folder" button until you see the "Shared libraries" and the SharePoint site will now be available.
HOWTO: Deploy your own endpoint on a server
OSC clients who are affiliated with Ohio State can deploy their own endpoint on a server using OSU subscriptions. Please follow the steps below:
- Send a request to OSC Help the following information:
- Name of organization that will be running the endpoint, ie: OSU Arts and Sciences
- NOTE: if the name already exists, they will have to coordinate with the existing Admin for that project
- OSU affiliated email address associated with the Globus account, ie: name.#@osu.edu
- Name of organization that will be running the endpoint, ie: OSU Arts and Sciences
- OSC will create a new project at https://developers.globus.org, make the user provided in #1 the administrator, and inform the user to set up the endpoint credentials
- The user goes to https://developers.globus.org/ and chooses “Register a new Globus Connect Server v5”. Under the project, the user chooses Add dropdown and chooses Add new Globus Connect Server. Provide a display name for the endpoint, ie: datamover02.hpc.osc.edu. Select “Generate New Client Secret” and save that value and Client ID and use those values when configuring the Globus Connect Server install on their local system
- The user finishes configuring Globus Connect Server and runs the necessary commands to register the new endpoint with Globus. Once the new endpoint is registered, please email OSC Help the endpoint name so we can mark the endpoint as managed under the OSU subscription
HOWTO: Use Jupyter on OnDemand
This page outlines how to use the Jupyter interactive app on OnDemand.
Launching Jupyter App
Log on to https://ondemand.osc.edu/ with your OSC credentials. Choose Jupyter under the InteractiveApps option. 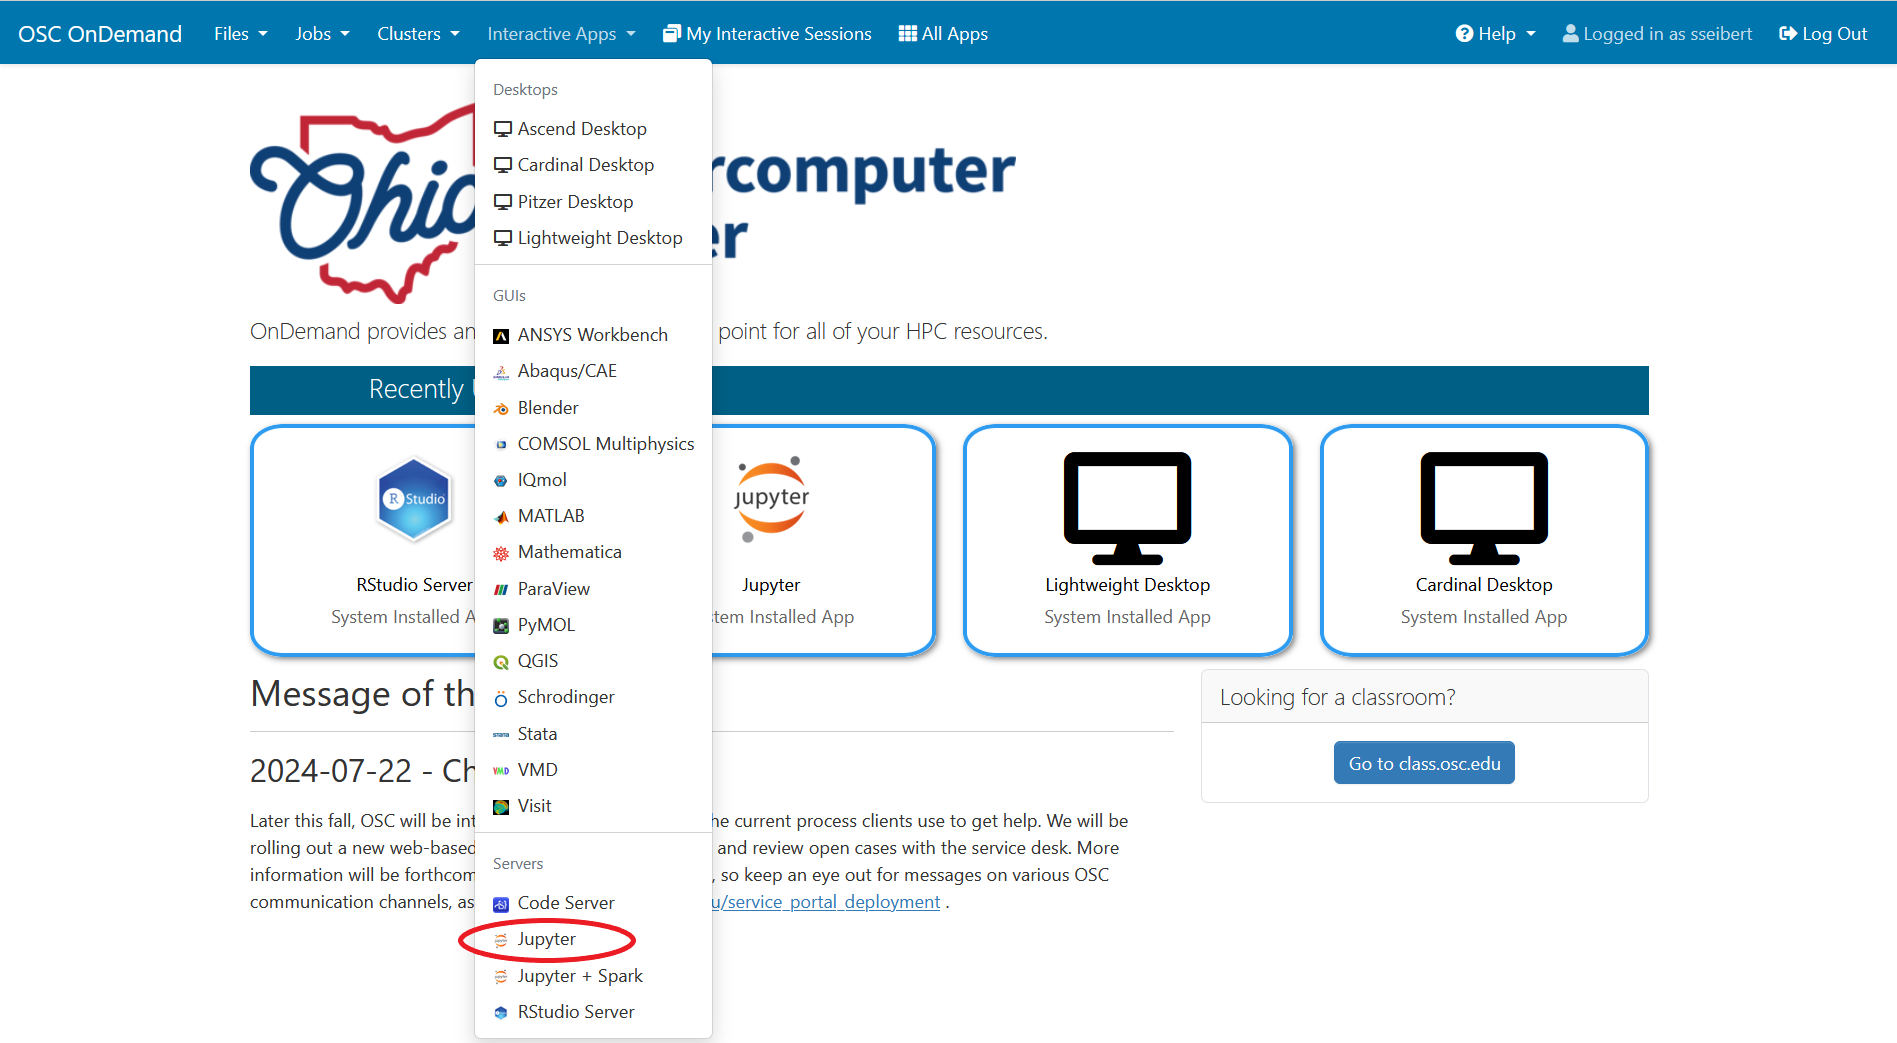
Provide job submission parameters then click Launch.
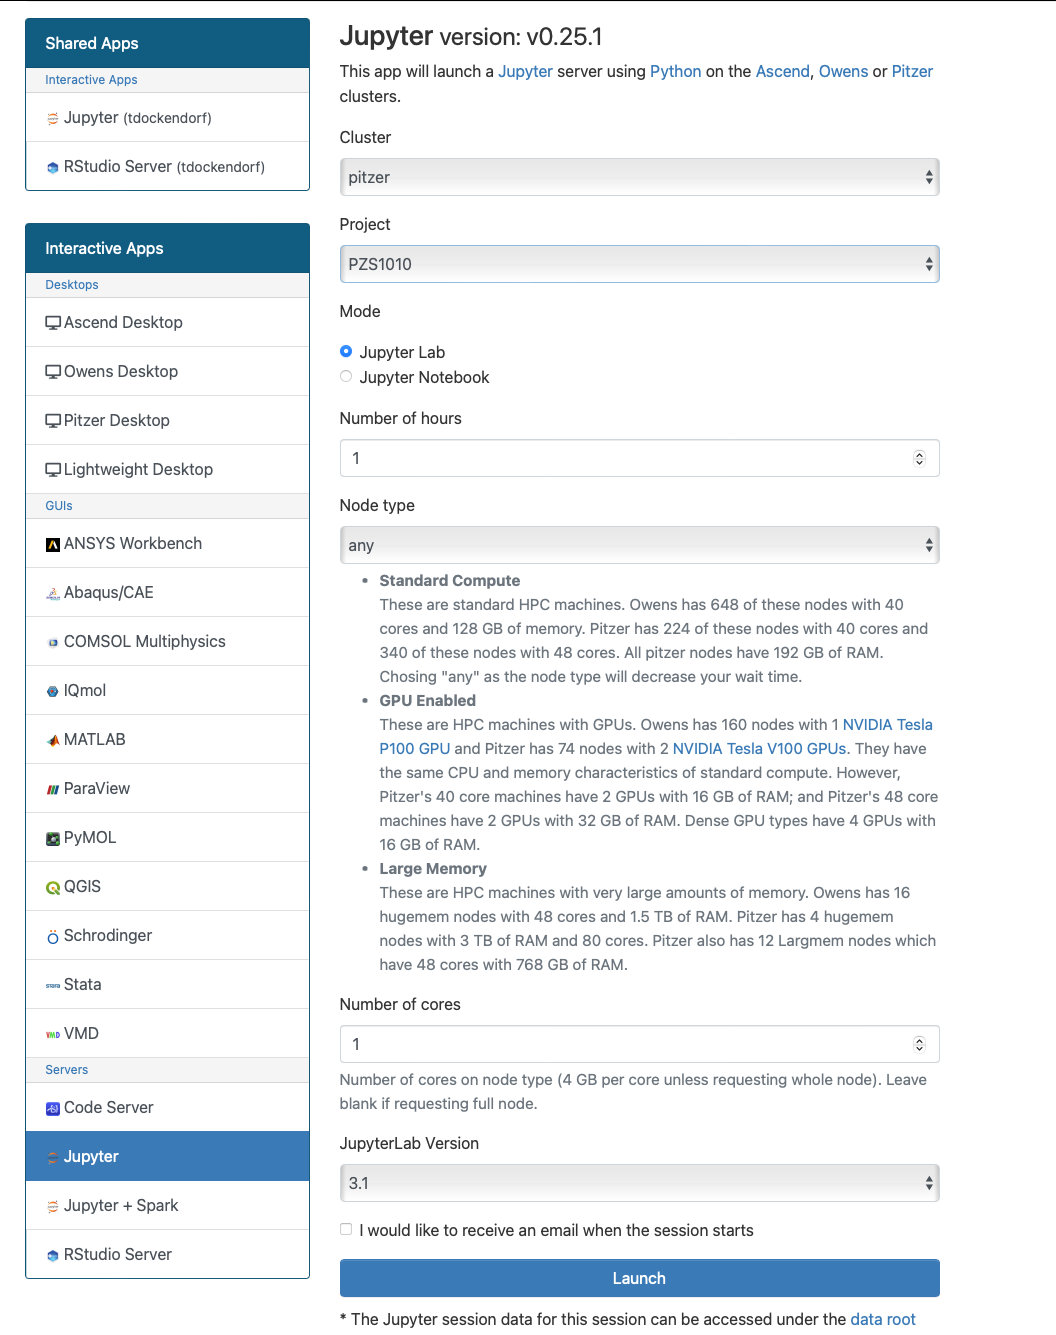
The next page shows the status of your job either as Queued or Starting or Running. Your job may sit in a queue for a few minutes depending on cluster load and resources requested.
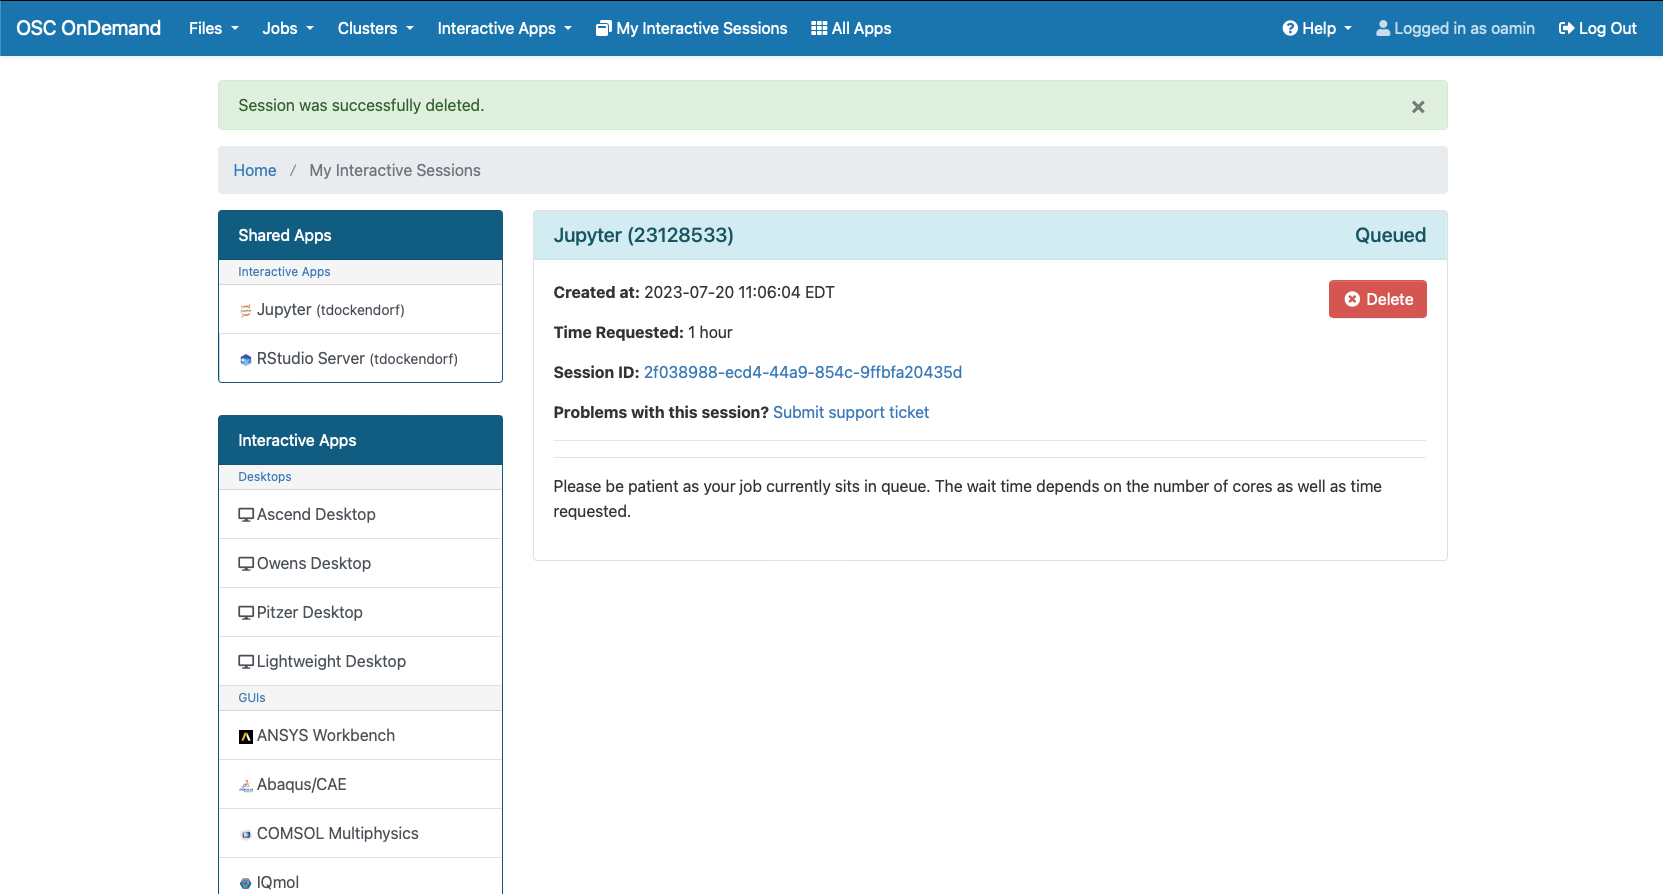
When the job is ready, please click on Connect to Jupyter. This will now launch a Jupyter App.
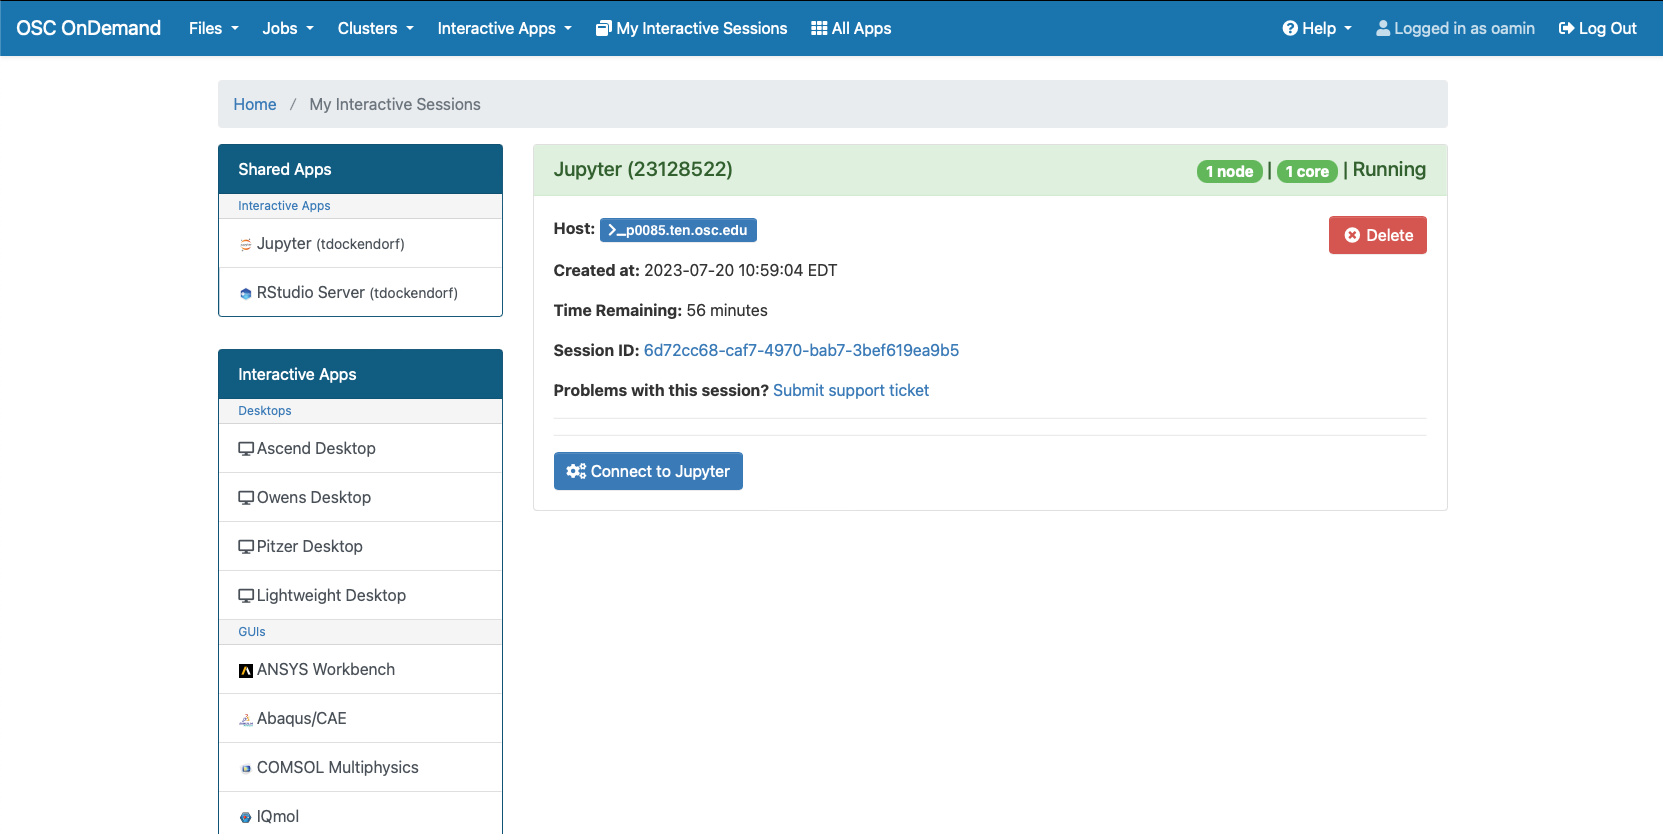
Jupyter App Usage
With the app open, you will be able to access your home directory on the left and all your available kernels will appear on the right. Any custom kernels created using HOWTO: Use a conda/virtual environment with jupyter will also appear in this selection.
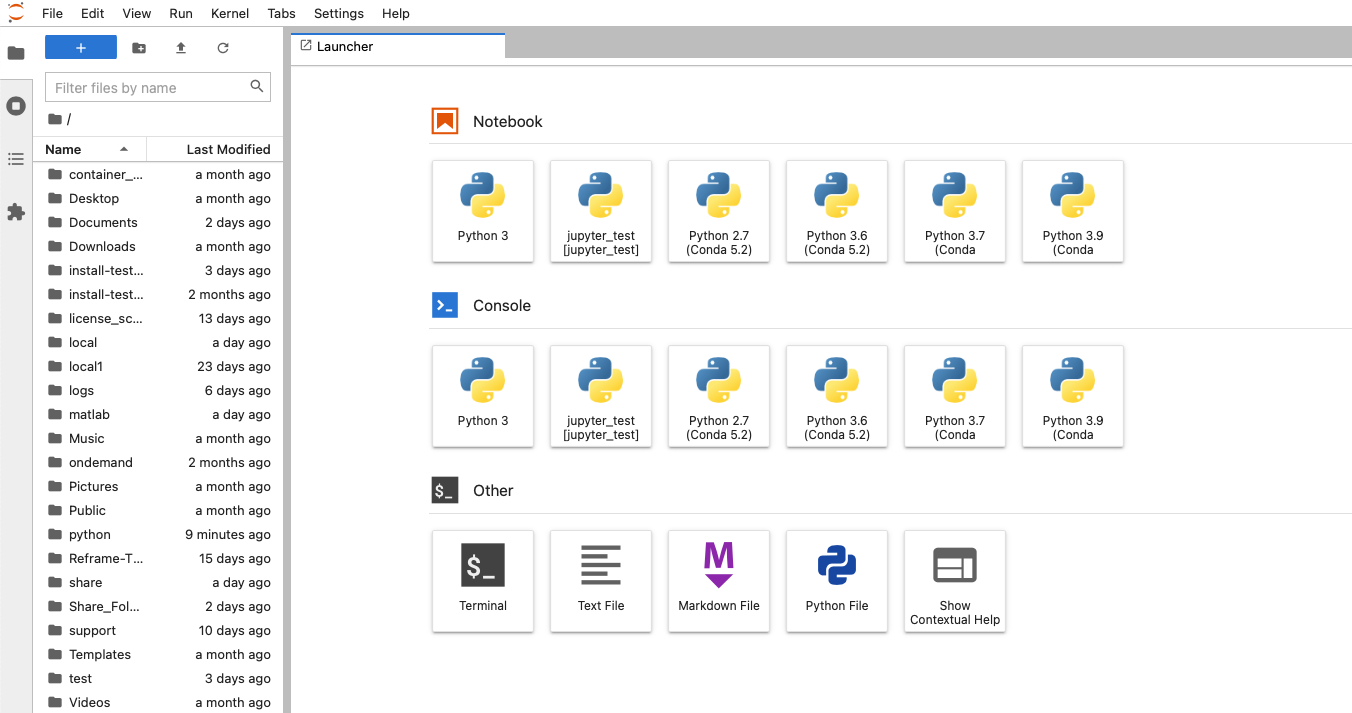
With a file open you can easily switch between different kernels by clicking the kernel name in the top right.
HOWTO: Use VNC in a batch job
SSHing directly to a compute node at OSC - even if that node has been assigned to you in a current batch job - and starting VNC is an "unsafe" thing to do. When your batch job ends (and the node is assigned to other users), stray processes will be left behind and negatively impact other users. However, it is possible to use VNC on compute nodes safely.
The examples below are for Pitzer. If you use other systems, please see this page for supported versions of TurboVNC on our systems.
Starting your VNC server
Step one is to create your VNC server inside a batch job.
Option 1: Interactive
The preferred method is to start an interactive job, requesting an gpu node, and then once your job starts, you can start the VNC server.
salloc --nodes=1 --ntasks-per-node=40 --gpus-per-node=1 --gres=vis --constraint=40core srun --pty /bin/bash
This command requests an entire GPU node, and tells the batch system you wish to use the GPUs for visualization. This will ensure that the X11 server can access the GPU for acceleration. In this example, I have not specified a duration, which will then default to 1 hour.
module load virtualgl
module load turbovnc
Then start your VNC server. (The first time you run this command, it may ask you for a password - this is to secure your VNC session from unauthorized connections. Set it to whatever password you desire. We recommend a strong password.)
vncserver
vncpasswd command.The output of this command is important: it tells you where to point your client to access your desktop. Specifically, we need both the host name (before the :), and the screen (after the :).
New 'X' desktop is p0302.ten.osc.edu:1
Connecting to your VNC server
Because the compute nodes of our clusters are not directly accessible, you must log in to one of the login nodes and allow your VNC client to "tunnel" through SSH to the compute node. The specific method of doing so may vary depending on your client software.
The port assigned to the vncserver will be needed. It is usually 5900 + <display_number>. e.g.
New 'X' desktop is p0302.ten.osc.edu:1
would use port 5901.
Linux/MacOS
Option 1: Manually create an SSH tunnel
I will be providing the basic command line syntax, which works on Linux and MacOS. You would issue this in a new terminal window on your local machine, creating a new connection to Pitzer.
ssh -L <port>:<node_hostname>.ten.osc.edu:<port> <username>@pitzer.osc.edu
The above command establishes a proper ssh connection for the vnc client to use for tunneling to the node.
Open your VNC client, and connect to localhost:<screen_number>, which will tunnel to the correct node on Pitzer.
Option 2: Use your VNC software to tunnel
This example uses Chicken of the VNC, a MacOS VNC client. It is a vncserver started on host n0302 with port 5901 and display 1.
The default window that comes up for Chicken requires the host to connect to, the screen (or port) number, and optionally allows you to specify a host to tunnel through via SSH. This screenshot shows a proper configuration for the output of vncserver shown above. Substitute your host, screen, and username as appropriate.
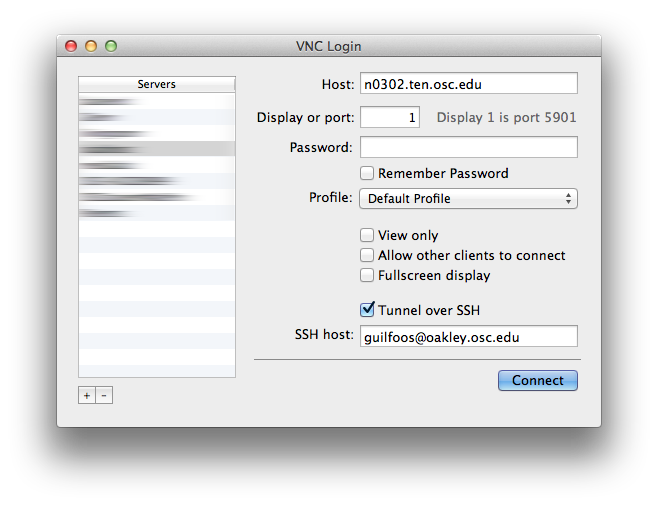
When you click [Connect], you will be prompted for your HPC password (to establish the tunnel, provided you did not input it into the "password" box on this dialog), and then (if you set one), for your VNC password. If your passwords are correct, the desktop will display in your client.
Windows
This example shows how to create a SSH tunnel through your ssh client. We will be using Putty in this example, but these steps are applicable to most SSH clients.
First, make sure you have x11 forwarding enabled in your SSH client.
Next, open up the port forwarding/tunnels settings and enter the hostname and port you got earlier in the destination field. You will need to add 5900 to the port number when specifiying it here. Some clients may have separate boxes for the desination hostname and port.
For source port, pick a number between 11-99 and add 5900 to it. This number between 11-99 will be the port you connect to in your VNC client.
Make sure to add the forwaded port, and save the changes you've made before exiting the configutations window.
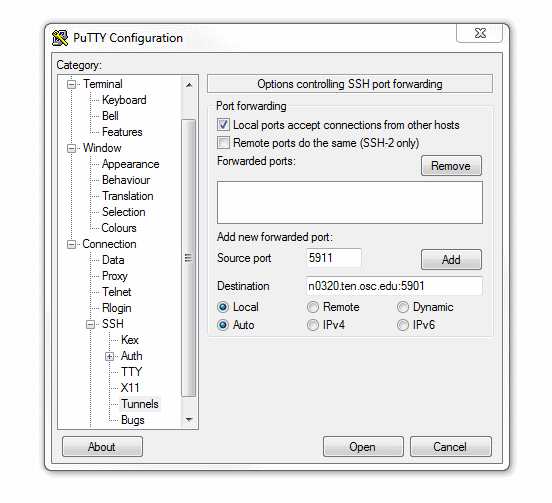
Now start a SSH session to the respective cluster your vncserver is running on. The port forwarding will automatically happen in the background. Closing this SSH session will close the forwarded port; leave the session open as long as you want to use VNC.
Now start a VNC client. TurboVNC has been tested with our systems and is recommended. Enter localhost:[port], replacing [port] with the port between 11-99 you chose earlier.
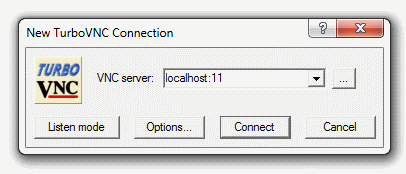
If you've set up a VNC password you will be prompted for it now. A desktop display should pop up now if everything is configured correctly.
How to Kill a VNC session?
Occasionally you may make a mistake and start a VNC server on a login node or somewhere else you did not want to. In this case it is important to know how to properly kill your VNC server so no processes are left behind.
The command syntax to kill a VNC session is:
vncserver -kill :[screen]
In the example above, screen would be 1.
You need to make sure you are on the same node you spawned the VNC server on when running this command.
HOWTO: Use a Conda/Virtual Environment With Jupyter
The IPython kernel for a Conda/virtual environment must be installed on Jupyter prior to use. This tutorial will walk you though the installation and setup procedure.
Install kernel
Load the preferred version of Python or Miniconda3 using the command:
module load python
or
module load miniconda3
Replace "python" or "miniconda3" with the appropriate version, which could be the version you used to create your Conda/venv environment. You can check available Python versions by using the command:
module spider python
Run one of the following commands based on how your Conda/virtual environment was created. Replace "MYENV" with the name of your Conda environment or the path to the environment.
-
If the Conda environment was created via
conda create -n MYENVcommand, use the following command:~support/classroom/tools/create_jupyter_kernel conda MYENV
-
If the Conda environment was created via
conda create -p /path/to/MYENVcommand, use the following command:~support/classroom/tools/create_jupyter_kernel conda /path/to/MYENV
-
If the Python virtual environment was created via
python3 -m venv /path/to/MYENVcommand, use the following command~support/classroom/tools/create_jupyter_kernel venv /path/to/MYENV
-
If you would like to create a kernel for the Python environment iin a container, use the following command
~support/classroom/tools/create_jupyter_kernel container /path/to/container
The resulting kernel name appears as "MYENV [/path/to/MYENV]" in the Jupyter kernel list. You can change the display name by appending a preferred name in the above commands. For example:
~support/classroom/tools/create_jupyter_kernel conda MYENV "My_Research_Project"
This results in the kernel name "My_Research_Project" in the Jupyter kernel list.
You should now be able to access the new Jupyter kernel on OnDemand in a jupyter session. See Usage section of Python page for more details on accessing the Jupyter app.
Install Jupyterlab Debugger kernel
According to Jupyterlab page, debugger requires ipykernel >= 6. Please create your own kernel with conda using the following commands:
module load miniconda
conda create -n jupyterlab-debugger -c conda-forge "ipykernel>=6" xeus-python
~support/classroom/tools/create_jupyter_kernel conda jupyterlab-debugger
You should see a kernelspec 'conda_jupyterlab-debugger' created in home directory. Once the debugger kernel is done, you can use it:
1. go to OnDemand
2. request a JupyterLab app with kernel 3
3. open a notebook with the debugger kernel.
4. you can enable debug mode at upper-right kernel of the notebook
Manually install kernel
If the create_jupyter_kernel script does not work for you, try the following steps to manually install kernel:
# change to the proper version of python
module load python

# replace with the name of conda env
MYENV=useful-project-name

# create the cpnda enironment
conda create -n $MYENV

# Activate your conda/virtual environment
## For Conda environment
source activate $MYENV

# ONLY if you created venv instead of conda env
## For Python Virtual environment
source /path/to/$MYENV/bin/activate

# Install Jupyter kernel
python -m ipykernel install --user --name $MYENV --display-name "Python ($MYENV)"
Remove kernel
If the envirnoment is rebuilt or renamed, users may want to erase any custom jupyter kernel installations.
rm -rf ~/.local/share/jupyter/kernels/${MYENV}
HOWTO: Use an Externally Hosted License
Many software packages require a license. These licenses are usually made available via a license server, which allows software to check out necessary licenses. In this document external refers to a license server that is not hosted inside OSC.
If you have such a software license server set up using a license manager, such as FlexNet, this guide will instruct you on the necessary steps to connect to and use the licenses at OSC.
Users who wish to host their software licenses inside OSC should consult OSC Help.
Introduction
Broadly speaking, there are two different ways in which the external license server's network may be configured. These differ by whether the license server is directly externally reachable or if it sits behind a private internal network with a port forwarding firewall.
If your license server sits behind a private internal network with a port forwarding firewall you will need to take additional steps to allow the connection from our systems to the license server to be properly routed.
License Server is Directly Externally Reachable
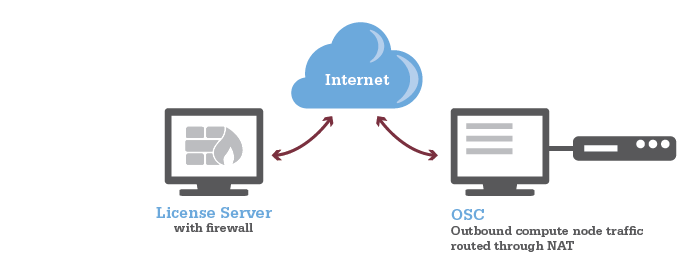
License Server is Behind Port Forwarding Firewall
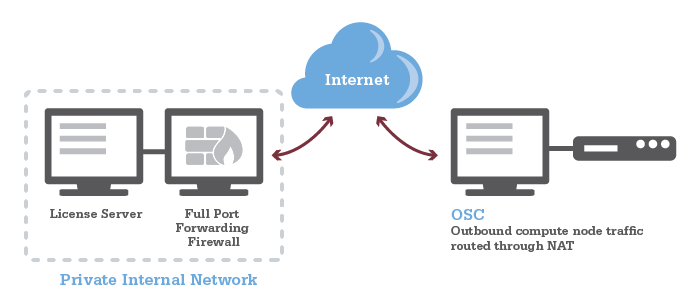
Unsure?
If you are unsure about which category your situation falls under contact your local IT administrator.
Configure Remote Firewall
In order for connections from OSC to reach the license server, the license server's firewall will need to be configured. All outbound network traffic from all of OSC's compute nodes are routed through a network address translation host (NAT).
The license server should be configured to allow connections from nat.osc.edu including the following IP addresses to the SERVER:PORT where the license server is running:
- 192.148.249.249
A typical FlexNet-based license server uses two ports: one is server port and the other is daemon port, and the firewall should be configured for the both ports. A typical license file looks, for example,
SERVER licXXX.osc.edu 0050XXXXX5C 28000
VENDOR {license name} port=28001
In this example, "28000" is the server port, and "28001" is the daemon port. The daemon port is not mandatory if you use it on a local network, however it becomes necessary if you want to use it outside of your local network. So, please make sure you declared the daemon port in the license file and configured the firewall for the port.
Confirm Configuration
The firewall settings should be verified by attempting to connect to the license server from the compute environment using telenet.
Get on to a compute node by requesting a short, small, interactive job and test the connection using telenet:
telnet <License Server IP Address> <Port#>
(Recommended) Restrict Access to IPs/Usernames
It is also recommended to restrict accessibility using the remote license server's access control mechanisms, such as limiting access to particular usernames in the options.dat file used with FlexNet-based license servers.
For FlexNet tools, you can add the following line to your options.dat file, one for each user.
INCLUDEALL USER <OSC username>
If you have a large number of users to give access to you may want to define a group using GROUP within the options.dat file and give access to that whole group using INCLUDEALL GROUP <group name> .
Users who use other license managers should consult the license manager's documentation.
Modify Job Environment to Point at License Server
The software must now be told to contact the license server for it's licenses. The exact method of doing so can vary between each software package, but most use an environment variable that specifies the license server IP address and port number to use.
For example LS DYNA uses the environment variable LSTC_LICENSE and LSTC_LICENSE_SERVER to know where to look for the license. The following lines would be added to a job script to tell LS-DYNA to use licenses from port 2345 on server 1.2.3.4, if you use bash:
export LSTC_LICENSE=network
export LSTC_LICENSE_SERVER=2345@1.2.3.4
or, if you use csh:
setenv LSTC_LICENSE network
setenv LSTC_LICENSE_SERVER 2345@1.2.3.4
License Server is Behind Port Forwarding Firewall
If the license server is behind a port forwarding firewall, and has a different IP address from the IP address of the firewall, additional steps must be taken to allow connections to be properly routed within the license server's internal network.
- Use the license server's fully qualified domain name in SERVER line in the license file instead of the IP address.
- Contact your IT team to have the firewall IP address mapped to the fully qualified domain name.
Software Specific Details
The following outlines details particular to a specific software package.
ANSYS
Uses the following environment variables:
ANSYSLI_SERVERS=<port>@<IP>
ANSYSLMD_LICENSE_FILE=<port>@<IP>
If your license server is behind a port forwarding firewall and you cannot use a fully qualified domain name in the license file, you can add ANSYSLI_EXTERNAL_IP={external IP address} to ansyslmd.ini on the license server.
HOWTO: Use ulimit command to set soft limits
This document shows you how to set soft limits using the ulimit command.
The ulimit command sets or reports user process resource limits. The default limits are defined and applied when a new user is added to the system. Limits are categorized as either soft or hard. With the ulimit command, you can change your soft limits for the current shell environment, up to the maximum set by the hard limits. You must have root user authority to change resource hard limits.
Syntax
ulimit [-HSTabcdefilmnpqrstuvx [Limit]]
| flags | description |
|---|---|
| -H | Specifies that the hard limit for the given resource is set. If you have root user authority, you can increase the hard limit. Anyone can decrease it |
| -S | Specifies that the soft limit for the given resource is set. A soft limit can be increased up to the value of the hard limit. If neither the -H nor -S flags are specified, the limit applies to both |
| -a | Lists all of the current resource limits |
| -b | The maximum socket buffer size |
| -c | The maximum size of core files created |
| -d | The maximum size of a process's data segment |
| -e | The maximum scheduling priority ("nice") |
| -f | The maximum size of files written by the shell and its children |
| -i | The maximum number of pending signals |
| -l | The maximum size that may be locked into memory |
| -m | The maximum resident set size (many systems do not honor this limit) |
| -n | The maximum number of open file descriptors (most systems do not allow this value to be set) |
| -p | The pipe size in 512-byte blocks (this may not be set) |
| -q | The maximum number of bytes in POSIX message queues |
| -r | The maximum real-time scheduling priority |
| -s | The maximum stack size |
| -t | The maximum amount of cpu time in seconds |
| -u | The maximum number of processes available to a single user |
| -v | The maximum amount of virtual memory available to the shell and, on some systems, to its children |
| -x | The maximum number of file locks |
| -T | The maximum number of threads |
The limit for a specified resource is set when the Limit parameter is specified. The value of the Limit parameter can be a number in the unit specified with each resource, or the value "unlimited." For example, to set the file size limit to 51,200 bytes, use:
ulimit -f 100
To set the size of core dumps to unlimited, use:
ulimit –c unlimited
How to change ulimit for a MPI program
The ulimit command affects the current shell environment. When a MPI program is started, it does not spawn in the current shell. You have to use srun to start a wrapper script that sets the limit if you want to set the limit for each process. Below is how you set the limit for each shell (We use ulimit –c unlimited to allow unlimited core dumps, as an example):
- Prepare your batch job script named "myjob" as below (Here, we request a job with 5-hour 2-cores):
#!/bin/bash
#SBATCH --ntasks=2
#SBATCH --time=5:00:00
#SBATCH ...


...
srun ./test1
...
- Prepare the wrapper script named "test1" as below:
#!/bin/bash
ulimit –c unlimited
.....(your own program)
-
sbatch myjob
HOWTO: Using MLFlow to track ML training and models
MLflow is a tool for managing the training and deployment of machine learning models.
At OSC, MLflow is available to help researchers and developers efficiently track training runs and manage models when working. This guide explains how to access MLflow at OSC, run example notebooks, and visualize your experiment data using the MLflow UI. MLflow is available on OSC clusters as part of the PyTorch module or can be installed to your virtual environment via package managers such as pip, conda, or uv.
We provide a repository with marimo notebooks demonstrating how to integrate MLflow into your training and inference codes on UCR.
To run them at OSC:
- Clone the repository
- Select the marimo OnDemand app from the list of apps.
- In the field labeled
Working Directory or Notebook, specify the path to one of the notebooks in the repo. - Select the
Sandbox environmentcheckbox. - The first time you run a notebook in sandbox mode, you may be asked to install missing package dependencies. After the packages have been installed, restart the kernel or start a new marimo ondemand job.
Running the code in the notebooks will create an mlruns/ subdirectory in your local copy of the repository, which contains all of the logged training run data and any registered models. As described in the notebooks, this tracking data can be accessed via Python API. It is also possible to use the MLflow UI, which is available via the MLflow OnDemand app, to graphically view the data collected while executing the notebook. To view the data generated by these notebooks, set the Tracking URI directory to your local copy of the respository.
For more information about how to use MLflow read their documentation.
Note that MLflow offers several options for deploying MLflow servers as described in the MLflow docs. No servers have been deployed at OSC, but if this is necessary for your research please submit a ticket.
HOWTO: test data transfer speed
The data transfer speed between OSC and another network can be tested.
Test data transfer speed with iperf3 tool
Connect to a data mover host at osc and note the hostname.
$ ssh sftp.osc.edu
# login
$ hostname
gcs01.hpc.osc.edu
# the hostname may also be gcs02.hpc.osc.edu
From there, an iperf3 server process can be started. Note the port used.
iperf3 -s -p 5201
Server listening on 5201
# the above port number could be different
Test Upload Performance
Next, on your local machine, try to connect to the iperf3 server process
iperf3 -c gcs01.hpc.osc.edu -p 5201
If it connects sucessfully, then it will start testing and then finish with a summary
Connecting to host gcs01.hpc.osc.edu, port 5201
...
- - - - - - - - - - - - - - - - - - - - - - - - -
[ ID] Interval           Transfer     Bitrate
[  7]   0.00-10.00  sec  13.8 MBytes  11.6 Mbits/sec                  sender
[  7]   0.00-10.00  sec  13.8 MBytes  11.6 Mbits/sec                  receiver
Test Download Performance
For the data downloaded speed, you can also test the newwork performace in the reverse direction, with the server on gcs01 sending data, and the client on your computer receiving data:
iperf3 -c gcs01.hpc.osc.edu -p 5201 -R
Run iperf3 using docker (alternative)
Docker can be used if iperf3 is not installed on client machine, but docker is.
$ docker run --rm -it networkstatic/iperf3 -c gcs01.hpc.osc.edu -p 5201