Classroom Project Resource Guide
Request a Classroom Project
Classroom projects will not be billed under the Ohio academic fee structure; all fees will be fully discounted at the time of billing.
Please submit a new project request for a classroom project. You will request a $500 budget. If an additional budget is needed or you want to re-use your project code, you can apply through MyOSC or contact us at OSCHelp. We require a class syllabus; this will be uploaded on the last screen before you submit the request.
During setup, OSC staff test accounts may be added to the project for troubleshooting purposes.
Access
We suggest that students consider connecting to our OnDemand portal to access the HPC resources. All production supercomputing resources can be accessed via that website without having to worry about client configuration. We have a guide for new students to help them figure out the basics of using OSC.
class.osc.eduResources
We currently have two production clusters, Pitzer and Cardinal, with Nvidia GPUs available that may be used for classroom purposes. All systems have "debug" queues that, during typical business hours, allow small jobs of less than one hour to start much quicker than they might otherwise.
If you need to reserve access to particular resources, please contact OSC Help, preferably with at least two weeks lead time, so that we can put in the required reservations to ensure resources are available during lab or class times.
Software
We have a list of supported software, including sample batch scripts, in our documentation. If you have specific needs that we can help with, let OSC Help know.
If you are using Rstudio, please see this webpage.
If you are using Jupyter, please see the page Using Jupyter for Classroom.
Account Maintenance
Our classroom project information guide will instruct you on how to get students added to your project using our client portal. For more information, see the documentation. You must also add your username as an authorized user.
Homework Submissions
We can provide you with project space to have students submit assignments through our systems. Please ask about this service and see our how-to. We typically grant 1-5 TB for classroom projects.
Support
Help can be found by contacting OSC Help weekdays, 9 a.m. to 5 p.m. (614-292-1800).
Fill out a request online.
We update our web pages to show relevant events at the center (including training) and system notices on our main page (osc.edu). We also provide important information in the “message of the day” (visible when you log in). You also can receive notices by following @HPCNotices on X.
Helpful Links
FAQ: http://www.osc.edu/supercomputing/faq
Main supercomputing pages: http://www.osc.edu/supercomputing/
Classroom Guide for Students
Join a Classroom Project
Your classroom instructor will provide you with a project and access code that will allow you to join the classroom project. Visit our user management page for more information.
All emails will be sent from "no-reply@osc.edu" - all folders should be checked, including spam/junk. If they did not receive this email, please contact OSC Help.
Review our classroom project info guide for detailed informatoin.
Account Management
You can manage your OSC account via MyOSC, our client portal. This includes:
Access
If your class uses a custom R or Jupyter environment at OSC, please connect to class.osc.edu
If you do not see your class there, we suggest connecting to ondemand.osc.edu.
You can log into class.osc.edu or ondemand.osc.edu either using your OSC HPC Credentials or Third-Party Credentials. See this OnDemand page for more information.
File Transfer
There are a few different ways of transferring files between OSC storage and your local computer. We suggest using OnDemand File App if you are new to Linux and looking to transfer smaller-sized files - measured in MB to several hundred MB. For larger files, please use an SFTP client to connect to sftp.osc.edu or Globus.
More Information for New Users
We have a guide for new users to help them figure out the basics of using OSC; included are basics on getting connected, HPC system structure, file transfers, and batch systems.
Support
Help can be found by contacting OSC Help weekdays, 9 a.m. to 5 p.m. (614-292-1800).
Fill out a request online.
Using Jupyter for Classroom
OSC provide an isolated and custom Jupyter environment for each classroom project that requires Jupyter Notebook or JupyterLab.
The instructor must apply for a classroom project that is unique for the course. More details on the classroom project can be found in our classroom project guide. Once we get the information, we will provide you a project ID and a course ID (which is commonly the course ID provided by instructor + school code, e.g. MATH_2530_OU). The instructor can set up a Jupyter environment for the course using the information (see below). The Jupyter environment will be tied to the project ID.
Set up a Jupyter environment
Once the project space is initialized and the classroom is configured, the PI will receive a notification from OSC. Then, the instructor can proceed with the following steps to set up a Jupyter environment for the classroom.
- Log in to class.osc.edu using the PI account associated with the classroom project.
- Click on the Classroom Jupyter app.
- In the Classroom dropdown list, locate and select your
course ID. - Click launch.
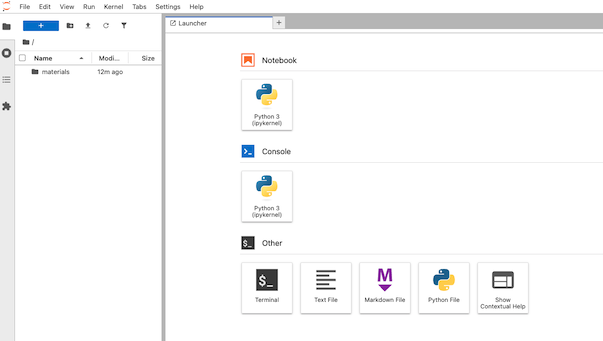
It may take a few minutes for the Jupyter environment to initialize. Once ready, you will be redirected to the JupyterLab interface, as shown below.
Manually creating a Jupyter environment
If you encounter issues that prevent you from automatically creating a Jupyter environment for your classroom, you can either contact OSC Help or follow the steps below to create one manually:
- Log in to Ascend Shell: Access on class.osc.edu using the PI account associated with the classroom project.
- Remove any existing Jupyter environment
cd /fs/ess/project_ID/course_ID
rm -rf ./jupyter
- Create a new Jupyter environment
~support/classroom/tools//setup_jupyter_classroom /fs/ess/project_ID course_ID
- Once the setup completes successfully, you should be able to launch the classroom Jupyter app as usual.
Manage the Jupyter environment
Install packages via pip
Once the Jupyter environment is ready, you can open a notebook and install packages using the following command:
pip install --no-cache-dir --ignore-installed [package-name]
Note: The --no-cache-dir and --ignore-installed flags prevent pip from using cached packages stored in the user’s home directory. This helps avoid conflicts, especially if you’ve previously installed packages across multiple Python environments.
Packages installed via pip are available to all participants in the classroom environment. For this reason, participants are not permitted to install packages themselves. As a result, any commands they run that attempt to download data to a system-wide Python location will fail. To resolve this, either install the required data as the classroom owner, or instruct participants to set the download path to a location they have write access to. For example:
import os
nltk.download('stopwords', download_dir=os.environ['NOTEBOOK_ROOT'])
Install packages via conda and register as own Jupyter Kernel
First, load the proper python and create the conda environment under the project directory. Here, we create a new env called pygmt-env
module load miniconda3/24.1.2-py310
conda create -y -p /fs/ess/project_ID/.conda/envs/pygmt-env python=3.11
Then, activate the environment and install required Python packages:
source activate /fs/ess/project_ID/.conda/envs/pygmt-env
conda install -y pygmt gmt numpy pandas matplotlib seaborn ipykernel
Register the environment as a Jupyter kernel to makes the environment available in the Jupyter interface for the course:
python -m ipykernel install --prefix /fs/ess/project_ID/course_ID/jupyter --name pygmt-env --display-name "Python (pygmt-env)"
This creates the kernel at:
/fs/ess/project_ID/course_ID/jupyter/share/jupyter/kernels/pygmt-env/
After that, when launching the Jupyter from class.osc.edu, you can that Python (pygmt-env) is listed under the Kernel menu.
Please note,
- Environments stored in a project count against the project’s storage quota.
- To create additional kernels, repeat the steps with a different name.
Install extensions
Jupyter Notebook
To enable or install nbextension, please use --sys-prefix to install into the classroom Jupyter environment, e.g.
!jupyter contrib nbextension install --sys-prefix
Please do not use --user, which install to your home directory and could mess up the Jupyter environment.
JupyterLab
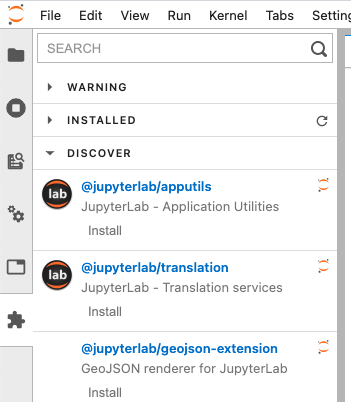
To install labextension, simply click Extension Manager icon at the side bar
Enable local package access (optional)
By default this Jupyter environment is an isolated Python environment. Anyone launches python from this environment can only access packages installed inside unless PYTHONPATH is used. The instructor can change it by setting include-system-site-packages = true in /fs/ess/project_ID/course_ID/jupyter/pyvenv.cfg. This will allows students to access packages in home directory ~/.local/lib/pythonX.X/site-packages ,and install packages via pip install –user
Workspace
When a Jupyter classroom instance starts, we create a classroom workspace under the instructor's and students' home space: $HOME/osc_classes/course_ID, and launch Jupyter at the workspace. The root / will appear in the landing page (Files) but everything can be found in $HOME/osc_classes/course_ID on OSC system.
Shared Access
Share class material
The instructor can upload class material to /fs/ess/project_ID/course_ID/materials . When a student launch a Jupyter instance, the diretory will be copied to the student's worksapce $HOME/osc_classes/course_ID . The student will see the directory materials on the landing page. PI can add files to the material source directory. New files will be copied to the destination every time when a new Jupyter instance starts. But If PI modifies existing files, the changes won't be copied as the files were copied before. Therefore we recommend renaming the file after the update so that it will be copied
Use data dir for large files
For large files, create a data dir to the classroom and place the large files there.
mkdir /fs/ess/project_ID/course_ID/data
Now the large data will not be copied to each user's home dir when they start a classroom Jupyter instance. Make sure to reference this data properly in notebooks that will be copied to students home dirs from the /materials dir.
Access student workspace
The instructor and TAs can access a student's workspace with limited permissions. First, the instructor sends us a request with the information including the instructor's and TAs' OSC accounts. After a student launches a class session, you can access known files and directories in the student's workspace. For example, you cannot explore the student's workspace
ls /users/PZS1234/student1/osc_classes/course_ID
ls: cannot open directory /users/PZS1234/student1/osc_classes/course_ID: Permission denied
but you can access a known file or directory in the workspace
ls /users/PZS1234/student1/osc_classes/course_ID/homework
Using Rstudio for classroom
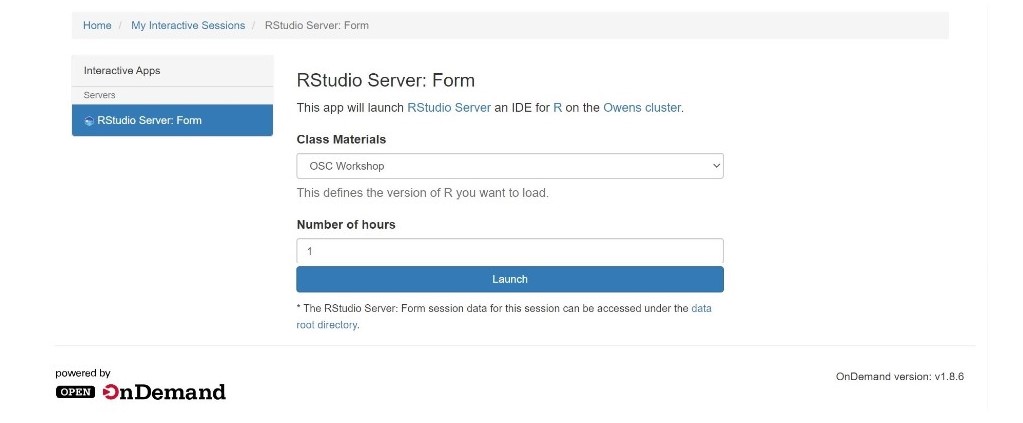
OSC provides an isolated and custom R environment for each classroom project that requires Rstudio. The interface can be accessed at class.osc.edu. Before using this interface, please apply for a classroom project account that is unique for the course. More details on the classroom project can be found here. The custom R environment for the course will be tied to this project ID. Please inform us if you have additional requirements for the class. Once we get the information, we will provide you a course_ID (which is commonly the course ID provided by instructor + school code, e.g. MATH2530_OU)and add your course to the server with the class module created using the course_ID. After login to the class.osc.edu server, you will see several Apps listed. Pick Rstudio server and that will take you to the Rstudio Job submission page. Please pick your course from the drop-down menu under the Class materials and the number of hours needed.
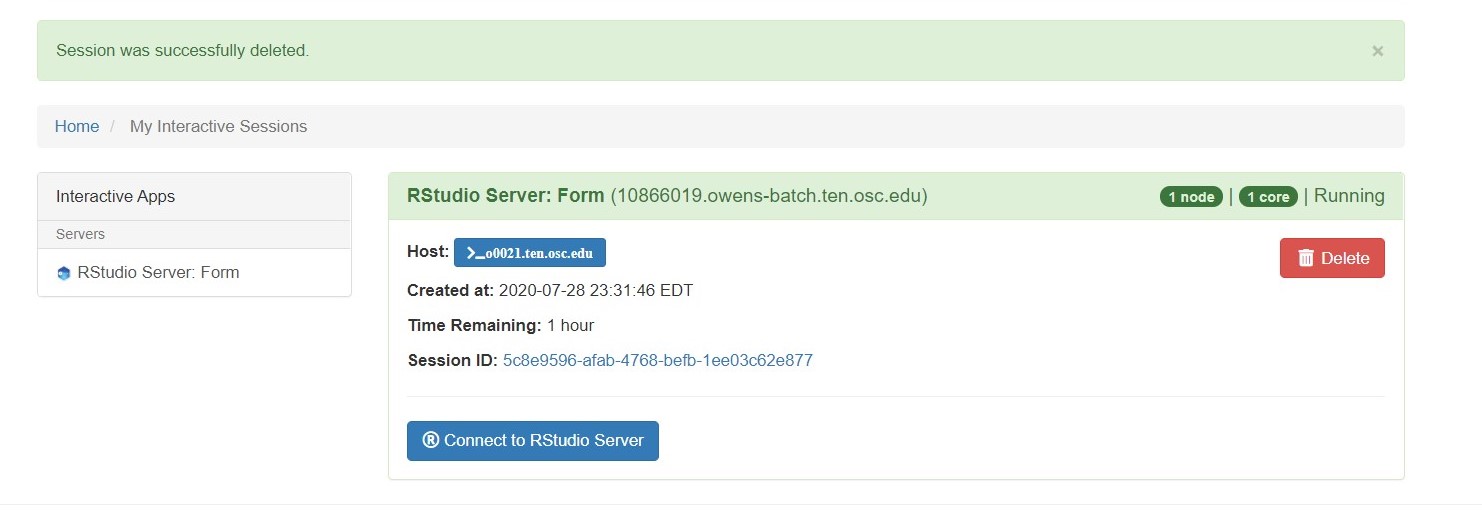
Clicking on the Launch will submit the Rstudio job to the scheduler and you will see Connect to Rstudio server option when the resource is ready for the job. Each Rstudio launch will run on 1 core on Ascend machine with 4GB of memory.
Rstudio will open up in a new tab with a custom and isolated environment that is set through a container-based solution. This will create a folder under $HOME/osc_classes/course_ID for each user. Please note that inside the Rstudio, you won't be able to access any files other than class materials. However, you can access the class directory outside of Rstudio to upload or download files.

You can quit a Rstudio session by clicking on File from the top tabs then on the Quit. This will only quit the session, but the resource you requested is still held until walltime limit is reached. To release the resource, please click on DELETE in the Rstudio launch page.
Shared Access
PI can store and share materials like data, scripts, etc, and R packages with the class. We will set up a project space for the project ID of the course. This project space will be created under /fs/ess/project_ID.
Shared R packages
Once the class module is ready, PI can access the course at class.osc.edu under the Rstudio job submission page. PI can launch the course environment and install R packages for the class.
After launching Rstudio, please run the .libPaths() as follows
> .libPaths()
[1] "/users/PZS0711/akachlan/osc_classes/OSCWORKSHOP/R"
[2] "/fs/ess/PZS1117/OSCWORKSHOP/Rpkgs"
[3] "/apps/R/gnu/9.1/4.0.2/site/pkgs"
[4] "/apps/R/gnu/9.1/4.0.2/lib64/R/library"
Here you will see four R library paths. The last two are system R library paths and are accessible for all OSC users. OSC installs a number of popular R packages at the site location. You can check available packages with library() command. The first path is a personal R library of each user in the course environment and is not shared with students. The second lib path is accessible to all students of the course(Eg: /fs/ess/PZS0687/OSCWORKSHOP/Rpkgs). PI should install R packages in this library to share with the class. As a precaution, it is a good idea to eliminate PI's personal R library from .libPaths() before R package installation as follows. Please note that this step is needed to be done only when preparing course materials by PI.
> .libPaths(.libPaths()[-1])
> .libPaths()
[1] "/fs/ess/PZS1117/OSCWORKSHOP/Rpkgs"     "/apps/R/gnu/9.1/4.0.2/site/pkgs"
[3] "/apps/R/gnu/9.1/4.0.2/lib64/R/library"
Now there is only one writable R library path such that all packages will be installed into this library path and shared for all users.
PI can install all packages required for the class using install.packages() function. Once the installation is complete, students will have access to all those packages.
Please note that students can also install their own packages. Those packages will be installed into their personable library in the class environment i.e., the first path listed under .libPaths()
Shared materials
PI can share materials like data, scripts, and rmd files stored in /fs/ess/project_ID/course_ID/materials with students. When a student launch a Rstduio session, the directory will be copied to the student's workspace $HOME/osc_classes/courseID (destination). Please inform us if you want to use a source directory other than /fs/ess/project_ID/course_ID/materials. The student will see the directory materials on the landing page. PI can add files to the material source directory. New files will be copied to the destination every time using rsync when a new Rstudio session starts. But If PI modifies existing files, the changes won't be copied as the files were copied before. Therefore we recommend renaming the file after the update so that it will be copied.
Please limit the size of data stored in the material folders of your project space to a maximum of 3GB. Larger files can cause issues with the rsync process. If you have files that exceed this limit, we recommend hosting them outside the material folder within your project space. Students will still be able to access the data after launching RStudio. If you need assistance managing large files or have any other questions, please don't hesitate to reach out for support
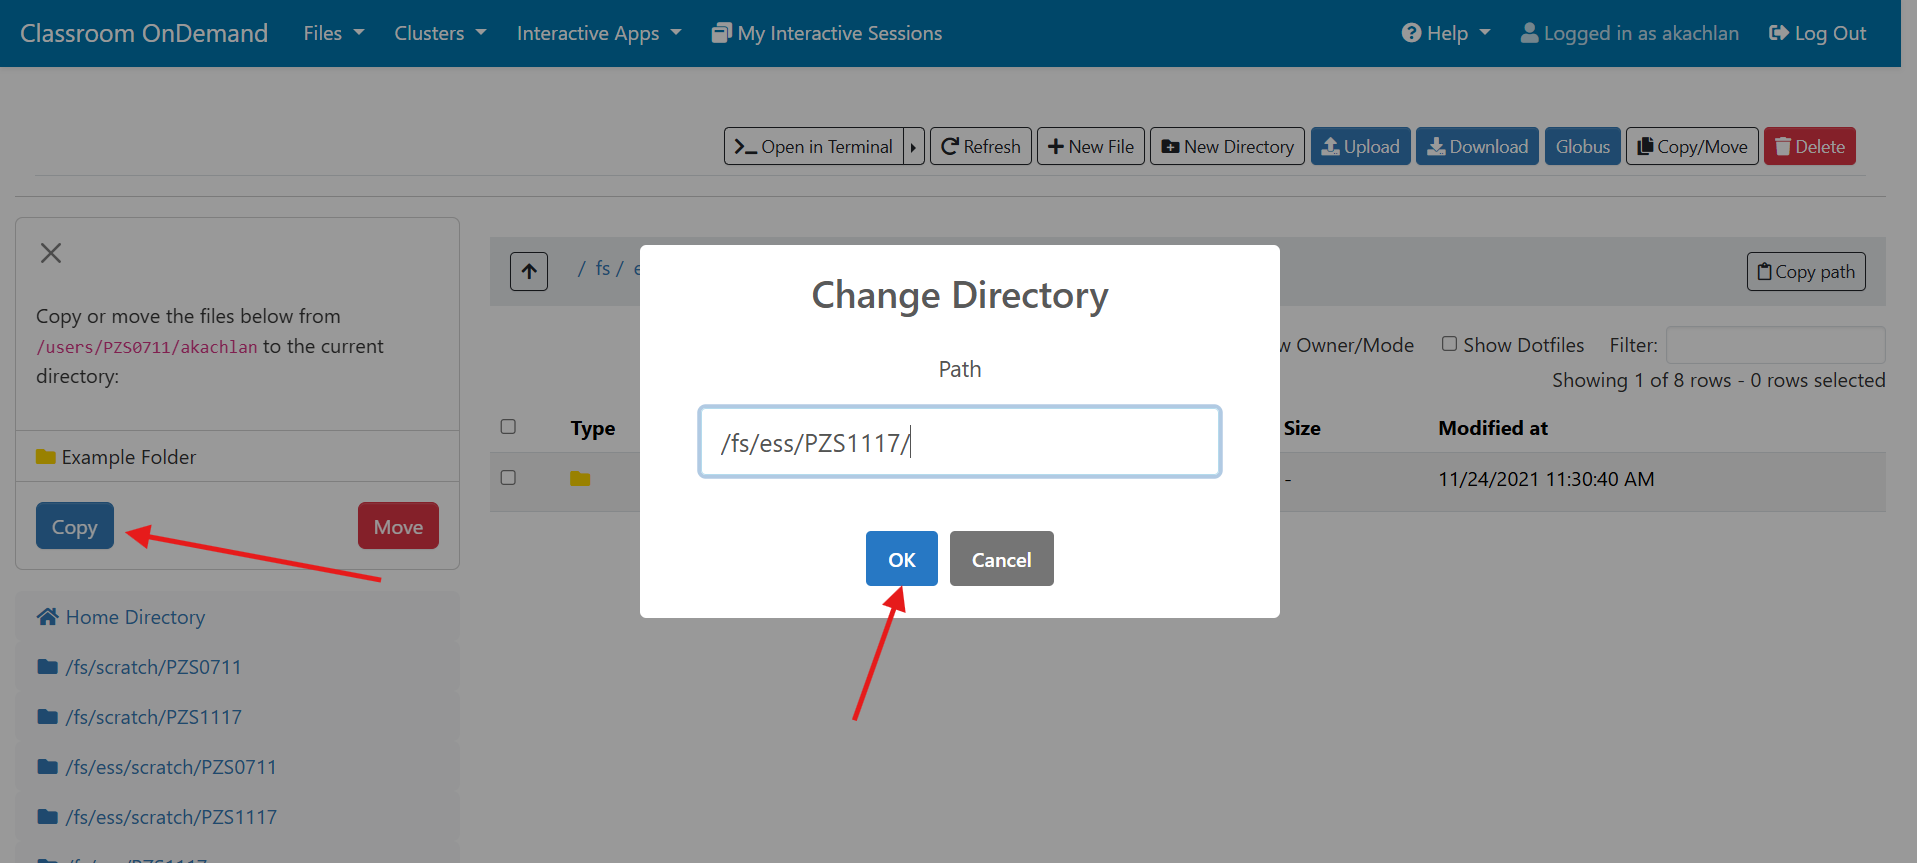
There are several different ways to copy materials manually from a directory to students' workspace.
- On
class.osc.eduserver, click onFilesfrom the top tabs, then on$HOMEdirectory. From the top right, click onGo toand enter the storage path (Eg:/fs/ess/PZS1117/) in the box and press OK. This will open up storage path and users can copy files. Open the class folder from the$HOMEtree shown on left and paste files there. All files copied to$HOME/osc_classes/course_IDwill appear in the Rstudio FIle browser.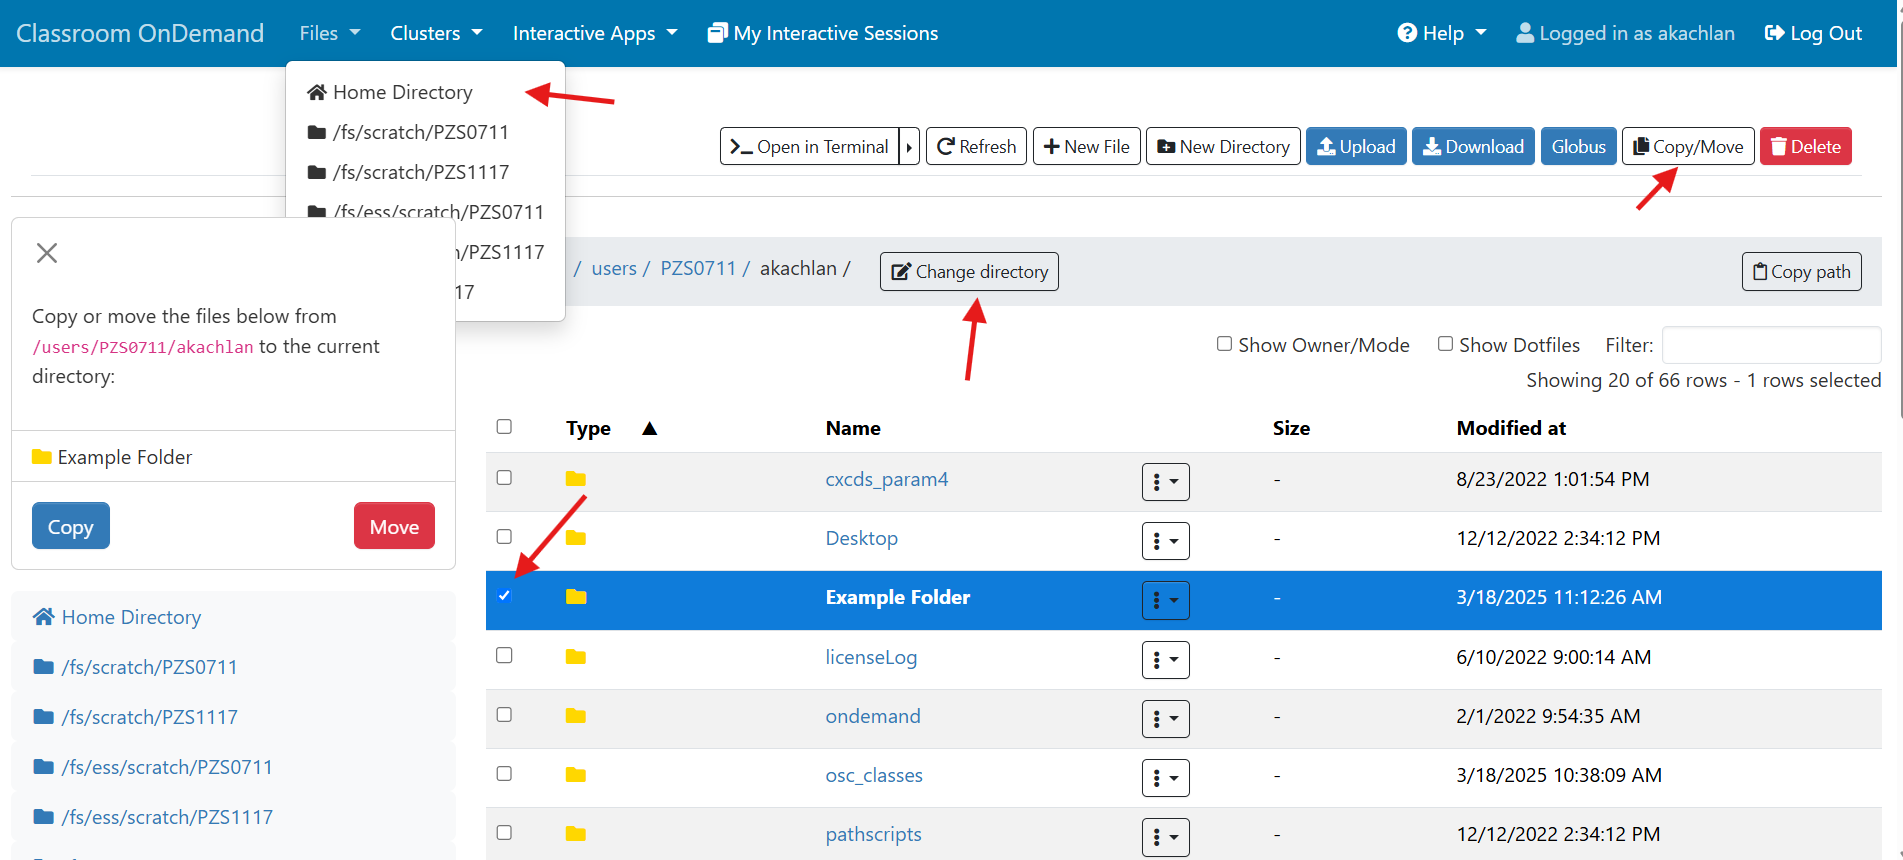
- On
class.osc.eduserver, Click onClustersfrom the top tabs, then onAscend Shell Access. This will open up a terminal on Ascend where students can enter Unix command for copying. Eg:
cp -r /fs/ess/PZS1117/OSCWORKSHOP/materials $HOME/osc_classes/course_ID
Please note that$HOME/osc_classes/course_IDwill be created only after launching Rstudio instance at least once. - Students can also upload material directly to Rstudio using the
uploadtab located in theFile browserof Rstudio from their local computer. This assumes they have already downloaded materials to their computers.

Checklist for PIs
- Apply for a classroom project ID that is unique to the course
- Add yourself, PI, to the project as an authorized user.
- Inform us about additional requirements such as R version or other software
- Once the class module is ready, create class materials under the storage path, and install R packages in the class environment.
- Invite students to the project at my.osc.edu to give them access to the project ID.
Please reach out to oschelp@osc.edu if you have any questions.
Using nbgrader for Classroom
Using ngbrader in Jupyter
Install nbgrader
You can install nbgrader in a notebook:
- Launch a Juypter session from class.osc.edu
- Open a new notebook
- To Install nbgrader, run:
!pip install nbgrader
!jupyter nbextension install --sys-prefix --py nbgrader --overwrite
!jupyter nbextension enable --sys-prefix --py nbgrader
!jupyter serverextension enable --sys-prefix --py nbgrader
To check the installed extensions, run
!jupyter nbextension list
There are six enabled extensions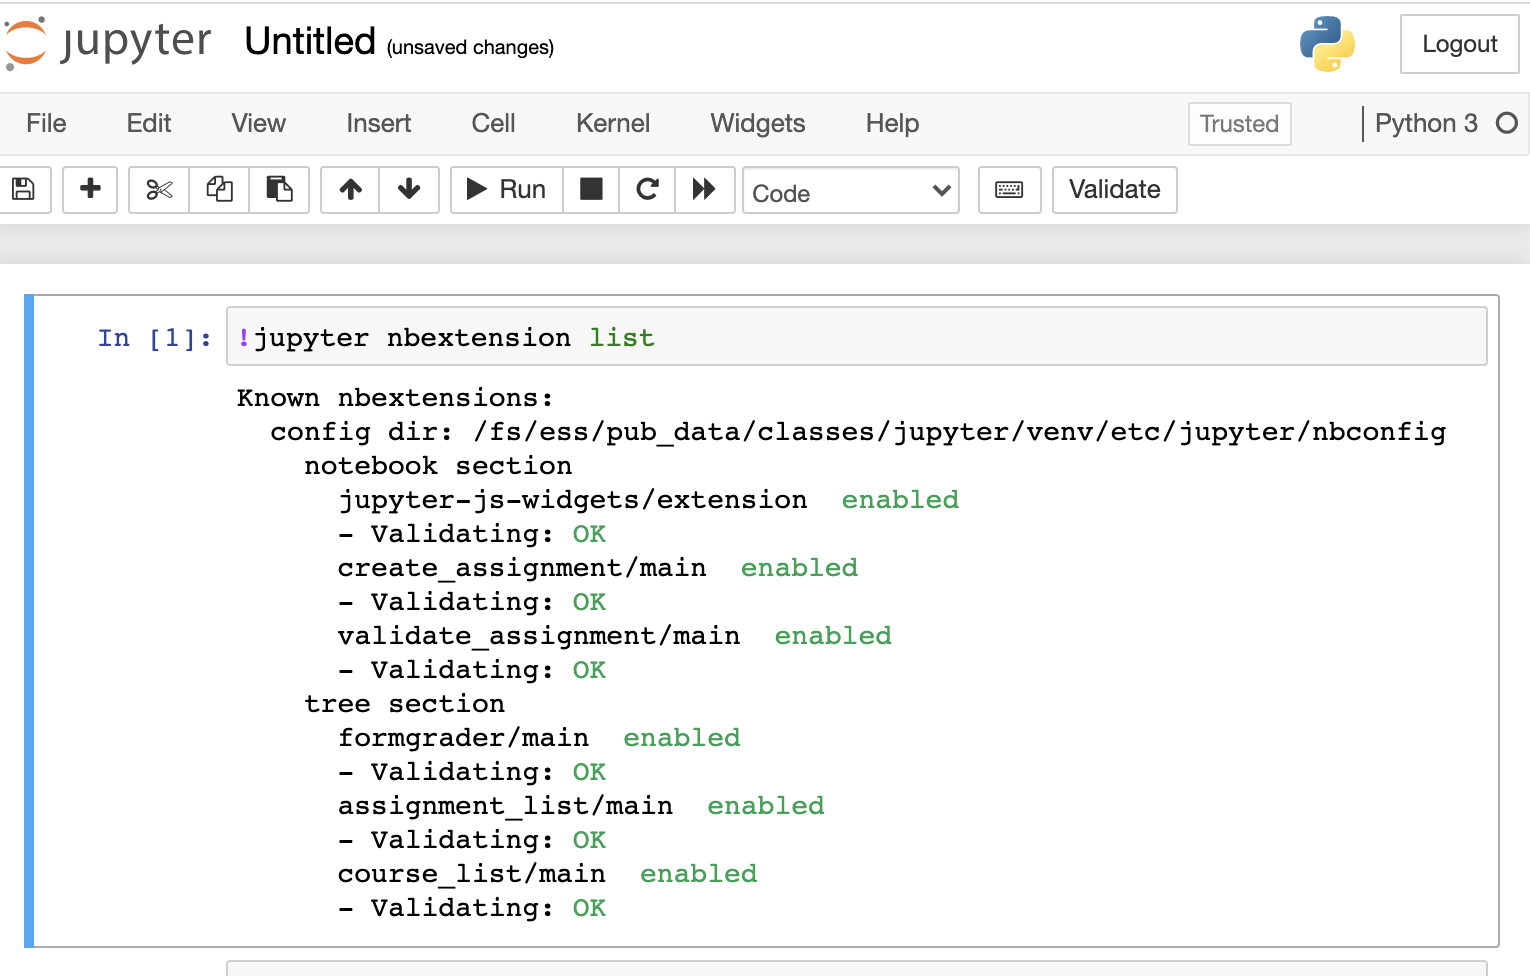
Configure nbgrader
In order to upload and collect assignments, nbgrader requires a exchange directory with write permissions for everyone. For example, to create a directory in project space, run:
%%bash
mkdir -p /fs/ess/projectID/courseID/exchange
chmod a+wx /fs/ess/projectID/courseID/exchange
Then get your cousre ID for configuratin. In a notebook, run:
%%bash
echo $OSC_CLASS_ID
Finally create the nbgrader configuration at the root of the workspace. In a notebook, run
%%file nbgrader_config.py
c = get_config()
c.CourseDirectory.course_id = "courseID"     # it must be the value of $OSC_CLASS_ID
c.Exchange.root = "/fs/ess/projectID/courseID/exchange"
c.Exchange.timezone = 'EST'
Once the file is created, you can launch a new Jupyter session then start creating assignments. For using nbgrader, please refer the nbgrader documents.
Access assignments
To let students access the assignments, students need to have the following configuration file in the root of their workspace:
%%file nbgrader_config.py
c = get_config()
c.Exchange.root = "/fs/ess/projectID/courseID/exchange"