OSC provide an isolated and custom Jupyter environment for each classroom project that requires Jupyter Notebook or JupyterLab.
The instructor must apply for a classroom project that is unique for the course. More details on the classroom project can be found in our classroom project guide. Once we get the information, we will provide you a project ID and a course ID (which is commonly the course ID provided by instructor + school code, e.g. MATH_2530_OU). The instructor can set up a Jupyter environment for the course using the information (see below). The Jupyter environment will be tied to the project ID.
Set up a Jupyter environment
Once the project space is initialized and the classroom is configured, the PI will receive a notification from OSC. Then, the instructor can proceed with the following steps to set up a Jupyter environment for the classroom.
- Log in to class.osc.edu using the PI account associated with the classroom project.
- Click on the Classroom Jupyter app.
- In the Classroom dropdown list, locate and select your
course ID. - Click launch.
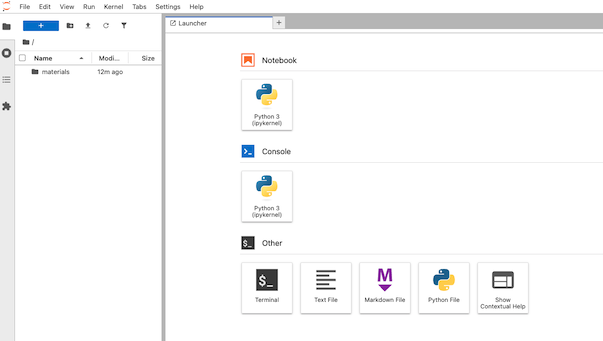
It may take a few minutes for the Jupyter environment to initialize. Once ready, you will be redirected to the JupyterLab interface, as shown below.
Manually creating a Jupyter environment
If you encounter issues that prevent you from automatically creating a Jupyter environment for your classroom, you can either contact OSC Help or follow the steps below to create one manually:
- Log in to Ascend Shell: Access on class.osc.edu using the PI account associated with the classroom project.
- Remove any existing Jupyter environment
cd /fs/ess/project_ID/course_ID
rm -rf ./jupyter
- Create a new Jupyter environment
~support/classroom/tools//setup_jupyter_classroom /fs/ess/project_ID course_ID
- Once the setup completes successfully, you should be able to launch the classroom Jupyter app as usual.
Manage the Jupyter environment
Install packages via pip
Once the Jupyter environment is ready, you can open a notebook and install packages using the following command:
pip install --no-cache-dir --ignore-installed [package-name]
Note: The --no-cache-dir and --ignore-installed flags prevent pip from using cached packages stored in the user’s home directory. This helps avoid conflicts, especially if you’ve previously installed packages across multiple Python environments.
Packages installed via pip are available to all participants in the classroom environment. For this reason, participants are not permitted to install packages themselves. As a result, any commands they run that attempt to download data to a system-wide Python location will fail. To resolve this, either install the required data as the classroom owner, or instruct participants to set the download path to a location they have write access to. For example:
import os
nltk.download('stopwords', download_dir=os.environ['NOTEBOOK_ROOT'])
Install packages via conda and register as own Jupyter Kernel
First, load the proper python and create the conda environment under the project directory. Here, we create a new env called pygmt-env
module load miniconda3/24.1.2-py310
conda create -y -p /fs/ess/project_ID/.conda/envs/pygmt-env python=3.11
Then, activate the environment and install required Python packages:
source activate /fs/ess/project_ID/.conda/envs/pygmt-env
conda install -y pygmt gmt numpy pandas matplotlib seaborn ipykernel
Register the environment as a Jupyter kernel to makes the environment available in the Jupyter interface for the course:
python -m ipykernel install --prefix /fs/ess/project_ID/course_ID/jupyter --name pygmt-env --display-name "Python (pygmt-env)"
This creates the kernel at:
/fs/ess/project_ID/course_ID/jupyter/share/jupyter/kernels/pygmt-env/
After that, when launching the Jupyter from class.osc.edu, you can that Python (pygmt-env) is listed under the Kernel menu.
Please note,
- Environments stored in a project count against the project’s storage quota.
- To create additional kernels, repeat the steps with a different name.
Install extensions
Jupyter Notebook
To enable or install nbextension, please use --sys-prefix to install into the classroom Jupyter environment, e.g.
!jupyter contrib nbextension install --sys-prefix
Please do not use --user, which install to your home directory and could mess up the Jupyter environment.
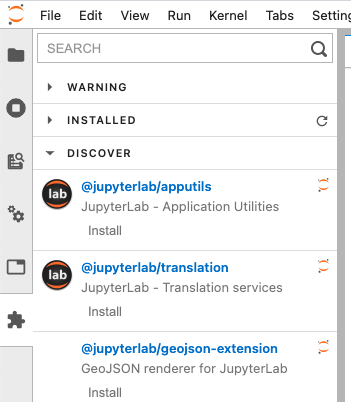
JupyterLab
To install labextension, simply click Extension Manager icon at the side bar
Enable local package access (optional)
By default this Jupyter environment is an isolated Python environment. Anyone launches python from this environment can only access packages installed inside unless PYTHONPATH is used. The instructor can change it by setting include-system-site-packages = true in /fs/ess/project_ID/course_ID/jupyter/pyvenv.cfg. This will allows students to access packages in home directory ~/.local/lib/pythonX.X/site-packages ,and install packages via pip install –user
Workspace
When a Jupyter classroom instance starts, we create a classroom workspace under the instructor's and students' home space: $HOME/osc_classes/course_ID, and launch Jupyter at the workspace. The root / will appear in the landing page (Files) but everything can be found in $HOME/osc_classes/course_ID on OSC system.
Shared Access
Share class material
The instructor can upload class material to /fs/ess/project_ID/course_ID/materials . When a student launch a Jupyter instance, the diretory will be copied to the student's worksapce $HOME/osc_classes/course_ID . The student will see the directory materials on the landing page. PI can add files to the material source directory. New files will be copied to the destination every time when a new Jupyter instance starts. But If PI modifies existing files, the changes won't be copied as the files were copied before. Therefore we recommend renaming the file after the update so that it will be copied
Use data dir for large files
For large files, create a data dir to the classroom and place the large files there.
mkdir /fs/ess/project_ID/course_ID/data
Now the large data will not be copied to each user's home dir when they start a classroom Jupyter instance. Make sure to reference this data properly in notebooks that will be copied to students home dirs from the /materials dir.
Access student workspace
The instructor and TAs can access a student's workspace with limited permissions. First, the instructor sends us a request with the information including the instructor's and TAs' OSC accounts. After a student launches a class session, you can access known files and directories in the student's workspace. For example, you cannot explore the student's workspace
ls /users/PZS1234/student1/osc_classes/course_ID
ls: cannot open directory /users/PZS1234/student1/osc_classes/course_ID: Permission denied
but you can access a known file or directory in the workspace
ls /users/PZS1234/student1/osc_classes/course_ID/homework