SSHing directly to a compute node at OSC - even if that node has been assigned to you in a current batch job - and starting VNC is an "unsafe" thing to do. When your batch job ends (and the node is assigned to other users), stray processes will be left behind and negatively impact other users. However, it is possible to use VNC on compute nodes safely.
The examples below are for Pitzer. If you use other systems, please see this page for supported versions of TurboVNC on our systems.
Starting your VNC server
Step one is to create your VNC server inside a batch job.
Option 1: Interactive
The preferred method is to start an interactive job, requesting an gpu node, and then once your job starts, you can start the VNC server.
salloc --nodes=1 --ntasks-per-node=40 --gpus-per-node=1 --gres=vis --constraint=40core srun --pty /bin/bash
This command requests an entire GPU node, and tells the batch system you wish to use the GPUs for visualization. This will ensure that the X11 server can access the GPU for acceleration. In this example, I have not specified a duration, which will then default to 1 hour.
module load virtualgl
module load turbovnc
Then start your VNC server. (The first time you run this command, it may ask you for a password - this is to secure your VNC session from unauthorized connections. Set it to whatever password you desire. We recommend a strong password.)
vncserver
vncpasswd command.The output of this command is important: it tells you where to point your client to access your desktop. Specifically, we need both the host name (before the :), and the screen (after the :).
New 'X' desktop is p0302.ten.osc.edu:1
Connecting to your VNC server
Because the compute nodes of our clusters are not directly accessible, you must log in to one of the login nodes and allow your VNC client to "tunnel" through SSH to the compute node. The specific method of doing so may vary depending on your client software.
The port assigned to the vncserver will be needed. It is usually 5900 + <display_number>. e.g.
New 'X' desktop is p0302.ten.osc.edu:1
would use port 5901.
Linux/MacOS
Option 1: Manually create an SSH tunnel
I will be providing the basic command line syntax, which works on Linux and MacOS. You would issue this in a new terminal window on your local machine, creating a new connection to Pitzer.
ssh -L <port>:<node_hostname>.ten.osc.edu:<port> <username>@pitzer.osc.edu
The above command establishes a proper ssh connection for the vnc client to use for tunneling to the node.
Open your VNC client, and connect to localhost:<screen_number>, which will tunnel to the correct node on Pitzer.
Option 2: Use your VNC software to tunnel
This example uses Chicken of the VNC, a MacOS VNC client. It is a vncserver started on host n0302 with port 5901 and display 1.
The default window that comes up for Chicken requires the host to connect to, the screen (or port) number, and optionally allows you to specify a host to tunnel through via SSH. This screenshot shows a proper configuration for the output of vncserver shown above. Substitute your host, screen, and username as appropriate.
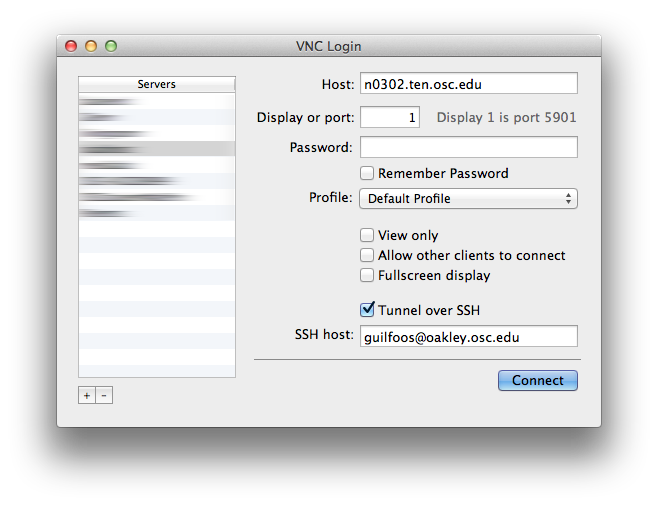
When you click [Connect], you will be prompted for your HPC password (to establish the tunnel, provided you did not input it into the "password" box on this dialog), and then (if you set one), for your VNC password. If your passwords are correct, the desktop will display in your client.
Windows
This example shows how to create a SSH tunnel through your ssh client. We will be using Putty in this example, but these steps are applicable to most SSH clients.
First, make sure you have x11 forwarding enabled in your SSH client.
Next, open up the port forwarding/tunnels settings and enter the hostname and port you got earlier in the destination field. You will need to add 5900 to the port number when specifiying it here. Some clients may have separate boxes for the desination hostname and port.
For source port, pick a number between 11-99 and add 5900 to it. This number between 11-99 will be the port you connect to in your VNC client.
Make sure to add the forwaded port, and save the changes you've made before exiting the configutations window.
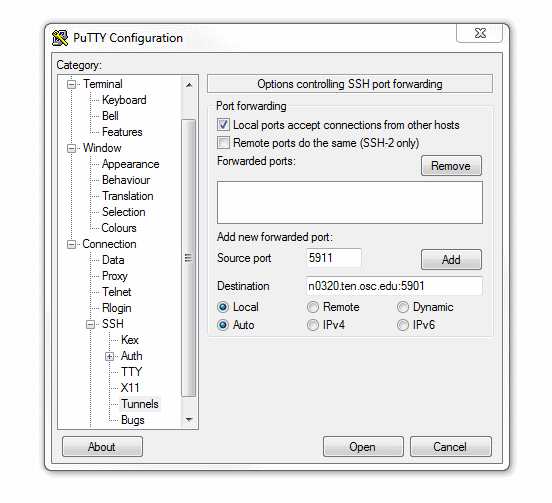
Now start a SSH session to the respective cluster your vncserver is running on. The port forwarding will automatically happen in the background. Closing this SSH session will close the forwarded port; leave the session open as long as you want to use VNC.
Now start a VNC client. TurboVNC has been tested with our systems and is recommended. Enter localhost:[port], replacing [port] with the port between 11-99 you chose earlier.
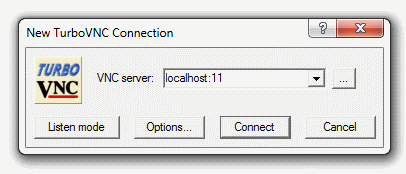
If you've set up a VNC password you will be prompted for it now. A desktop display should pop up now if everything is configured correctly.
How to Kill a VNC session?
Occasionally you may make a mistake and start a VNC server on a login node or somewhere else you did not want to. In this case it is important to know how to properly kill your VNC server so no processes are left behind.
The command syntax to kill a VNC session is:
vncserver -kill :[screen]
In the example above, screen would be 1.
You need to make sure you are on the same node you spawned the VNC server on when running this command.